Let's follow the selection of a particularly difficult type of image: hair. Ideally, every image with hair to be cropped would be photographed on a white, lime green, or blue screen background, similar to what is done on movie sets. If you have any say prior to the photography being done, opt for the blue screen. Having an image with a flat background that is colored with a color that is different from any portion of the image you are trying to crop out makes life a lot easier, as it allows you to select the background color to isolate the portion of the image you wish to crop out. Unfortunately in the real world, images are usually supplied from a number of sources, none of which lends itself well to cropping, unless you get an image from someone who is really on the ball.
Anyway, we are not going to make it easy on ourselves, so I'll select a typical image that you might get from a client. In this case, the client would like to crop the girl in figure from the background. We will make a selection of the person and the hair and place them on a layer so that any background can be dropped in behind them.
Start with the Color Range tool
I have found that a good way to create a mask or selection for something like hair is to first go into the Color Range tool and either select the hair or the background. If the background is fairly flat looking, it may be easier to select the background, and then invert the selection once all the background is selected, leaving the person/hair selected. If the background is very busy and the hair is more or less the same color, it may be easier to select the hair first with the Color Range tool to get your selection.
When using the Color Range tool, start by taking readings of the desired area to be masked or selected. I leave the settings just as you see them in the dialog box shown in following figure. With the Eyedropper tool, take readings on your image of the areas you would like to mask. Holding down the Shift key will allow you to keep adding to your selection. Continue to add selections of the hair or background, whichever area you decide to isolate, until you feel you have selected as much of the area as you can. When the selection starts to spill over into other undesired areas, you know you have reached you maximum selection.
The task: remove this girl from her complicated background

Use the Eyedropper tool to select areas you wish to mask
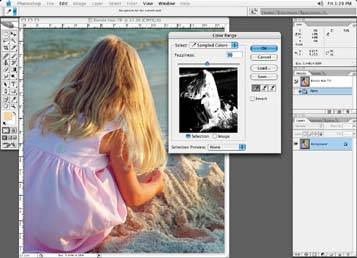
Once you have a good selection of either the background or the hair itself, adjust the slider in the Color Range tool until you get the maximum selection you can without the mask spilling over outside the desired area.
In above figure, the little slider control is above the black and white image in the dialog box; the number reads 96. I start my Color Range selection with the slider at the halfway point so that I have a wide adjustment range either + or. If you start with the slider all the way at either end, you may find that you run out of range!
In Figure 6-19, I've positioned the slider to capture the last bit of the hair possible.
Once you're happy with your selection, click OK. You will now see your selection (Figure 6-20)