Photoshop CS2 gives you another option to consider when trying to extend an image with a problematic background, the Vanishing Point filter. The Vanishing Point filter basically allows you to set up a grid on an image that matches the perspective of the image. As you brush or copy part of the image in an attempt to fill the image area, the perspective of your efforts are magically maintained as they follow the perspective of your grid.
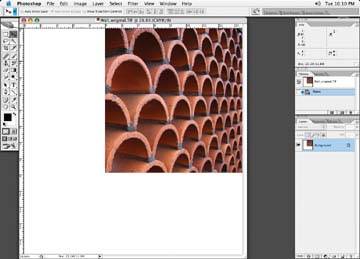
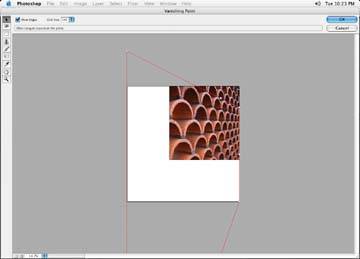
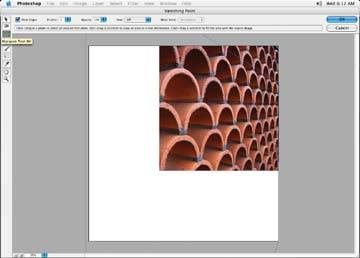
Figure 4-50 shows our brick image again. The image has had the necessary image area increased with the canvas size to fill the needs of the crop. The white space represents the amount of area we need to fill up with image.
Figure 4-49. Bricks distorted back to their original shape

Once you have your RGB image with appropriate canvas size set, access the Vanishing Point filter, Filter » Vanishing Point. You are now presented with the Vanishing Point filter window, as shown in Figure 4-51.
Figure 4-50. Our brick wall with extended canvas
The Vanishing Point filter can be used only on an image in RGB mode. If your image is not in RGB mode, you will have to convert it at this point to call up the Vanishing Point filter. You may also want to use a duplicate of the image or create a duplicate layer of your image in case things don't work out the way you have planned!
Select the Create Plane tool button, the second button from top left tool set. The first thing we have to do is create a grid over our image that matches the existing perspective of the bricks in our image. Obviously, the bricks are smaller to the right of our image and, as they get closer to us, they become larger. The grid button is the second button from the top of the tool set on the left side of the interface, as indicated in Figure 4-52.
Figure 4-51. Vanishing Point filter window
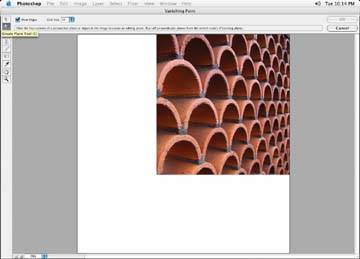
Figure 4-52. Draw grid to match perspective of existing
You get four points to draw with. Click on the image, and a new point is made for a total of four points. You can manipulate these points once your grid has been drawn with the Arrow tool button at the top of the tool set and move the points in such a way that they match the perspective of the image. This is a very important step to get the grid matching the perspective as accurately as possible. If the grid is off, you have less chance of getting an accurate look to your image, so spend some time getting it right. It won't be necessary to make the grid the full size of your image yet, as you will resize it later. You make the grid smaller than the full image so that you can make sure all four points are visible as points of reference on the image.
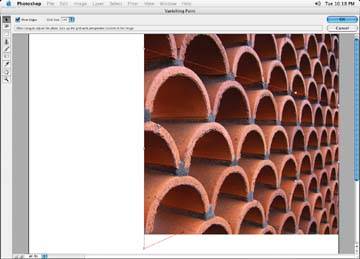
Once your grid has been made, you will want to resize the grid so it covers the entire image. The resizing of the grid is done by using the Arrow tool, grabbing the midway points on the grid lines, and clicking and dragging them to the desired size. As you can see in Figure 4-53, don't grab the corner points, as you will change the shape of the grid! Figure 4-54 shows the grid adequately resized.
There are a couple of ways to extend the image. The first way is to use the Stamp tool. The second way is to use a selection and duplicate large chunks of the image to fill the needs of the image. We'll start with the Stamp tool (Figure 4-55).
Figure 4-53. Using corner nodes will undesirably distort the grid you made

Figure 4-54. The final look of our grid once it has been completed and resized to fill out the image
Take note of the green Xs that indicate the alignment in Figure 4-56. This is very important, as you will clone and repeat the wrong portion of the image if the alignment is off.
Once your alignment is set and you have selected your brush size, opacity, and hardness as you would for any other brushing you would do in Photoshop, you can begin brushing. Kinda cool, eh? As you can see in Figure 4-57, as you brush, the perspective of the Stamp tool changes to match the perspective of the image!
Figure 4-55. Select the Stamp tool

Figure 4-56. Carefully align the two brush points on the same perspective as the brick
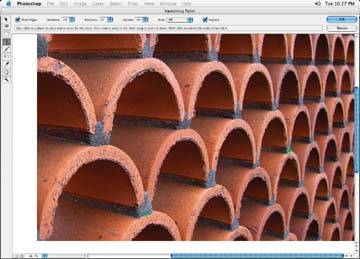
Figure 4-58 shows the final brushed image extended with the Stamp tool.
The other method for extending an image is to use the Marquee tool. Once you have your grid, start by making a Marquee selection containing the largest possible image area (Figure 4-59). (You don't want to grab the white area, as it will be included only when you paste in this new selection section.) The Marquee tool will follow the perspective based on the grid you made.
Figure 4-57. Brush in the image with the stamp tool while Vanishing Point keeps your perspective
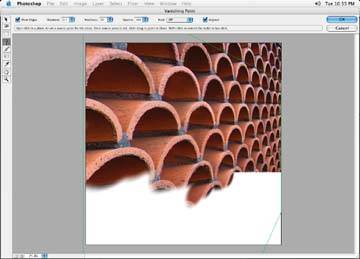
Figure 4-58. The final effect of Vanishing Point with the Stamp tool
While holding down the Option key, drag the selection area to an area of the image that needs extension (Figure 4-60. Placement is important. Notice how the selection changes quite dramatically as you move it around. As soon as you let go of a point, the adjustment takes effect. You do have an undo (Command+Z) if you have to undo your adusjtment.
Figure 4-59. Select the Marquee tool and grab a section of brick image
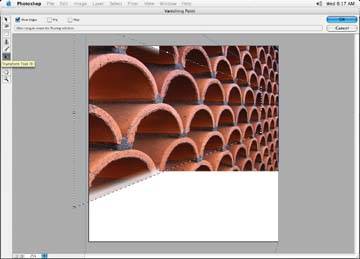
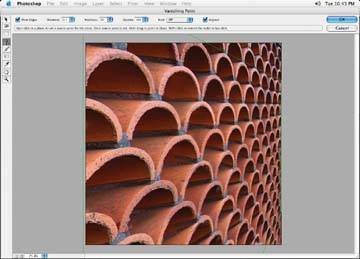
If necessary, use the Transform tool to fine tune the placement of the selection. (The Transform tool is the sixth button down on the Vanishing Point tool set.) Nodes will appear on the selection, and you can make adjustments from these points. Again, as soon as you let go of a point, the adjustment will take effect. Not bad, but you can see in Figure 4-61 that the black lines inside the bricks are a little off the correct perspective.
Figure 4-60. Hold the Option key and drag the selection to extend the bricks

I have found that adding selections can be difficult, especially in the case of the bottom portion of this image. If you go back in and make a Marquee selection of an area and try to fill another area of the image, you may run into difficulty. I won't lie to you and say it works like magic there is a lot of fiddling around to do. You may want to visit each method I have discussed for extending a difficult image like this and see which one work best for you.
Figure 4-61. The black lines inside the bricks are slightly off perspective