-
Convert the documents by hand (more work, more accurate)
-
Convert the documents using an automated conversion tool (less work, less accurate)
The former approach requires some serious elbow grease, but it yields the best results because you're carrying out the migration process with considerable attention to detail. On the other hand, the latter approach has the obvious benefit of automating the conversion process and saving you a lot of tedious work. However, as in any automated process, the conversion from HTML to XHTML doesn't always go perfectly smooth. That's why the first approach is the more accurate of the two, even though it requires much more effort. A middle ground hybrid approach involves first using an automated conversion tool and then making fine-tuned adjustments by hand.
Hands-on HTML to XHTML Conversion
Converting HTML documents to XHTML can be a tedious process, but if you have a strategy for the conversion process it can make things go much more smoothly. In fact, it helps to have a checklist to use as a guide while hand-coding the conversion. Follow these steps to convert HTML code to XHTML code:
|
1.
|
Add (or modify) a document type declaration that declares an appropriate XHTML DTD.
|
|
2.
|
Declare the XHTML namespace in the
html element. |
|
3.
|
Convert all element and attribute names to lowercase.
|
|
4.
|
Match every start tag with an end tag.
|
|
5.
|
Replace
> with /> at the end of all empty tags. |
|
6.
|
Make sure all required attributes are set.
|
|
7.
|
Make sure all attributes have values assigned to them.
|
|
8.
|
Enclose all attribute values in quotes (
""). |
|
9.
|
Make sure all elements and attributes are defined in the XHTML DTD used by the document.
|
If you carry out each of these steps, you should be able to arrive at a valid XHTML document without too much difficulty. A simple example will help explain the relevance of these steps a little better. Listing 21.2 contains the code for an HTML document that describes a web page chronicling the construction of a vegetable filter for a water garden. Figure 21.3 shows the veggie filter web page as viewed in Firefox.
Figure 21.3. The veggie filter sample HTML document as viewed in Firefox.

Listing 21.2. The Veggie Filter Sample HTML Document
 1: <HTML>
 2:   <HEAD>
 3:     <TITLE>Constructing a Veggie Filter</TITLE>
 4:   </HEAD>
 5:
 6:   <BODY STYLE=background-image:url(water.jpg)>
 7:     <H2>Constructing a Veggie Filter</H2>
 8:     <P>
 9:     A vegetable filter is a welcome addition to any water garden, as it
10:     provides a natural biofiltration mechanism above and beyond any other filter
11:     systems already employed. The concept behind a vegetable filter is that you
12:     simply pump water through the root system of aquatic plants, allowing them
13:     to absorb nutrients from the water and thereby assist in purifying the
14:     water. Below are pictures of the construction of a veggie filter that sits
15:     atop the pond it is helping to keep
16:     clean.
17:     <P>
18:     <A HREF=filter01_lg.jpg><IMG SRC=filter01.jpg STYLE=align:left BORDER=0></A>
19:     <A HREF=filter02_lg.jpg><IMG SRC=filter02.jpg STYLE=align:left BORDER=0></A>
20:     <A HREF=filter03_lg.jpg><IMG SRC=filter03.jpg STYLE=align:left BORDER=0></A>
21:     <A HREF=filter04_lg.jpg><IMG SRC=filter04.jpg STYLE=align:left BORDER=0></A>
22:     <A HREF=filter05_lg.jpg><IMG SRC=filter05.jpg STYLE=align:left BORDER=0></A>
23:     <A HREF=filter06_lg.jpg><IMG SRC=filter06.jpg STYLE=align:left BORDER=0></A>
24:     <P>
25:     In these photos, you see the veggie filter come together as the sand bottom
26:     is put into place, followed by protective felt, a leveled top, a pond liner,
27:     and plumbing for the pump outlets.
28:     <P>
29:     If you'd like to learn more about water gardening, contact my friends at
30:     Green and Hagstrom through their Web site at
31:     <A HREF=http://www.greenandhagstrom.com/>Green & Hagstrom Aquatic Nursery
32:     and Water Garden Supply</A>
33:   </BODY>
34: </HTML>
If you study the code for the veggie filter sample HTML document, you'll notice that it doesn't meet the high standards of XHTML in terms of structure and syntax. Granted, the code is cleanly organized but it definitely doesn't qualify as a valid or even well-formed document under the rules of XHTML. Following are the major problems with this code that need to be resolved in order for the document to comply with XHTML rules:
-
There is no document type declaration.
-
The XHTML namespace isn't declared.
-
The elements and attributes are all in uppercase.
-
Not every start-tag (
<P>) has an end tag (lines 8 and 17, among others). -
Empty elements (
IMG) don't end with/>(lines 18 through 23). -
Some elements (
IMG) are missing required attributes (ALT). -
Attribute values aren't enclosed in quotes (lines 6, 18, 19, and so on).
You might be thinking that this list of problems is uncannily similar to the list of HTML to XHTML conversion steps I mentioned earlier in the tutorial. This is not mere coincidenceI arrived at the list of conversion steps by addressing the most common HTML coding problems that conflict with XHTML. If you go through the document and fix all of these problems, the resulting XHTML code will look like the code shown in Listing 21.3.
Listing 21.3. The Veggie Filter Sample XHTML Document That Was Converted by Hand
1: <?xml version="1.0" encoding="UTF-8"?> 2: <!DOCTYPE html PUBLIC "-//W3C//DTD XHTML 1.1//EN" 3: "http://www.w3.org/TR/xhtml11/DTD/xhtml11.dtd"> 4: 5: <html xmlns="http://www.w3.org/1999/xhtml" xml:lang="en"> 6: <head> 7: <title>Constructing a Veggie Filter</title> 8: </head> 9: 10: <body style="background-image:url(water.jpg)"> 11: <h2>Constructing a Veggie Filter</h2> 12: <p> 13: A vegetable filter is a welcome addition to any water garden, as it 14: provides a natural biofiltration mechanism above and beyond any other filter 15: systems already employed. The concept behind a vegetable filter is that you 16: simply pump water through the root system of aquatic plants, allowing them 17: to absorb nutrients from the water and thereby assist in purifying the 18: water. Below are pictures of the construction of a veggie filter that sits 19: atop the pond it is helping to keep clean. 20: </p> 21: <p> 22: <a href="filter01_lg.jpg"><img src="filter01.jpg" alt="Step 1: Build the 23: rock support walls" style="align: left; border-width: 0px"/></a> 24: <a href="filter02_lg.jpg"><img src="filter02.jpg" alt="Step 2: Lay the 25: sand base" style="align: left; border-width: 0px"/></a> 26: <a href="filter03_lg.jpg"><img src="filter03.jpg" alt="Step 3: Protect the 27: walls with felt underlayment" style="align: left; border-width: 0px"/></a> 28: <a href="filter04_lg.jpg"><img src="filter04.jpg" alt="Step 4: Level the top 29: edges" style="align: left; border-width: 0px"/></a> 30: <a href="filter05_lg.jpg"><img src="filter05.jpg" alt="Step 5: Insert and 31: trim the liner" style="align: left; border-width: 0px"/></a> 32: <a href="filter06_lg.jpg"><img src="filter06.jpg" alt="Step 6: Assemble and 33: place the pump plumbing" style="align: left; border-width: 0px"/></a> 34: </p> 35: <p> 36: In these photos, you see the veggie filter come together as the sand bottom 37: is put into place, followed by protective felt, a leveled top, a pond liner, 38: and plumbing for the pump outlets. 39: </p> 40: <p> 41: If you'd like to learn more about water gardening, contact my friends at 42: Green and Hagstrom through their Web site at 43: <a href="http://www.greenandhagstrom.com/">Green & Hagstrom Aquatic 44: Nursery and Water Garden Supply</a> 45: </p> 46: </body> 47: </html>
If you study this document carefully, you'll see that it meets all of the requirements of a valid XHTML document. For example, the <p> tags all have matching </p> closing tags (lines 12, 21, 35, and 40). If you're a skeptic and want to make sure that the document is really valid, you can run it through the W3C Validator just to make sure. Actually, I already did it for you and the document checked out fine, which means that it is a bona fide XHTML document.
Automated HTML to XHTML Conversion
If you don't like getting your hands dirty, you might consider an automated approach to converting HTML documents to XHTML. Or you might decide to go for a hybrid conversion approach that involves using an automated tool and then a little hand coding to smooth out the results. Either way, there are a few tools out there that automate the HTML to XHTML conversion process. One such tool is HTML Tidy, which was developed by Dave Raggett, an engineer at Hewlett Packard's UK Laboratories.
HTML Tidy is a command-line tool that was originally designed to clean up sloppy HTML code, but it also supports converting HTML code to XHTML code. When you think about it, converting HTML to XHTML really is nothing more than cleaning up sloppy code, which is why HTML Tidy works so well. The HTML Tidy tool is available for free download from the HTML Tidy web site at http://www.w3.org/People/Raggett/tidy/. There are also a few graphical HTML applications that serve as front ends for HTML Tidy just in case you aren't comfortable using command-line applications.
Dave Raggett is also the developer is HTML Slidy, which is an XHTML-based slide show tool that allows you to create PowerPoint-style slide show presentations using nothing more than XHTML code. To learn more about HTML Slidy, visit the HTML Slidy web page at http://www.w3.org/2005/03/slideshow.html.
If you run HTML Tidy without any command-line options, it will process an HTML document and clean it up. However, the resulting document won't be an XHTML document. In order for HTML Tidy to generate an XHTML document, you must specify the -asxhtml command-line option, which indicates that HTML Tidy is to convert the HTML document to an XHTML document. Additionally, the -indent option helps to clean up the formatting of the output so that the resulting XHTML code is indented and easier to understand. The output of HTML Tidy defaults to standard output, which is usually just your command-line window. Although this works if you just want to see what a converted document looks like, it doesn't help you in terms of generating a converted document file. You must specify that you want the output to be in XHTML format by using the -output option and specifying the output file. Following is an example command that converts the vegfilter.html veggie filter HTML document to XHTML using HTML Tidy:
tidy -asxhtml -indent -output vegfilter_t.xhtml vegfilter.html
This command directs the output of the HTML Tidy application to the file vegfilter_t.xhtml. Aside from it being a little more compressed in terms of how the content is arranged, the resulting code from HTML Tidy is very similar to the hand-coded conversion of the XHTML document. The document type is changed to XHTML 1.0 Transitional, as opposed to XHTML 1.1. Other major changes include all element and attribute types being converted to lowercase, as well as empty img elements fixed with a trailing />. Also, all attribute values are quoted.
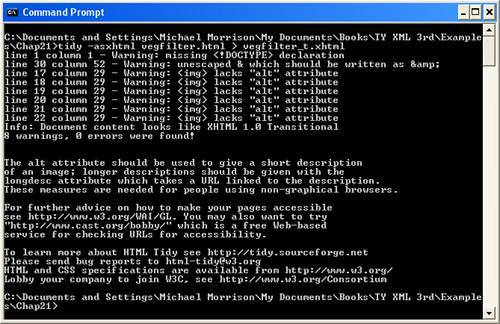
There is still an important aspect of the generated XHTML document that must be modified by hand. I'm referring to the img elements, none of which provide alt attributes. The alt attribute is a required attribute of the img element in HTML 4.0 and XHTML, so you must specify values for them in all images in order to make the document a valid XHTML document. Fortunately, the HTML Tidy tool caught this problem and output an error message indicating that the change needed to be made by hand (see Figure 21.4). Another required change that you'll notice in the figure is the ampersand (&) in the text Green & Hagstrom, which needs to be changed to the & entity.
Figure 21.4. HTML Tidy was able to detect conversion errors in the veggie filter sample HTML document so that you can repair them by hand.
Finalizing the conversion of the veggie filter example document involves changing the document type to XHTML 1.1 (if desired), adding alt attributes to the img elements, and adding an entity reference. Once that's done, the new XHTML document is good to go. The HTML Tidy tool significantly improves the HTML to XHTML conversion process, leaving you with relatively minor changes to make by hand.