When you create a macro group, you must give each macro in the macro group its own unique name to identify where each macro starts and ends. You do this by entering the macro names in the Macro Name column, which you display by clicking the Macro Names button on the toolbar.
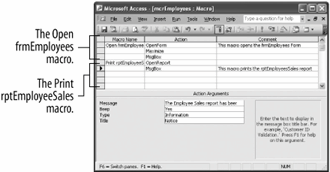
Two macros the Open frmEmployees macro and the Print rptEmployeeSales macro within a single macro group.
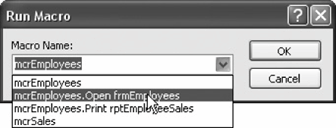
The Run Macro dialog box.
When you combine two or more macros within the same macro group, you must run them separately, by referring to the macro group name, followed by the macro name. For example, mcrEmployees. mcrEmployees frmEmployees refers to the Open frmEmployees macro in the mcrEmployees macro group.
In this lesson you will learn how to group several related macros together in a macro group.
-
Select the mcrEmployees macro and click the Design button.
In order to work with macro , you need to display the Macro Name column.
-
Click the
 Macro Names button on the toolbar.
First you need to give the macro you created in the previous two lessons a name. The cursor is already positioned in the Macro Name cell of the first row.
Always enter the macro name in the Macro Name column, next to the Action where the macro starts.
-
Type
Open frmEmployeesin the first blank cell in the Macro Name column.The macro name "Open frmEmployees" identifies the macro you created in the previous two lessons. To create another macro in the same macro group, type its name in the Macro Name column next to the first action of the new macro.
-
Press the
 key three times.
The cursor should be positioned in the Macro Name column next to the first blank Action row. This is where you will add another macro to the macro group.
-
Type
PrintrptEmployeeSales."Print rptEmployeeSales" is the name of the new macro we will create.
-
Click the Action cell to the right of the Print rptEmployeeSales macro name, click the list arrow, scroll down, and select OpenReport.
Similar to the OpenForm action, which opens a form, the OpenReport action opens a report. Next, you need to specify the arguments for the OpenReport action.
-
Click the Report Name text box in the Action Arguments panel, click the list arrow, and select rptEmployeeSales.
This macro will open the rptEmployeeSales report. Notice Print appears in the View argument boxthis will send the rptEmployeeSales report directly to the printer. Let's add a comment to this new macro.
-
Click the blank Comment box in the Print rptEmployeeSales macro row and type
This macro prints the rptEmployeeSales report.You want to add one more action to the Print rptEmployeeSales macro.
-
Click the Action cell just below the OpenReport action, click the list arrow, scroll down, and select MsgBox.
You need to tell Access what you want the message box to say.
-
Click the Message argument box and type
The Employee Sales report has been sent to the printer.Let's specify several additional arguments for the MsgBox action, such as the type of icon that is displayed in the message box.
-
Click the Type argument box, click the list arrow, and select Information. Click the Title argument box and type
Notice.Your macro should look like the one shown in figure.
-
Click the Save button on the toolbar and close the macro window.
Let's test our new macro. When you combine several macros within the same macro group you must run them separately using the Tools command on the Access menu.
Don't run a macro group by double-clicking it or selecting it and clicking Run. Doing so will run every macro in the macro groupoften with disastrous results!
-
Select Tools » Macro » Run Macro from the menu.
The Run Macro dialog box appears, as shown in figure. Here's where you select the specific macro you want to run.
-
Click the Macro Name list arrow, select mcrEmployees.Open frmEmployees, and click OK.
Access runs the Open frmEmployees macro.
-
Click OK to close the message box and close the frmEmployees form.
If you want, go ahead and repeat Step 13 and run the Print rptEmployeeSales macro. Make sure your computer is connected to a printer, as this macro will send a copy of the rptEmployeeSales report to the printer.
TO CREATE A MACRO GROUP:
-
CREATE A NEW MACRO OR EDIT AN EXISTING MACRO.
-
CLICK THE MACRO NAMES BUTTON ON THE TOOLBAR.
-
TYPE THE MACRO NAME IN THE MACRO NAME COLUMN NEXT TO THE ACTION WHERE THE MACRO STARTS.
-
IF NECESSARY, ADD THE MACRO ACTIONS OR EDIT THE EXISTING MACRO ACTIONS.
-
SAVE THE MACRO AND CLOSE THE MACRO WINDOW.
TO RUN A MACRO IN A MACRO GROUP:
-
SELECT TOOLS » MACRO » RUN MACRO FROM THE MENU.
-
CLICK THE MACRO NAME LIST ARROW, SELECT THE MACRO YOU WANT TO RUN, AND CLICK OK.