By divvying your image into what are called hotspots (invisible hyperlink areas), you can make separate clickable regions that link to different locations. These can be square, round, or any shape you wish. A collection of hotspots on an image creates what's known as an image map.
This is a great tool for creating a single reference point that leads a viewer to further details on separate pages. For example, if you sell bicycle parts, you could place hotspots on a picture of a bike. Make the wheel a hotspot that leads to a page of wheel types for sale. If a visitor clicks on the pedals, your shop's selection of pedals displays. And so on. You may have seen this effect used on images like actual maps, as in Figure 4-9.
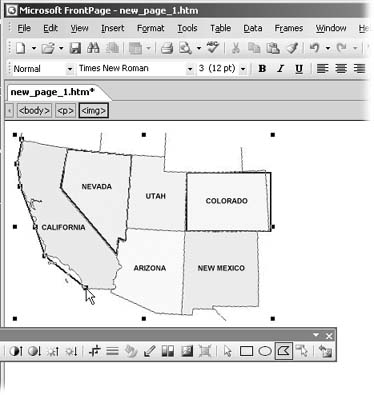
Figure 4-9. Hotspots can be any shape. The polygonal hotspot tool outlines irregular shapes, like California. The square hotspot tool traces square or rectangular shapes like Colorado.
To create an image map, using buttons on the Pictures toolbar, follow these steps:
-
Select the picture you want to use as an image map.
-
Select an image map tool.
Three buttons on the Pictures toolbar offer different shapes: rectangle, circle, and polygon. Click the button that's most appropriate for the shape of the hotspot you want to create.
-
Draw the hotspot.
Draw rectangle and circle spots with one stroke, by dragging diagonally through the area you want the shape to cover. Polygons require more steps. Click to create a corner, then click to create another corner, and another, until you click back on the first spot again to complete a closed shape. After you've drawn a shape, the hyperlink dialog box displays. If you don't like the placement of a hotspot, just click cancel and try again.
-
Choose a destination for the hotspot's hyperlink.
Set a hotspot hyperlink just as you would any other link (Creating Hyperlinks).
If your image is intricate, you may have trouble distinguishing where you've applied hotspots. FrontPage can help. Select the image and then click the Highlight Hotspots button on the far right side of the Pictures toolbar. The image disappears temporarily, leaving only your hotspots visible.
Editing a Hotspot
You can change the shape of a hotspot by dragging one of its handles. To edit a hotspot hyperlink, right-click the hotspot and select Picture Hotspot Properties. An Edit Hyperlink dialog box appears. You can remove a hotspot entirely by selecting it and pressing delete.
Create screen tips for your hotspots
Don't leave visitors in the dark. Let them know where a link will take them. Sure, the pictures underneath your image map help, but you can also create a screen tip for each hotspot to make its destination even more obvious. To do so, right-click a hotspot, and then select Picture Hotspot Properties. Click ScreenTip on the upper right and enter the text that you want viewers to see when their cursor passes over the hotspot.