In this tutorial, you'll work with the Northwind sample database that comes with FrontPage and learn how to display a list of products that a viewer can sort by supplier.
Creating the Drop-Down Search Form
First, you'll create the drop-down list of suppliers. To do so:
-
Create a blank page and insert a form on it.
Select Insert » Form » Form.
-
Insert a Database Results Wizard inside the form.
Select Insert » Database » Results.
-
In the first Database Results Wizard screen, select ASP and "Use a sample database." Then click Next.
-
Select the Suppliers table as your data source and click Next.
-
Edit the fields to display so only CompanyName and SupplierID display. Then click Next.
You'll use these two fields to create the drop-down list and to query the database. Remove all other fields by clicking Edit Fields, selecting each one, and then clicking Remove. Then click OK.
-
In the next screen, select "Dropdown list."
-
In the "Display values" drop-down list, select CompanyName, and in the "Submit values" drop-down list, select SupplierID.
Doing so ensures that visitors see the CompanyName values, which makes sense to them, while the form submits the SupplierID number, which makes sense to the database.
-
Click Next, then click Finish.
Creating a Table to Display Database Results
Next, you'll create a second Database Results Wizard, which will display the drop-down list's search results.
-
Insert a Database Results Wizard on the same page, outside the form you just created.
Select Insert » Database » Results.
-
In the first wizard dialog box, select ASP and "Use a sample database." Then click Next.
-
Select the Products table as your data source and click Next.
-
Click More Options and click Criteria.
-
Click Add and select the Supplier ID field.
-
Turn on the "Use this search form field" checkbox.
-
Click OK twice to close the open dialog boxes and save your settings.
-
Within the More Options dialog box, click Defaults, select the SupplierID field, and then click Edit.
-
Enter a default value of 0 (zero) and click OK three times.
If you don't specify a default value, the first time your list appears, it'll contain an error message. To avoid this, just enter a value here that doesn't appear as a SupplierID value in the Suppliers table. Zero usually does the trick.
-
Click Next, choose to display results in a table, and click Next again.
-
Turn off the "Add search form" checkbox and click Finish.
-
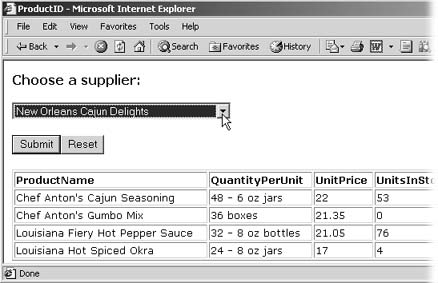
Save your page and test it in a browser (see Figure 16-11).

Figure 16-11. When a visitor selects a supplier from the drop-down list and clicks Submit, the table below shows all products provided by that company.