Cell comments enable you to place a sticky note on any specified cell in a worksheet. Although many people use cell comments, many don’t know that cell comments are customizable.
- Insert, Edit, or Remove Cell Comment
- Format Comment
- Change Comment Shape
- Apply Shadow Effect on Comment Shape
- Insert Picture in a Comment
- Extract Comment Text with a Function
Insert, Edit, or Remove Comments
To insert a comment, follow one of these steps:
- Right-click on the cell where you want to add a comment and choose
Insert Commentfrom the context menu. - Select the cell where you want to add a comment and go to the
Reviewtab and click onNew Commentin the Comments group.
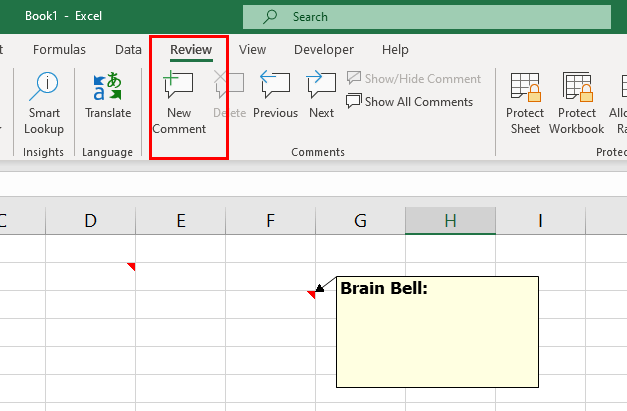
A small red triangle will appear in the top-right corner of the cell, indicating that it has a comment. A comment box will also pop up where you can type your comment.
To edit or delete a comment, follow one of these steps:
- Right-click on the cell and choose
Edit CommentorDelete Commentfrom the menu. - Select the cell and go to the
Reviewtab and click onEdit CommentorDeletein the Comments group.
To show or hide comments, follow one of these steps:
- To show or hide all comments in the worksheet, go to the
Reviewtab and click onShow All Commentsin the Comments group. - To show or hide the comment in the active cell, go to the
Reviewtab and click onShow/Hide Commentin the Comments group. - Right-click on the cell and choose
Show/Hide Commentsfrom the menu.
Format Comment
- Right-click on the cell and choose
Show/Hide Commentsfrom the menu. - Right-click the border of the text box and click
Format Commentfrom the menu to open the Format Comment dialog box.
You can use the Format Comment dialog box to change various format options for the comment you have selected, such as the font, Color, Border, etc.
To change the comment text size, font style, font color etc.
- Click
Fonttab and select your desired font size from the Size box. - Click
Colordrop-down to change the text color. - You can also change the font, font style, and many other settings from this tab.
To change the fill and border color for the comment’s text box:
- Click the
Colors and Linestab in the Format Comment dialog box. - In the
Fillsection, click theColoroption and choose the color you want to use for the background of the comment box. - In the
Linesection, click theColoroption and choose the color you want to use for the border of the comment box.
Change the Shape of the Comment
To change a Comment’s shape you need the Change Shape command. The Change Shape command allows you to change the shape of an existing object, such as a rectangle, a circle, or a star.
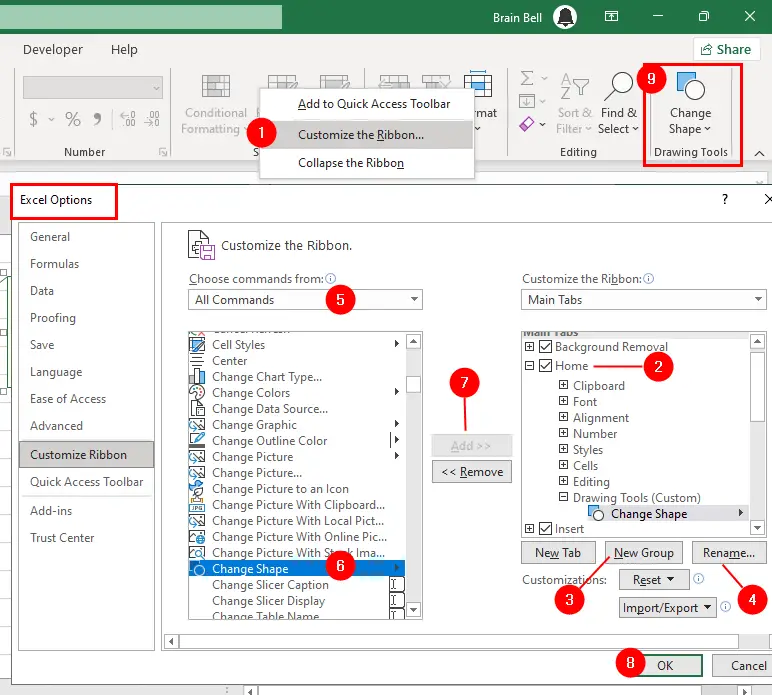
To make this command available on the ribbon, you need to customize the ribbon. Here are the steps to do so:
- Right-click on any part of the ribbon and select
Customize the Ribbon. - In the
Customize the Ribbonwindow, selectHomeunder theMain Tabslist on the right. - Click on the
New Groupbutton at the bottom of the window to create a new group under theHometab. - Rename the new group as
Drawing Toolsor any name you prefer. - In the
Choose commands fromlist on the left, selectAll Commands. - Scroll down and find the
Change Shapecommand and select it. - Click on the
Add >>button to add the command to the new group. - Click on
OKto close the window and save your changes.
Now you should see the Change Shape command on the ribbon under the Home tab in the new group. You can use it to change the shape of any object (including comments) you have inserted or drawn in your worksheet.
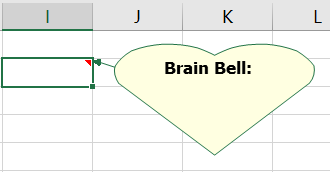
Now, follow these steps to change the comment shape:
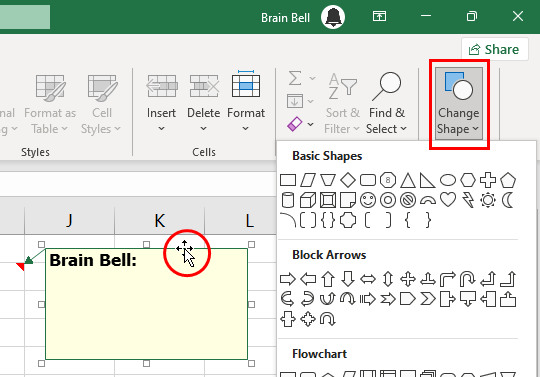
- Right-click on the cell and choose
Edit Commentfrom the menu. - Left-click the outside border of the cell comment so that you are no longer in Edit mode.
- With the comment box selected, click
Change Shapethat we recently added in theHometab. - You will be presented with a list of options including Basic Shapes, Block Arrow, Flow Chart, Stars and Banners, and Callouts.
- Choose a shape, and the cell comment will change to the shape selected, as shown in the figure.
Apply Shadow Effect on a Comment
You can take this a step further by applying a shadow effect to the comment to give it a more lifelike and three-dimensional look.
To apply the shadow effect, you need the Shadow Effects command. This command allows you to apply the various type of shadows on a shape of an existing object.
To make this command available on the ribbon, you need to customize the ribbon again. Here are the steps to do so:
- Right-click on any part of the ribbon and select
Customize the Ribbon. - In the
Customize the Ribbonwindow, selectHomeunder theMain Tabslist on the right. - Select the
Drawing Toolsgroup. - In the
Choose commands fromlist on the left, selectAll Commands. - Scroll down and find the
Shadow Effectscommand and select it. - Click on the
Add >>button to add the command to the new group. - Click on
OKto close the window and save your changes.
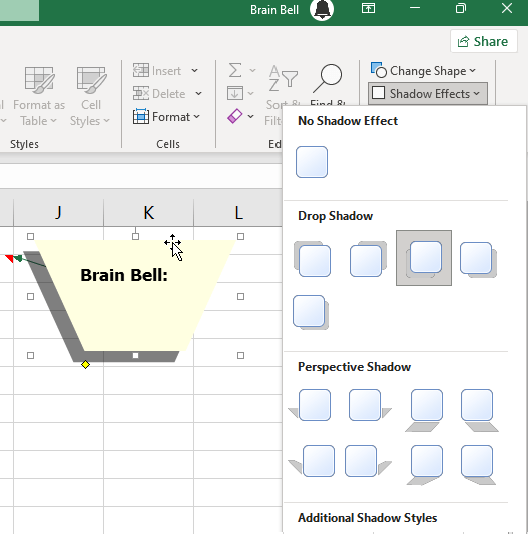
Now you should see the Shadow Effects command on the ribbon under the Home tab in the new group. Now, follow these steps to apply shadow on the comment:
- Right-click on the cell and choose
Edit Commentfrom the menu. - Left-click the outside border of the cell comment so that you are no longer in Edit mode.
- With the comment box selected, click
Shadow Effectsthat we recently added in theHometab. - You will be presented with a list of options including Drop Shadow, Perspective Shadow, and Additional Shadow Styles..
- Choose a shadow, and the shadow will apply to the comment’s shape, as shown in the figure.
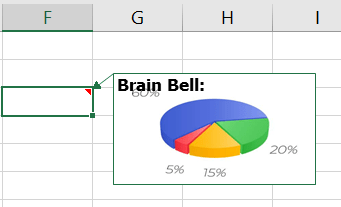
Insert Picture in a Comment
Another interesting thing you can do with cell comments is use them to display pictures without impeding on any associated data. For instance, you could insert a picture of a chart into a cell comment to better illustrate the data in the chart without having to show the chart all the time.
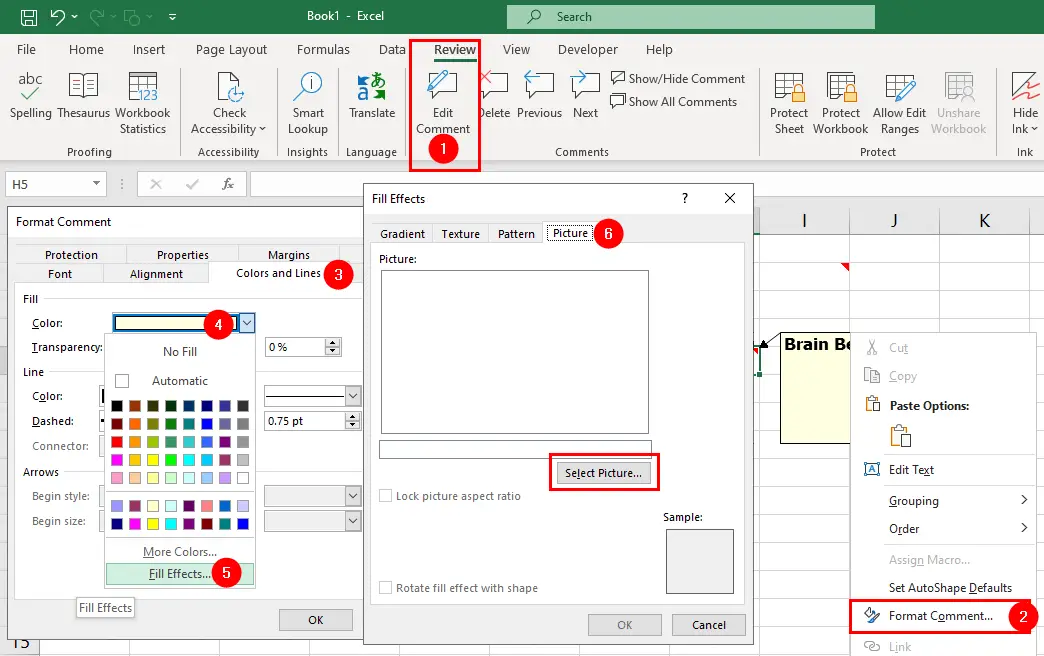
- Right-click on the cell and choose
Edit Commentfrom the menu. - Right-click the border of the text box and click
Format Commentfrom the menu to open the Format Comment dialog box. - Click
Colors and Linestab from the Format Comment dialog box. - From the
Fillsection, click theColordrop-down. - Select
Fill Effectsto open the Fill Effects dialog box. - Click the
Picturetab and click theSelect Picturebutton to insert the picture that you want to display in the cell comment. - Click OK twice to close the dialog boxes.
Extract Comment Text with User-Defined Function
One last thing you can do to cell comments is extract the text that was placed into a cell comment and have it appear in a cell. To do this, you need to place a simple custom function into a standard module. Press Alt+F11 (or Option+F11), then select Insert » Module and enter the following code:
Function GetCommentText(rCommentCell As Range)
Dim strGotIt As String
On Error Resume Next
 strGotIt = WorksheetFunction.Clean(rCommentCell.Comment.Text)
 GetCommentText = strGotIt
On Error GoTo 0
End Function
Close the code window and return to Excel. Now, in any cell, enter the following formula:
=GetCommentText(A1)
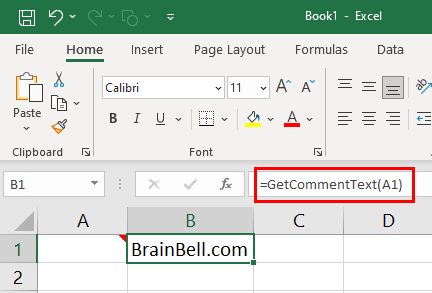
Where A1 has a cell comment in it. The comment text will appear in the cell.