Networking software can be a special program added on to the computer, such as Artisoft's LANtastic or Novell's NetWare, or it can be an integral part of an operating system such as Microsoft's Windows 95 or Windows 98, Windows NT, or Windows 2000.
Network Interface Cards
Network interface cards (NICs) link a computer to the network cable system. They provide the physical connection between the computer's expansion bus and the network cabling. The low-powered digital signals that transmit data inside a computer are not powerful enough to travel long distances. A network interface card boosts these signals so they can cross a network cable. The interface card also must change the form of data from a wide parallel stream-coming in 8, 16, or 32 bits at a time-to a narrow stream, moving 1 bit at a time in and out of the network port (parallel to serial conversion-see Tutorial 2, Lesson 2: The Computer Bus).
The network interface card takes data from the computer, packages the data for transmission, and acts as a gatekeeper to control access to the shared network cable. Because the NIC functions as an interface between the computer and the network cabling, it must serve two masters. Inside the computer, it moves data to and from RAM. Outside the computer, it controls the flow of data in and out of the network cable system. Because the computer is typically much faster than the network, the interface card must buffer the data between the computer and cable. This means it must temporarily store the data coming from the computer until it can place it on the network.
Installation of the network interface card (see Figure 18.4) is the same as for any other expansion card. It requires setup of the system resources: IRQ, address, and software. Most cards today allow connection for either thin Ethernet or UTP (unshielded twisted-pair) cabling. Thin Ethernet uses a round BNC connector, and UTP uses a RJ-45 connector (similar to a telephone jack).
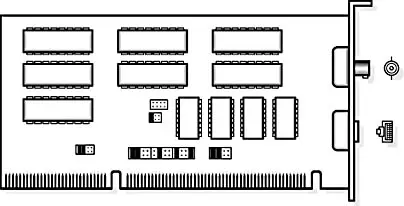
Figure 18.4 Network interface card
Installing a NIC is just like installing any other expansion card. If you are installing a Windows 95-compliant Plug and Play card in a Windows 95 or Windows 98 machine, you'll simply need to physically install the card and boot up the computer. The card will be detected and, more than likely, install itself. You might only need to answer a few questions along the way. It requires a little more work to install a NIC in an operating system that is not Plug and Play-compliant. Installing network cards includes the following steps:
- Be sure to document any changes that you make to the existing computer. This will eliminate any confusion in the installation process and provide future reference in case of problems.
- Determine whether the card needs IRQ, DMA (direct memory access), or address settings. Remember that you might have to configure these manually, so be sure to check the card's documentation for default settings and instructions for how to make any needed changes.
- Determine whether the necessary settings are available on the machine on which they will be installed. If proper documentation is not available, use diagnostic software such as Microsoft Diagnostics (MSD) to determine settings. Also check your AUTOEXEC.BAT, CONFIG.SYS, and SYSTEM.INI files; they might give clues as to which settings are already in use.
- Turn off the machine and remove the cover. Be sure to take all appropriate measures for protection against electrostatic discharge (ESD).
- Set the NICs jumpers or DIPP (dual inline package) switches as necessary and insert the card.
- Turn on the machine and run the setup utility provided by the manufacturer. If you are using Windows 95, Windows 98, or Windows 2000, and the NIC is not Plug and Play, you can use the Add New Hardware wizard in the Control Panel to install the drivers and set up the card. (Remember to document all settings.)
If you are replacing (upgrading) an existing NIC, follow the same steps as just described, with one addition. Before removing the card, document all its settings. Figure 18.5 shows an example of a NIC information card. You can use these cards to create a file documenting the specifics of the cards in your network.
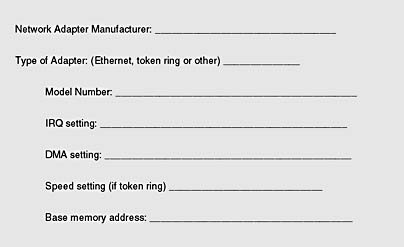
Figure 18.5 Information card
IMPORTANT
An improperly configured network interface card could prohibit network access. Check your settings carefully.