Installation of a hard disk drive consists of five simple steps:
- Physical installation and cabling
- CMOS setup
- Low-level formatting (if required)
- Partitioning
- Formatting
Cabling
Just as there are different types of drives, there are different cabling requirements for each. Let's look at the three most common types.
ST-506
The ST-506 uses a 34-connector control cable (daisy-chained for dual drives) and a 20-connector data cable for each drive. The 34-wire control cable has a twist in it for line 25 through 29 configuration (similar to the floppy disk drive cable); this twist determines which hard disk drive is hard drive 0 and which is hard drive 1. The drive at the end is drive 0.
IDE/EIDE
The IDE uses a simple 40-pin cable that plugs into the controller and into the drive (see Figure 8.9). There are no twists. IDE controllers identify the two drives as either master or slave. Drive makers use different methods to set up their drives. The most common system uses jumpers. Setting these jumpers serves the same function as the twist used with other drive cables: it identifies whether the drive is master or slave. Other drives use switches, and some new drives use software to determine which is the dominant drive. Be sure to check the manufacturers' specifications to properly set up the drive.
U-DMA 66
A special version of the 40-pin IDE cables is used for U-DMA 66. Be sure to obtain and install it if you are working with one of these newer drives. It is also 40-pin, but has a blue connector on one end and a black one on the other. All the other installation and cabling procedures are the same as for traditional IDE devices.
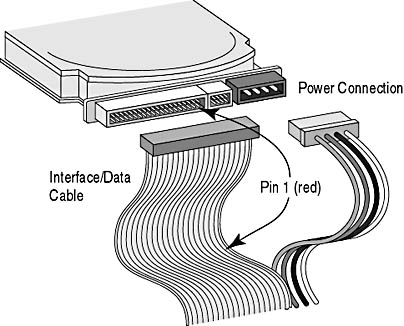
Figure 8.9 IDE connections
When installing a new secondary hard disk drive in a system, be sure to set the new drive as slave and verify that the first drive is set to master. The documentation supplied with the drive should provide the necessary information. Often, this information is printed on the label of the drive. Both drives must be properly configured before the system is started. If the drives are not properly jumpered, they won't work.
If you don't know how to set the jumpers (see Figure 8.10), try calling the hard disk drive manufacturer (or look for its Web site on the Internet).

Figure 8.10 Master/slave jumper settings