The FormsAuthentication Class
Many of ASP.NET's authentication services center around the FormsAuthentication class. Listing 10-3 shows the FormsAuthentication class. In the example above, the Login.aspx page uses the FormsAuthentication.RedirectFromLoginPage method to issue an authentication cookie and render the originally requested page. FormsAuthentication includes a number of other services, including issuing an authentication token without redirecting and encrypting passwords.
Listing 10-3
public class FormsAuthentication
{
…
  public static bool CookiesSupported {get;}
  public static string FormsCookieName {get;}
  public static string FormsCookiePath {get;}
  public static string LoginUrl {get;}
  public static bool RequireSSL {get;}
  public static bool SlidingExpiration {get;}
  public static bool Authenticate(string strName,
      string strPassword);
  public static string Encrypt(FormsAuthenticationTicket ticket);
  public static FormsAuthenticationTicket Decrypt(string str);
  public static HttpCookie GetAuthCookie(string strUserName,
      bool bPersist);
  public static string GetRedirectUrl(string strUserName,
      bool bPersist);
  public static string HashPasswordForStoringInConfigFile(
      string strPassword, string strFormat);
  public static void RedirectFromLoginPage(string struserName,
      bool bPersist);
  public static void Initialize();
   public static FormsAuthenticationTicket RenewTicketIfOld(
   FormsAuthenticationTicket tOld
);
  public static void SignOut();
}
The example shown in Listings 10-1 and 10-2 show how the rudimentary authentication works by installing an authentication cookie in the response and redirecting the processing back to the originally requested page. There are some other interesting methods in the FormsAuthentication class that allow for finer-grained control over the authentication process. For example, you can authenticate users manually (without forcing a redirect). That's useful for creating optional login pages that vary their content based upon the authentication level of the client.
An Optional Login Page
The code accompanying this tutorial also includes an example showing how to authenticate separately. The page in Listing 10-4 uses the same authentication algorithm (three users-Gary, Jay, and Susan-with hard-coded passwords). However, the page authenticates users and then redirects them back to the same page (OptionalLogin.aspx).
Listing 10-4
<%@ Page language=C# trace="false"%>
<html>
  <script runat=server>

  protected bool AuthenticateUser(String strUserName,
                                  String strPassword)
  {
    if (strUserName == "Gary")
    {
       if(strPassword== "K4T-YYY")
       {
          return true;
       }
    }
    if(strUserName == "Jay")
    {
       if(strPassword== "RTY!333")
       {
          return true;
       }
    }
    if(strUserName == "Susan")
    {
       if(strPassword== "erw3#54d")
       {
          return true;
       }
    }
    return false;
  }

  public void OnLogin(Object src, EventArgs e)  {
    if (AuthenticateUser(m_textboxUserName.Text,
                         m_textboxPassword.Text))
    {
     FormsAuthentication.SetAuthCookie(
                m_textboxUserName.Text,
      m_bPersistCookie.Checked);
          Response.Redirect("optionallogin.aspx");
    } else {
       Response.Write("Invalid login: You don't belong here…");
    }
  }

  protected void ShowContent()
  {
     if(Request.IsAuthenticated)
     {
        Response.Write("Hi, you are authenticated. <br>" );
        Response.Write("You get special content…<br>" );
     } else
     {
        Response.Write("You're anonymous. Nothing special for you… ");
     }
  }
  </script>
  <body><form runat=server>

       <h2>Optional Login Page</h2>

       User name:
       <asp:TextBox id="m_textboxUserName" runat=server/><br>
       Password:
       <asp:TextBox id="m_textboxPassword"
           TextMode="password" runat=server/>
       <br/>
       Remember password and weaken security?:
       <asp:CheckBox id=m_bPersistCookie runat="server"/>
       <br/>
       <asp:Button text="Login" OnClick="OnLogin"
                   runat=server/>

       <br/>

       <%ShowContent(); %>
    </form></body>
</html>
Notice the page sets the authentication cookie manually by calling FormsAuthentication.SetAuthCookie and then redirects the processing back to the page. Each time the page shows, it calls the ShowContent method, which checks the authentication property in the page to decide whether or not to display content specialized for an authenticated user. Because the page redirects manually after authenticating, the Web.Config file needs to look a bit different. To make it work, the authentication node should remain, but the authorization node that denies anonymous users needs to be removed. That way, any user can log in to the OptionLogin.aspx page (they won't be denied) but they may proceed after they're authenticated. Here's the new Web.Config file, shown in Listing 10-5.
Listing 10-5
<configuration>
  <system.web>
    <authentication mode="Forms">
    </authentication>
  </system.web>
</configuration>
Here's how the optional login page appears before the user has been authenticated, shown in Figure 10-5.
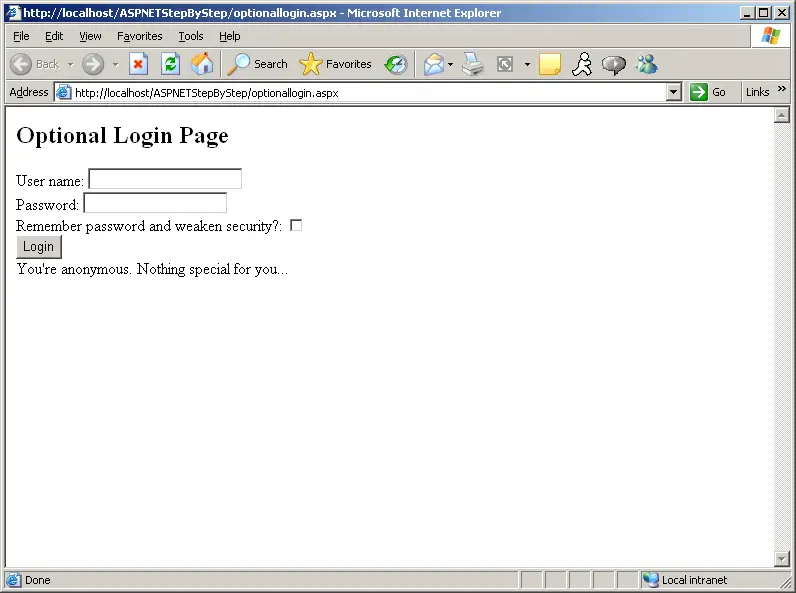
Figure 10-5 The optional login page before an authenticated user logs in.
Run the Optional Login Page
-
This example shows how to run the optional login page.
To run the optional login page, create a virtual directory to hold the site. Alternatively, you can use an already existing site and try the optional login page from there.
-
Copy the OptionalLogin.aspx page from the Tutorial 10 examples into the virtual directory.
-
Copy the Web.ConfigOptionalLogin from the Tutorial 10 examples into the virtual directory. Make sure the configuration file is named Web.Config so ASP.NET picks up on it.
-
Try to surf to a page in that virtual directory. ASP.NET should allow you to see the page, but as an unauthenticated user.
-
Type in a valid user name and password. You should see the content tailored for authenticated users. Subsequent requests/responses to and from the site will include an authentication token.
After the user has been authenticated, the optional login page shows the content tailored to the specific authenticated user. Figure 10-6 shows the page after an authenticated user logs in.
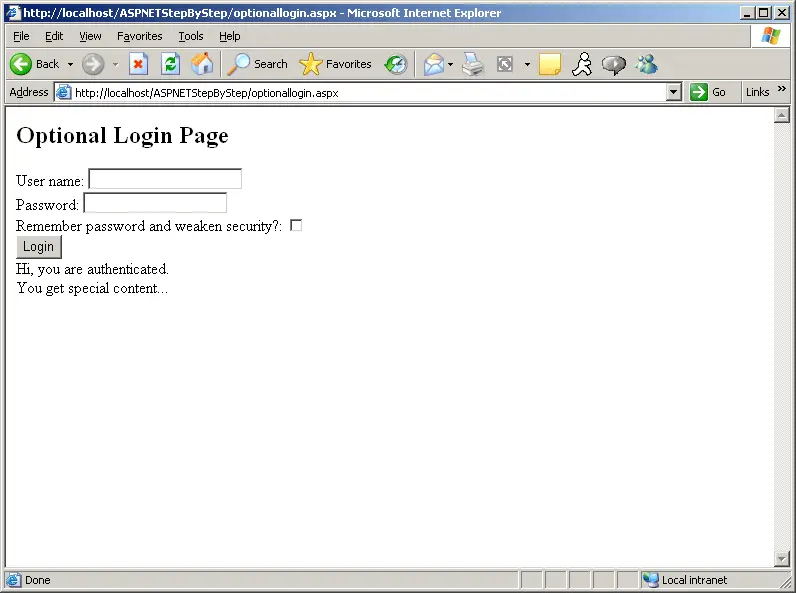
Figure 10-6 An Authenticated user has logged in.