Built-in commands are not the only things you can add to the toolbars and pull-down menus you customize or create from scratch. You can also add macros you have recorded and hyperlinks to particular documents, folders, and even favorite Web sites. To do this, you attach the macro or link to a custom button that you add to a toolbar or to a custom menu item that you add to a pull-down menu.
To attach a macro or hyperlink to a custom button that you add to a toolbar, follow these steps:
- Choose View > Toolbars > Customize to open the Customize dialog box.
- If the toolbar to which you want to add the custom button is not already open, select the
Toolbars tab and then select the toolbar's check box to display it in the Excel screen.
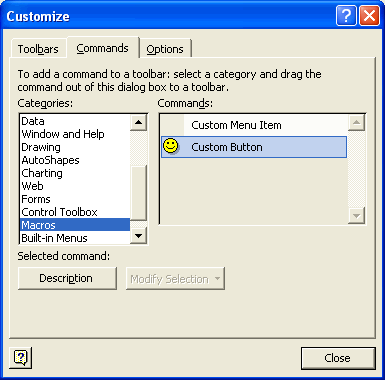
- Select the Commands tab and then select Macros near the bottom of the Categories list
box, as shown below.
When you select the Macros category, the Commands list box gives you a choice between a Custom Menu Item and a Custom Button.
- Drag the Custom Button (with the Happy Face icon) and drop it into position on the toolbar
from which you want to be able to run the macro or select the hyperlink.
- Right-click the Custom Button you just added to the toolbar and then click either the Assign
Hyperlink > Open item (to attach a hyperlink to it) or the Assign Macro item (to attach a macro
to it) on the shortcut menu, shown below.
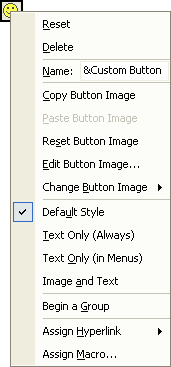
If you choose Assign Hyperlink > Open, Excel opens the standard Assign Hyperlink dialog box where you can select an existing file or Web page or e-mail address to link to. If you choose Assign Macro, the program opens the Assign Macro dialog box where you can select the macro to run when the button is clicked. - Select the link to the hyperlink's destination in the Assign Hyperlink dialog box or the macro
to run in the Assign Macro dialog box; then click OK.
- To select a new icon for the button, right-click the custom button and choose Change Button
Image. From the icon pop-up palette that appears, choose the new icon you want to use.
You can use the Button Editor - which you can open by selecting Edit Button Image on the button's shortcut menu - to modify the icon that you choose on the Change Button Image's icon palette. This editor lets you make pixel-by-pixel changes to the image, either by erasing pixels or by painting with new colors. - Click the Close button in the Customize dialog box.
The process for assigning a hyperlink or macro to a menu item is almost the same, except that you select Custom Menu Item in the Macros category on the Commands tab of the Customize dialog box. Then you drag this Custom Menu Item to the place on the pull-down menu where you want it to appear. Next, you assign either a hyperlink or macro to it by rightclicking the Custom Menu Item on its pull-down menu and then choosing either Assign Hyperlink > Open or Assign Macro on its shortcut menu.
After assigning the link or macro, you will want to rename the menu item. To do this, right-click Custom Menu Item on its pull-down menu and then click the Name option and replace Custom Menu Item with a name of your own. If you want to assign a hotkey to one of the characters in the new name, be sure to type an ampersand (&) immediately in front of the character in the custom menu name that you want to so designate.