-
Move the mouse pointer over the area that separates the Stage from the Timeline. When the resizing handle appears, drag up or down slightly to resize the Timeline as necessary.
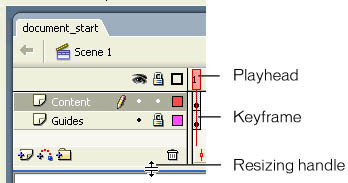
The playhead (the red indicator line) is on Frame 1 in the Timeline. The keyframes are designated by small circles in the frames, which are filled, indicating there's content in those frames. You can add a keyframe to a document when you want the Flash content to change in some way in that frame.
Change background and Stage size
The Stage provides a preview of how your Flash content will appear in your published file. You'll change the size of the Stage to accommodate artwork designed for a larger Stage, and you'll change the background color of the Stage.
|
1.
|
In the Tools panel, click the Selection tool.
|
|
2.
|
On the Stage, click anywhere in the gray workspace that surrounds the Stage, or on the background area of the Stage, so that no objects are selected.
The Property inspector, under the Stage, displays properties for the document when no objects are selected. |
|
3.
|
To change the Stage background color, click the Background color box and select a light shade of gray, such as gray with the hexadecimal value of #CCCCCC.
|
|
4.
|
To change the Stage size, click Size in the Property inspector. In the Document Properties dialog box, enter 750 for the Stage width, and then click OK.
The Stage resizes to 750 pixels wide. |
by updated