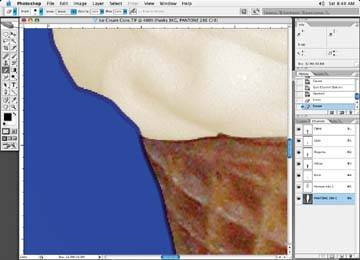
Figure 9-21. The look of a trap on the ice cream image (exaggerated here so you get the idea)
Keep in mind that you may want to check with the people preparing the final packaging files prior to adding trap. Many high-end packaging programs will allow the packaging operator to add trap on their end, making it unnecessary for you to do so. However, you may be asked to add trap, although this isn't typical. Trapping is covered in Tutorial 5.
In an effort to correct this problem, a certain amount of extra image surrounding a picture element is added, called trap. Trap is added to picture elements so that if a shift occurs, the gaps are prevented because the trap between elements fills in this potential error (Figure 9-21).
When all your color issues and trapping have been looked after, it is typical to get a proof done of your files. Proofs are generated on high-end output devices and may have built-in curves to simulate what may happen on press so that everyone gets a good idea of what to expect when the job is finally run on press. The high-end proofing systems can include all special colors and be prepared on a number of various substrates to again match what can be expected on the final press output. When the proof comes back for a final inspection, it is at this point that adjustments are made. It can be typical to have several proofs made until the desired results have been achieved. Of course, in an ideal world, the image will be perfect the first time through. This is the goal, and it would save everyone a lot of time and money on the job, but it is rare!
It is typical to have someone at the press who is associated with the job on hand to approve the press run. This is called a press approval.
Once the final proof has been approved by the client, a press run is made of the job. Small adjustments in color can be made at the press run, but only overall color changes. Press time is expensive, so you want the press process to run smoothly. Any errors that you or the client have missed up to this point that are caught on press, whether they are image errors or type issues, can be very expensive to fix. A printing press waiting to get reissued files for reprinting at this point can be charged to a client or the person(s) responsible for the errors, and people can be charged upward of $500.00 per hour to have a press on hold. This is something anyone would want to avoid, for sure!