An XSLT style sheet is broken down into two types of information: instructions and literals. Instructions are the XSLT elements and attributes that describe exactly how XML content is to be transformed. Literals, on the other hand, are static pieces of information that are placed directly in the resulting document and therefore aren't processed in any way. You can think of the relationship between instructions and literals as the relationship between text and blanks in a traditional paper form that you might fill out, such as an IRS tax form. (I apologize for the scary IRS reference but when people think of forms, many of them think of taxes.) Anyway, the comparison to paper forms has to do with the fact that text on a form is static and doesn't change, whereas the blanks are subject to being filled in by whomever is using the form. In the case of XSLT, the blanks are "filled in" by XSLT instructions that determine the XML content to be placed in the blanks. The resulting output document is the combination of transformed XML content and the literals located throughout a style sheet.
Literals play a significant role in XSLT whenever you transform an XML document into an XHTML document for display in a web browser. In order to successfully generate an XHTML document using XSLT, you must place XHTML code throughout the style sheet as literals. XSL instructions are then used to transform XML content and place it within the XHTML code.
XML content is merged with literals in a style sheet by way of the xsl:value-of element, which inserts the value of an element or attribute in the output document. To get a better understanding of how this works, consider the following example:
<p>Hello, my name is <xsl:value-of select="name"/></p>
This code shows how the xsl:value-of element is used to insert the value of a name element into an XHTML paragraph. In this example, the xsl:value-of element is the instruction, and the remaining XHTML code is the literal. Now that you understand the difference between instructions and literals, let's move on to more important business.
Creating and Applying Templates
You learned in the previous tutorial that templates are used in XSLT style sheets to transform a particular portion of an XML document for output to a result tree. Templates are created using the xsl:template element, which requires an attribute named match that determines which nodes of the source document tree are processed by the template. The value assigned to the match attribute is a pattern or expression that resolves to a set of nodes. An example of a commonly used value for the match attribute is a forward slash (/), which identifies the root node of a document:
<xsl:template match="/">
...
</xsl:template>
This root template is significant because it serves as the first template applied to a document. Technically, it isn't necessary to include a root template in your style sheets because the XSL processor will automatically start applying other templates with the root element if no root template exists. However, if you want to control the manner in which other templates are applied, you'll want to create a root template. Keep in mind that you can also refer to a root element directly by name, as the following example shows:
<xsl:template match="news">
...
</xsl:template>
Because the news value assigned to the match attribute in this example is the root element of the News document from Styling XML Content With CSS, "Styling XML Content with CSS," it has the same effect as using the forward slash to identify the root element. Although the root element gets things started in an XSLT style sheet, most of the action takes place in other templates. Templates in an XSLT style sheet are used to transform specific portions of an XML document, which are identified using the match attribute, as the following example demonstrates:
<xsl:template match="headline">
...
</xsl:template>
In this example, the headline element is matched by the template, which means the template is used to transform all content in the News document that is contained within a headline element. This template is usually applied from the parent template of the headline element, which in this case is the news element. In other words, the headline template would be applied from within the news template. Following is a portion of XML code for a news document to which this template could be applied:
<header>
  <headline>
  Local Author Creates Free Online Music Game
  </headline>
  <byline>
  By Brent Andrews
  </byline>
  <dateline>
    <location>Nashville, Tennessee</location>
    <date>Monday October 17 2005 12:08 CST</date>
  </dateline>
</header>
There are trickier approaches to specifying nodes using the match attribute. These approaches require knowledge of XPath, which you learn about in Addressing And Linking XML Documents, "Addressing and Linking XML Documents."
In this code, the headline element matches up with the previous example template. It then becomes important to apply the template and somehow transform the headline element. What do I mean by "applying" a template? Applying a template means that you are invoking the template so that it actually carries out the transformation logic defined in it. It isn't always necessary to explicitly apply every template that you create because the XSL processor will automatically attempt to figure out which templates to apply to certain parts of a document using the match attributes of the templates. However, you will usually apply at least one template to get the ball rolling; templates are applied using the xsl:apply-templates element. The xsl:apply-templates element supports an attribute named select that identifies the nodes to which the template is applied. If you don't specify a value for the select attribute, the template will be applied to all of the child nodes of the current node. So, the select attribute serves to limit the nodes to which a template is applied.
Similar to the match attribute of the xsl:template element, the select attribute of the xsl:apply-templates element allows you to use XPath to carry out more advanced node selections. You learn a little more about how this is accomplished later in this tutorial in the section titled "Pattern Essentials." You get the whole scoop on XPath in Addressing And Linking XML Documents.
If you want to apply the root template to a document, you can simply place an empty xsl:apply-templates element directly in the root template:
<xsl:template match="/">
  <xsl:apply-templates/>
</xsl:template>
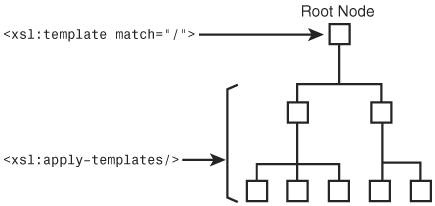
In this example, the default template is automatically applied to the root node of the document, after which the xsl:apply-templates element makes sure the remaining templates are applied to children of the root element. This may sound a little confusing, so let's take a second to understand exactly what is happening. This code defines a template that handles the default node of the document, as indicated by the forward slash (/) value of the match attribute. When the XSL processor encounters the root node of the document, it automatically matches it up with this template and invokes the template to process the node. The xsl:apply-templates element within the template doesn't include a select attribute, which means that templates matching any children of the root node should be applied (illustrated in Figure 12.1).
Figure 12.1. The xsl:applytemplates element is applied to the child elements of an XML document.
If you wanted to target a specific set of nodes, you could identify it using the select attribute of the xsl:apply-templates element:
<xsl:template match="/">
  <xsl:apply-templates select="//headline"/>
</xsl:template>
In this example, the headline child node is identified in the select attribute, which means only templates matching headline nodes are applied. This demonstrates how the select attribute limits the set of nodes to which templates are applied. Incidentally, the two forward slashes (//) before the headline element name indicate that the selected headline elements are children of the current node (news).
Processing Nodes
There are several elements defined in XSLT that are used to process nodes. These node-processing elements perform a range of operations and ultimately provide you with somewhat of a programming approach to creating templates. The first of these elements is xsl:for-each, which allows you to process a set of nodes individually according to a certain transformation. The xsl:for-each element is particularly useful for database transformations where you have a set of data that must be formatted into a list or table. The xsl:for-each element accepts a select attribute that works similarly to the select attribute in the xsl:apply-templates element. Following is an excerpt of code from the contacts.xsl style sheet that you saw in the previous tutorial, which demonstrates the usefulness of the xsl:for-each element:
<xsl:for-each select="contacts/contact">
  <div style="width:450px; padding:5px; margin-bottom:10px; border:5px double black;
    color:black; background-color:white; text-align:left">
    <xsl:apply-templates select="name"/>
    <xsl:apply-templates select="address"/>
    <xsl:apply-templates select="city"/>
    <xsl:apply-templates select="state"/>
    <xsl:apply-templates select="zip"/>
    <hr />
    <xsl:apply-templates select="phone/voice"/>
    <xsl:apply-templates select="phone/mobile"/>
    <hr />
    <xsl:apply-templates select="email"/>
  </div>
</xsl:for-each>
In this example, the xsl:for-each element is used to loop through the contact elements in a document. For each contact element in the document, the transformation code within the loop is applied. More specifically, an XHTML div element is created with the appropriate styles, and several templates are applied for every child contact element. This usage of the xsl:for-each element allows you to effectively display a formatted list of contacts.
Another interesting XSLT node-processing element is the xsl:if element, which allows you to include conditional processing within a template. Transformation code within an xsl:if element is conditionally carried out based upon the result of the conditional expression for the element. This expression is specified in the test attribute of the xsl:if element. You learn a great deal more about expressions in Addressing And Linking XML Documents, but a quick example might help to reveal how easy they are to use with the xsl:if element:
<xsl:template match="name">
  <div style="font-family:Times, serif; font-size:15pt; font-weight:bold">
    <xsl:value-of select="."/>
    <xsl:if test=". = 'Test Name'">
      <span> (that's me!)</span>
    </xsl:if>
  </div>
</xsl:template>
This code shows how you can conditionally add a literal to the output document based upon the value of the name element. The test attribute of the xsl:if element checks to see if the content of the name element is equal to 'Test Name'. If the conditional expression is true, the literal text (that's me!) is inserted into the output document just after the value of the name element. If not, the value of the name element is inserted like normal.
If you find that you need to conditionally choose between more than one possible value, you can use the xsl:choose element in conjunction with the xsl:when and xsl:otherwise elements. The xsl:choose element works a lot like the xsl:if element except that it supports multiple conditional sections, which are identified by xsl:when elements. Following is the general form of the xsl:choose element:
<xsl:choose>
<xsl:when test="">
</xsl:when>
<xsl:when test="">
</xsl:when>
<xsl:otherwise>
</xsl:otherwise>
</xsl:choose>
This code shows two different conditional sections of transformation code, which is evident by the two xsl:when elements. The final xsl:otherwise element identifies transformation code that is carried out if none of the previous xsl:when conditionals apply. Following is an example that should help show how to use these elements to create multiple conditionals:
<xsl:template match="name">
  <div style="font-family:Times, serif; font-size:15pt; font-weight:bold">
    <xsl:value-of select="."/>
    <xsl:choose>
      <xsl:when test=". = 'Test Name'">
        <span> (that's me!)</span>
      </xsl:when>
      <xsl:when test=". = 'Second Name'">
        <span> (brother)</span>
      </xsl:when>
      <xsl:when test=". = 'Third Name'">
        <span> (friend)</span>
      </xsl:when>
      <xsl:otherwise">
        <span> (don't know this guy!)</span>
      </xsl:otherwise>
    </xsl:choose>
  </div>
</xsl:template>
This example uses an xsl:choose element and three xsl:when elements to provide three conditional transformations that add unique text next to name elements whose content matches the conditionals. An xsl:choose element is also specified to handle any name elements that don't match the conditionals.
Sorting Nodes
I've mentioned several times that one of the enormous benefits of using XSLT to transform XML documents is that you can carefully organize document content before formatting it for display with CSS or XSL-FO. One of the most common operations performed on databases is sorting, in which items are organized according to the value of a particular type of information such as date, quantity, or price. XSLT supports sorting through the xsl:sort element. This element allows you to sort the nodes in a node set according to specified criteria. The criteria for an XSLT sort operation are determined by the select, order, and data-type attributes of the xsl:sort element.
A set of nodes is sorted based upon a key, which is a pattern or expression that identifies a piece of information in the set. For example, if you wanted to sort a set of nodes on an attribute named price, the sorting key would be set to @price. This value is assigned to the select attribute of the xsl:sort element. Another important attribute in the xsl:sort element is order, which is set to either ascending (the default) or descending. The final attribute of interest with the xsl:sort element is data-type, which allows you to specify the type of data being sorted; this attribute is important because it impacts the manner in which the sorting is carried out. The data-type attribute can be set to one of the following values: text or number. Following is an example of an xsl:sort element that is used to sort a list of names alphabetically in descending order:
<xsl:sort select="name" order="descending" data-type="text"/>
This example uses the name element as the key and then sorts nodes within the node set in descending order. The data type is set to text to indicate that the sorting routine is text-based. Following is an example of how you might use this code in the context of a real style sheet:
<xsl:for-each select="contacts/contact">
  <xsl:sort select="name" order="descending"/>
  <div style="width:450px; padding:5px; margin-bottom:10px; border:5px double black;
    color:black; background-color:white; text-align:left">
    <xsl:apply-templates select="name"/>
    <xsl:apply-templates select="address"/>
    <xsl:apply-templates select="city"/>
    <xsl:apply-templates select="state"/>
    <xsl:apply-templates select="zip"/>
    <hr />
    <xsl:apply-templates select="phone/voice"/>
    <xsl:apply-templates select="phone/mobile"/>
    <hr />
    <xsl:apply-templates select="email"/>
  </div>
</xsl:for-each>
You probably recognize this XSLT code from the familiar contacts.xsl style sheet. In this example the xsl:sort element is used to sort the contacts prior to displaying each of them.