Inserting a picture into a report.
The Insert Picture dialog box
Pictures, and illustrations can make your reports more professional looking. This lesson explains how to insert clip art and graphics in your reports. You can insert graphics and created with graphics programs such as Microsoft Paint (which comes with Windows), scanned pictures, or graphics from a clip-art library.
-
Make sure that you have the rptCustomers report open in Design view.
Here's how to insert a picture or graphic onto a report (this works for forms too!):
-
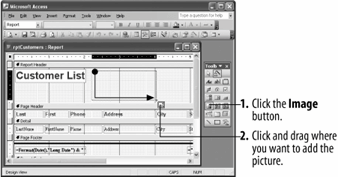
Click the
 Image button on the Toolbox.
The pointer changes to a
 . You use this pointer to determine where you want to place the image.
 -
Click and drag the
pointer in the Report Header section down and to the right about an inch and a half, as shown in figure.As soon as you finish clicking and dragging, the Insert Picture dialog box appears, as shown in figure. You need to specify the name and location of the graphic file you want to insert.
-
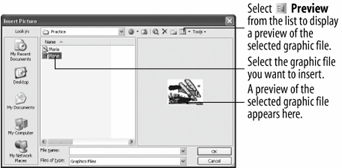
Browse to your Practice folder.
All the graphic files located in your Practice folder appear in the file window.
-
Select the Plane file.
You can display a preview of the graphic in the right side of the Insert Picture dialog box by clicking the
 list and selecting Preview.
 -
Click OK to insert the Plane graphic.
Access inserts the plane picture on the report.
Reports with lots of information can sometimes be difficult to read. You can add vertical and/or horizontal lines to make your reports more organized.
-
Click the
 Line button on the Toolbox.
The pointer changes to a
 line-draw tool. Unless you actually want to draw a diagonal line, hold down the Shift key as you click and drag to draw a straight line.
 -
Position the
pointer in the far left side of the top of the Detail section (just above the LastName text box). Hold down the Shift key, then click the mouse and drag the pointer to the far right edge of the report.More than likely your screen will not be wide enough to display the entire reportdon't worry, simply drag the
pointer past the right edge of the screen to automatically scroll to the right.If you want to add a control, such as a line, that is larger than the current screen width, simply click and drag the pointer past the edge of the screen.
Let's see how our report looks.
-
Click the View button to view the report in Print Preview.
Notice that the line you added appears not once but under every record! That's because you added the line to the report's Detail section, which prints for every record in the report.
-
Click the Close button to close the report and click Yes to save.
You can also use this technique to add pictures to your forms. Table lists some of the types of graphic that you can use in Access.
Common Graphic File Formats
| Format | File Size | Description |
|---|---|---|
|
BMP |
Large |
Also known as a bitmap, this is a generic graphics format used by Paintbrush and many other programs. |
|
CGM |
Small |
Clip-art pictures often come in Computer Graphics Metafile format. |
|
GIF |
Small |
Picture file format commonly used on the Internet. |
|
JPG |
Small |
Digital photographs are usually saved as JPEG files. Because of their small size, JPEG files are also commonly used on the Internet. |
|
WMF |
Small |
Another file format used for clip-art pictures |
|
TIF |
Large |
A file format used by scanners, fax programs, and some drawing programs. |
TO INSERT A GRAPHIC:
-
CLICK THE IMAGE BUTTON ON THE TOOLBOX.
-
MOVE THE
POINTER ONTO THE FORM OR REPORT, THEN CLICK AND DRAG TO DRAW A RECTANGLE PLACEHOLDER FOR THE GRAPHIC. -
SELECT THE GRAPHIC FILE YOU WANT TO INSERT AND CLICK OK.
TO DRAW A LINE:
-
CLICK THE LINE BUTTON ON THE TOOLBOX.
-
MOVE THE
POINTER ONTO THE FORM OR REPORT, THEN CLICK AND DRAG TO DRAW THE LINE. -
HOLD DOWN THE SHIFT KEY AS YOU DRAG TO DRAW A STRAIGHT LINE.