The first step of the Wizard.

Specify how you want your text to be stored: with or without the input mask symbols.
There are two ways to create an input mask:
-
Click the
 Build button and have the create the input mask for you (the fast and easy way). The only problem with the Input Mask Wizard is that it can only help you create input masks for phone numbers, social security numbers, Zip Codes, and date and time fields.
 -
Create the input mask yourself by typing a series of characters in the Input Mask box (the hard way). If you want to use this brutal method, refer to table to see what you have to enter in order to create an input mask.
In this lesson you will learn how to use the Input Mask Wizard to add an input mask to a field.
-
Switch to Design view by clicking the View button on the toolbar.
Now let's create an input mask for the Phone field in order to reduce data entry errors and to remind users to enter the area code.
-
Click the Phone field.
Now let's look at the ...
-
Click the Input Mask box.
A
button appears next to the Input Mask boxclick this button to start the Input Mask Wizard. -
Click the
Build button to start the Input Mask Wizard.The first step of the Input Mask Wizard appears, as shown in figure. All you need to do here is select the input mask you want to choose.
If you want to try an input mask to see how it works, click the input mask you want to use and then type some sample text in the "Try It" box.
Depending on how Access is set up on your computer, an error message may appear when you click the Build button. Don't worry all this means is that the Input Mask Wizard is not currently installed. Click OK to install it.
-
Click the Phone Number input mask and then try typing a phone number in the Try It box. Click Next when you're finished.
The next step of the Input Mask Wizard appears. If you want, you can select a different placeholder to use than the default underscore ( _ _ ) character.
-
Click Next.
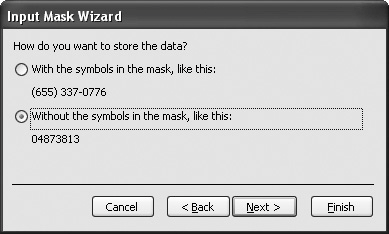
The next step of the Input Mask Wizard is very important specifying how Access should store your data (see figure). You have two choices:
-
With the symbols in the mask: This will store only the text you type in the field and the input mask symbols. For example, if you enter 5555555555 in a Phone field, Access will save the input mask symbols with the text you enter, so (555) 555-5555 would be saved.
-
Without the symbols in the mask: This will store only the text you type in the field. For example, if you enter 5555555555 in a Phone field, Access will display (555) 555-5555 but only store the numbers you typed (5555555555).
This may not seem like much of an issue, and it's not unless you want to export your table. Then you will have to work with the results of the decision you made here: the phone numbers will be in either 5555555555 or (555) 555-5555 format.
-
-
Select the With the symbols in the mask option and click Next.
That's it! You're ready to create your input mask!
-
Click Finish to create the input mask.
The Input Mask Wizard creates an input mask for the field.
Creating an input mask by hand is difficult, but it can be done. Create an input mask from scratch by entering the characters shown in the following table into the Input Mask box.
Input Mask Characters
0: Numbers 0 to 9 required; plus and minus signs not allowed.
&: Character or space required.
9: Number or space optional; plus and minus signs not allowed.
C: Character or space optional.
#: Number or space optional; plus and minus signs not allowed.
<: Converts the following characters to lowercase.
. , : ; - /: Decimal point, thousands, date, and time separators.
>: Converts the following characters to uppercase.
A : Letter or number required.
!: Displays characters from right to left, rather than left to right.
a: Letter or number optional.
\: Displays the following input mask character. For example, \* would display *.
L: Letters A to Z required.
Password: Displays an asterisk( * ) for each character you type.
?: Letter or number optional.
To create an input mask for a field:
-
make sure the table is displayed in design view and click the field you want to create an input mask for.
-
click the input mask box in the field properties section.
-
click the build button to start the input wizard and select an input mask from the predefined list.
or...
manually create the input mask by entering the appropriate characters.