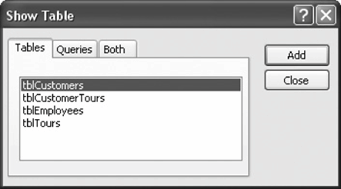
The Show Table dialog box

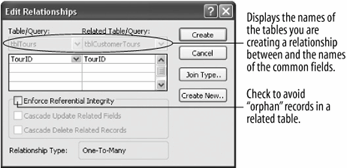
The Edit Relationships dialog box.

Click and drag the primary key field from one table to the matching field in the related table.


Once you begin to understand the difficult concept of relational databases, the process of actually linking the tables in a database is rather simple. You link related tables by connecting the table's common fields in Access's , shown in figure. The Relationships window lets you view, create, and modify relationships among tables in a database.
Keep the following rules in mind when you link two tables together:
-
Linked fields should be (almost) identical. Related fields must have the same data type and field size, and they must contain the same kind of information. Related fields don't have to have the same field namebut they should so that things don't get confusing. The most common problem people have when they try to link two tables is caused by fields with different data types and/or sizes.
-
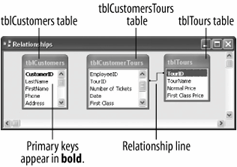
The primary key in one table is usually linked with a matching field in the other table. Notice that in figure the tblTours table's primary key, TourID, links to the TourID field in the tblCustomerTours table.
-
Fields related to an AutoNumber primary key field must be Number fields with the Long Integer Field Size.
Now you're ready to create a relationship between the tables in your database. Here's how to do it:
-
Locate and click on the Lesson 5 database to open it.
To view and create relationships between tables, you need to display the Relationships window.
-
Click the
 Relationships button on the toolbar.
Another way to define table relationships is to right-click any blank area in the Database window and select Relationships.
The Relationships window appears. If any relationships exist between the tables in your database, each of these tables will appear in a small box with lines connecting the table's linked fields.
-
If the Show Table dialog box doesn't appear when you open the Relationships window, click the
 Show Table button on the toolbar.
First you have to add the tables that you want to relate using the Show Table dialog box, as shown in figure. In this exercise you want to relate the tblCustomers, tblCustomerTours, and tblTours tables, so you will need to add these tables to the Relationships window.
-
Click the tblCustomers table and click Add.
The tblCustomers table appears in the Relationships window.
-
Click the tblCustomerTours and tblTours tables and then click Add to add them to the Relationships window.
You can close the Show Table window when you have finished adding all the tables that you want to relate to one another.
-
Click Close to close the Show Table dialog box.
You're ready to start relating the tables you added. Relating tables may sound difficult, but it's really nothing more than dragging and dropping the field you want to use to link one table to the other. Before you can drag and drop the matching field from one table to the other, you have to make sure that the linking fields in both tables are visible.
-
Drag the TourID field from the tblTours table to the TourID field in the tblCustomerTours table, as shown in figure.
Dragging a field from one table to another in the Relationships window links the two tables using the selected field.
Okay, so dragging and dropping isn't quite that easy. Access is very picky about where you point, click, drag, and drop. You need to be very accurate and drag the pointer right next to the field you're linking to.
The appears, as shown in figure. What's especially important here is the Enforce Referential Integrity check box. Referential integrity helps you avoid "orphan" records and maintains database accuracy. For example, checking the Referential Integrity box would ensure that you could not enter an invoice for a customer in an Invoice table unless that same customer existed in a Customers table. We'll discuss referential integrity more later in the tutorial.
-
Click Create to create the relationship between the tblTours and tblCustomerTours tables.
The Edit Relationships dialog box closes and a line appears between the two tables' TourID fields, indicating that the tables are linked, as shown in figure.
Congratulations! You've just linked two related tables together!
TO DEFINE TABLE RELATIONSHIPS:
-
IN THE DATABASE WINDOW, CLICK THE RELATIONSHIPS BUTTON ON THE TOOLBAR.
OR...
RIGHT-CLICK ANY BLANK AREA IN THE DATABASE WINDOW AND SELECT RELATIONSHIPS.
-
IF NECESSARY, CLICK THE SHOW TABLE BUTTON ON THE TOOLBAR.
-
CLICK THE TABLE YOU WANT AND CLICK ADD.
-
REPEAT STEP 3 FOR EACH TABLE YOU WANT TO USE IN THE RELATIONSHIP.
-
CLICK CLOSE.
-
CLICK THE RELATED FIELD IN THE FIRST TABLE AND DRAG IT TO THE RELATED FIELD IN THE SECOND TABLE.
-
SPECIFY ANY REFERENTIAL INTEGRITY AND/OR JOIN TYPE OPTIONS (OPTIONAL).
-
CLICK CREATE TO CREATE THE RELATIONSHIP.