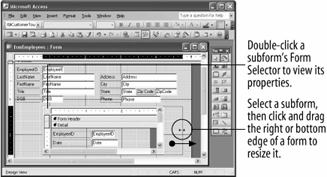
Modifying a subform in Design view.

Subforms rarely come out the way you want them to the first time: They may be too small or too large and must be resized so that the main form and subform fit together nicely. If you're using an existing form as a subform, you may need to change the subform layout. Subforms can be displayed using one of three different formats:
-
Single Form: Displays one record at time on a form.
-
Continuous Forms: Displays multiple records on a form. The main difference between datasheets and continuous forms is that you can design and customize continuous forms.
-
Datasheet: Displays multiple records in a table, using one line per record. Tables and queries display their data in Datasheet layout.
-
PivotTable: Dynamically analyzes information and summarizes it into a datasheet-like table.
-
PivotChart: Dynamically analyzes information and summarizes it into a chart.
-
Make sure that you have the frmEmployees form you modified in the previous lesson open in Form view.
When you add records on a main form or subform, Access stores the appropriate data in each table. Usually you won't even realize that you are working with several tables!
Let's see how the new subform works.
-
Click the
 Next Record button on the main form's Record Navigation bar.
Notice that the subform displays tours booked by the current employee.
Also, notice that the main form and sub form each have their own set of navigation buttons that you can use to add and move between records. Try adding a new record to the subform.
-
Click the
 New Record button on the Record Navigation bar.
The record indicator jumps to the blank row at the end of the subform datasheet and the blinking insertion point (|) appears in the EmployeeID field. Notice that Access has automatically filled in the EmployeeID field with the main form's EmployeeID.
If you have set referential integrity between two or more related fields in a subform's underlying table or query, you will have to obey those referential integrity rules in order to add or edit a record in the subform. For example, you can't enter a number in the TourID field unless that number exists in the qryCustomerTours query.
-
Enter a new record in the subform using the following information:
EmployeeID Date TourID CustomerID Number of Tickets (Current)
9/2/01
China
Ali
2
It's easy to switch between the main form and subform: simply click a field or control in the form you want to move to or press Ctrl + Shift + Tab.
-
Click any field in the main form to move to the main form.
Here's how to modify a subform:
-
Switch to Design view.
First get rid of that annoying subform label.
-
Select the label for the subform and press Delete.
Here's how to change the layout of a subform:
-
Double-click the subform's
 Form Selector in the upper left corner of the subform.
The Properties dialog box appears.
-
Click the Format tab, click in the Default View box, click the
 button and select Continuous Forms. Close the Properties dialog box.
Now you need to resize the subform control and the main form.
-
Click the subform to select it, then click and drag the right edge of the subform to eliminate the wasted, empty space, as shown in figure.
Let's see how our form looks.
-
Display the frmEmployees form in Form view.
The subform is displayed in continuous form layout instead of Datasheet layout.
-
Save your changes to the form and close the Lesson 7 database.
Whew! We just covered a lot of ground in this tutorial. Try moving on to the Tutorial Review to see how much you remember.
TO MODIFY A SUBFORM:
-
CLICK ANYWHERE IN THE SUBFORM.
-
EDIT THE SUBFORM AS NEEDED.
TO DISPLAY A SUBFORM'S PROPERTIES:
-
DOUBLE-CLICK THE SUBFORM'S FORM SELECTOR.