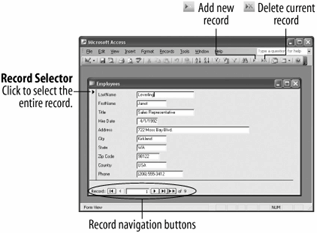
The Employees form.

Record navigation buttons are displayed at the bottom of most forms

Adding, viewing, and modifying information in a database should be straightforward and easy. Information in a table is often difficult to understand and manage. Access solves this problem by using forms to display table and query information. The forms in Access are actually quite similar to the ordinary paper type of form you fill out with a pen or pencil. Access forms have several major advantages over the traditional paper type of forms they save you time, effort, and paper, not to mention no worries about trying to read poor penmanship!
Forms can include fill-in-the-blank fields, check boxes, lists of optionseven information and prompts to help users complete the form. Forms can also contain buttons that allow you to perform other actions, such as running macros to print reports or labels. Forms can even validate data entry by automatically checking your entries for errors.
This lesson will give you a brief overview of the ins and outs of working with forms.
-
Click the Forms icon in the Objects bar.
Access lists all the forms in the current database.
-
Double-click the Employees form.
The Employees form opens in its own window, as shown in figure. You should already be familiar with some of the items on the form, such as the record navigation buttons located at the bottom of the window, as shown in figure. As with tables, the record navigation buttons are used to move between records.
-
Click the
 Next Record button on the Record Navigation bar.
Access moves to the next record. The Employees form displays information from the Employees table, one record at a time.
-
Practice using the form navigation buttons to move through the various records in the Employees table.
You can usually add new records to a form's underlying table. The procedure for adding a new record with a form is virtually the same as adding a new record to a table.
-
Click the New Record button on the Record Navigation bar.
Other ways to add a new record are to press Ctrl + +, or click the
 New Record button on the datasheet toolbar.
A blank form appears, ready for your information.
-
Enter your last name in the LastName field.
Just as with tables, once you have finished entering data into a form's field, you can press Tab or Enter to move to the next field or Shift + Tab to move to the previous field.
-
Press Tab to move to the next field and enter your first name.
-
Complete the record by entering your own information into each respective field (enter today's date for the hire date). Remember to press Tab to move to the next field.
When you enter data, you don't have to click a Save button to save the information-Access automatically saves the information as you enter it. When you have finished entering the record, you can close the form, click the New Record button to enter another record, or use the record navigation buttons to view another record.
The simple form used in this exercise contains only fill-in-the-blank style text fields. Some forms are more complex and may contain lists, combo boxes, check boxes even sub-forms! If you are unfamiliar with these controls you might want to review the dialog box lesson, presented earlier in this tutorial.
You can also delete records using a form. The procedure for deleting records in a form is no different than it is for deleting them from a table.
-
Make sure the record you just added appears in the form and click the Delete Record button on the toolbar.
The record disappears and a warning dialog box appears, asking you to confirm the deletion.
-
Click Yes to confirm the deletion and then click on the Close button to close the form.
Access deletes the record from the Employees table.
TO OPEN A FORM:
-
CLICK THE FORMS ICON IN THE OBJECTS BAR AND DOUBLE-CLICK THE FORM OR SELECT THE FORM AND CLICK OPEN.
TO MOVE BETWEEN RECORDS:
-
USE THE RECORD NAVIGATION BUTTONS NEAR THE BOTTOM OF THE SCREEN.
TO DELETE A RECORD:
-
PLACE THE INSERTION POINT ANYWHERE IN THE RECORD AND CLICK THE DELETE RECORD BUTTON ON THE TOOLBAR.
TO ADD A NEW RECORD:
-
CLICK THE NEW RECORD NAVIGATION BUTTON.
OR...
-
CLICK THE NEW RECORD BUTTON ON THE TOOLBAR.
OR...
-
PRESS CTRL + +.