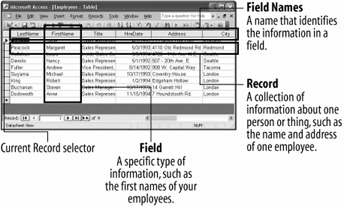
The structure of a table.

Record navigation buttons.

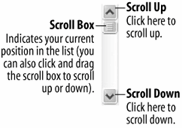
A vertical scroll bar.

Tables are the heart and soul of any database. Tables are where a database stores all of its information. All the other database objects queries, forms, reports, pages, macros, and modules are merely tools to analyze and manipulate the information stored in a table. Any of these other database objects are optional but without , a database wouldn't be a database. Each table in a database stores related information. Most databases have more than one table: Each table is used to store a different type of information. For example, one table might contain a list of customers and their addresses, while another table might contain any orders placed by the customers, while yet another table might contain a list of products.
Tables are made up of groups of fields. A field is a specific type of information, such as a person's last name, address, or phone number. Together, the related fields for each individual person, place, or thing make up a single record. If your company has ten employees, your employee table would have ten one for each employee.
Here's how to open and view a table:
-
Click the Tables icon in the Database window Objects bar.
Access lists all the tables in the current database.
-
Click the Employees table to select it and then click the Open button in the Database window.
Another ways to open a table is to select the table and click Open.
The Employees table opens in its own window, as shown in figure. If you are working on a table, you will usually want to maximize the window so that you can see as much information as possible.
-
Click the table window's Maximize button.
The table window expands to fill the entire screen. Table information is displayed, entered, and modified in a datasheet. A datasheet is a grid that contains all the records in a table. Records are stored in rows and field names are stored in columns, as shown in figure.
Let's take a closer look at the current table. First notice the
 that appears to the left of the first record in the table. This is the , and it shows the record that you are currently working on.
Next, take a look at the near the bottom of the screen, as shown in figure. The record navigation buttons display the number of records in the current database and allow you to move between these records.
-
Click the
 Next Record button on the .
Other ways to move to the next necord are to click anywhere in the record (if it is displayed on the screen), or to press the down arrow key
Access moves to the next record in the table. Notice that the
 record selector moves to the next record and that the Record Navigation bar indicates that you are currently viewing Record 2.
 -
Click the
 button on the Record Navigation bar.
Another way to move to the last record is to press Ctrl + End (when not editing the record).
Tables will often contain too much information to display on the screen at once and you will have to use the vertical scroll bar to move up or down and/or the horizontal scroll bar to move left or right. Since the current database only contains nine records, Access can display all of them on the screen at once. However you will still need to use the horizontal scroll bar in order to see all of the table's fields.
-
Click the Scroll Right button on the horizontal scroll bar at the bottom of the screen to scroll to the right.
The screen scrolls to the right, displaying previously hidden fields.
See table below for the ways to navigate a table. This ends the first half of our table tour. In the next lesson you'll learn how to add, edit, and delete a table's records.
Table Navigation
| To move to: | Navigation buttons | Keyboard | Mouse |
|---|---|---|---|
|
The |
Click the |
Press the |
Click the record you want to select (if displayed). |
|
The |
Click the |
Press the |
Click the record you want to select (if displayed). |
|
The Last Record in the table |
Click the |
Press Ctrl + End (when not editing record). |
N/A |
|
The in the table |
Click the |
Press Ctrl + Home (when not editing record). |
N/A |
TO OPEN A TABLE:
-
CLICK THE TABLES ICON IN THE OBJECTS BAR AND DOUBLE-CLICK THE TABLE OR SELECT THE TABLE AND CLICK OPEN.
TO MOVE TO THE NEXT RECORD:
-
CLICK THE NEXT RECORD NAVIGATION BUTTON, OR PRESS THE
KEY, OR CLICK THE RECORD YOU WANT TO SELECT.
TO MOVE TO THE PREVIOUS RECORD:
-
CLICK THE PREVIOUS RECORD NAVIGATION BUTTON, OR PRESS THE UP ARROW KEY, OR CLICK THE RECORD YOU WANT TO SELECT.
TO MOVE TO THE LAST RECORD IN A TABLE:
-
CLICK THE LAST RECORD NAVIGATION BUTTON OR PRESS CTRL + END (WHEN NOT EDITING RECORD).
TO MOVE TO THE FIRST RECORD IN A TABLE:
-
CLICK THE FIRST RECORD NAVIGATION BUTTON OR PRESS CTRL + HOME (WHEN NOT EDITING RECORD).