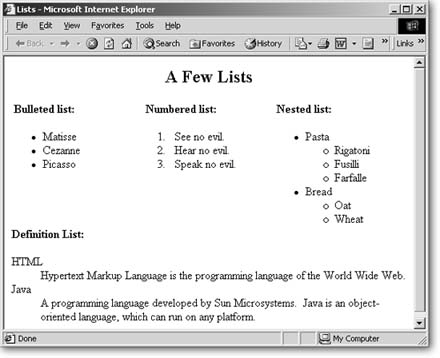
Figure 2-11. HTML features these basic list formats. FrontPage does most of the work for you, adding bullets and numbering automatically. You can customize these lists a bit by choosing from different bullet and number styles.
Bulleted and Numbered Lists
You might think that bulleted and numbered lists are quite different from each other. For instance, numbered lists are, by definition, ordered, and bulleted lists aren't. However, they actually work the same way and therefore share a FrontPage dialog box.
To create a bulleted or numbered list:
-
Within the document window, place your cursor where you want to insert the list.
-
Apply list formatting.
The fastest way to do this is to click either the Bullets or the Numbering button on the Formatting toolbar. These buttons automatically add the standard bullet or numbering styles. You can also choose Format » Bullets and Numbering, which gives you the chance to select alternate bullet or number styles. Later, you can always right-click within any list and select List Properties to change a list's appearance.
The Style list on the Formatting toolbar also offers Bulleted and Numbered list styles. Selecting these styles is equivalent to clicking the Bullets or Numbering button on the toolbar.
-
Type the first list item and press Enter.
Each line that follows inherits the list formatting, letting you type without interruption.
-
To end the list, press Enter twice.
If you have existing text that you want to turn into a list, it's just as easy. Select all the text that you want to appear in the list and pick the list style you want.
Picture bullets
FrontPage gives you the option of using an image file as a bullet point. Picture bullets are found throughout FrontPage's packaged themes and automated Web sites. You can also create your own small image file to use as a bullet style.
You can change any bulleted list into one that uses picture bullets:
-
Click to place your cursor anywhere in the list.
-
Right-click and select List Properties from the pop-up menu.
-
Click the Picture Bullets tab.
-
Click Specify Picture, and then click the Browse button to find and select the image file you want to use.
If you haven't yet saved the image file in your Web site, you'll be prompted to do so when you save the page (Section 14).
Outline Lists
Some lists are more complex than others. You may find that you need to break down an existing numbered or bulleted list even further, creating many levels and sublevels. This is what FrontPage calls an outline style list. HTML programmers and other Web-editing programs might refer to these lists as nested or multi-level. Once you've created a normal one-level list, you can turn it into an outline list and organize the list items any way you want.
Within an existing list, select the item(s) you want to move to a sublevel.
-
To move items down a level, click the Increase Indent button on the Formatting toolbar twice.
-
To move items up a level, click the Decrease Indent button.
-
To align an item with bulleted text but remove its bullet, click the Increase Indent button once.
You can continue to move items farther up or down the hierarchy by clicking the Increase Indent and Decrease Indent buttons successive times.
If you want to change the bullet or numbering style for a group of items or sub-items, click to place your cursor anywhere in the list, right-click, select List Properties from the menu, and set your preference.
Collapsible lists
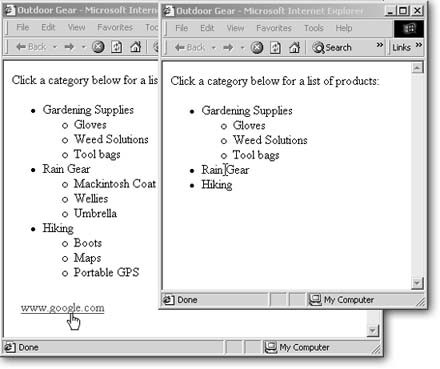
You can take any outline list and turn it into a collapsible list (Figure 2-12). A collapsible list lets you hide sublists under a so-called parent item so that the sublists display only when the parent is clicked.
To create a collapsible list:
-
Create an outline list.
-
Place your cursor on one of the parent items in the list.
-
Right-click and select List Properties from the pop-up menu.
-
Turn on the Enable Collapsible Outlines checkbox.
Save and preview your list in a browser (Adding Bookmarks) to see how your collapsible list works.
Use collapsible lists with caution. They work only in Internet Explorer. Also, even when they do work correctly, they suffer from another drawback: when you're looking at a collapsible list within a browser window, the parent items don't give any indication that they're clickable, as shown in Figure 2-12.

Figure 2-12. Collapsible lists have potential but suffer from a serious display drawback. In the browser window on the right, two parent items are still collapsed. Running your cursor over the selection displays only an I-beam shaped edit cursor (which you can see within the "Rain Gear" heading). A visitor to your site will have a hard time understanding that he should click on "Rain Gear" to see the rest of the items in that list. Most people are used to seeing their cursor change from an arrow into the "press here" pointer shown over the Google hyperlink. This means that you should probably include some indication within your text or through nearby images that your list items are clickable.
Other Lists
FrontPage has some additional list options, which also appear within the List dialog box. The styles discussed below are less popular than those already covered, but you might find them handy.
Definition list
This format is designed for dictionary-style entries, in which one line for a word or phrase is set apart from its definition. If your site features a glossary, definition lists are a handy formatting tool.
You create definition lists using the Style list on the Formatting toolbar.
-
Type a term, leaving your cursor on the same line as the term.
-
From the Style drop-down list, select Defined Term and then press Enter.
-
Type the term's definition.
Take another look up at the Style drop-down menu. FrontPage has set it to Definition for you. Press Enter when you're done writing your definition.
-
Type the next term.
FrontPage automatically formats each line with the appropriate alternating style so you can keep typing continuously.
-
When you're finished with the list, press Enter twice.
FrontPage returns you to Normal text style.
You can also apply definition list styles to existing text. Click in the appropriate paragraph and use the Style drop-down list to apply either the Defined Term or Definition style.
The definition can also appear on the same line as the term, but only if the term is very short. To get this format, turn on the Compact Layout checkbox within the List Property dialog box. If you don't see a change, your term is too long.
Menu and directory lists
The two least-used list styles are Menu and Directory. Menu lists are appropriate for one-line entries, and directory lists are used for very short one-line entries. A directory list is actually supposed to display as columns across the page. However, the style doesn't work in most browsers. Developers designed both these lists to display more compactly than a regular bulleted list. But unfortunately, you can't see any discernible difference between these selections and a regular list. So, you may as well just use a regular bulleted list.