FrontPage offers a spreadsheets and charts Web component that lets you do just that. You can insert what's essentially a miniature version of Excel within your Web page. This component can be in spreadsheet, chart, or pivot table format, and your viewers can interact with it, using some limited Excel controls.
Sounds great. So what's the catch? Your visitors need to be completely Microsoft equipped in order to see the component, otherwise they'll be greeted with the not-so-friendly message shown in Figure 18-6. In other words, if you want visitors to see your spreadsheet, not only will they have to view the page with Internet Explorer (version 5.0 or later) and have Excel installed on their system, they'll also need to have Microsoft Office Web Components installed. Office Web Components are automatically installed during a default installation of Office 2003. You can also install them separately from the Office Resource Kit (for more info, visit www.microsoft.com/office). Because of this, you should probably use this feature only if you're sure your visitors have all this software installedas in a corporate intranet, for example. Due to these requirements, Web developers rarely use these components for pages destined for the broader Internet.
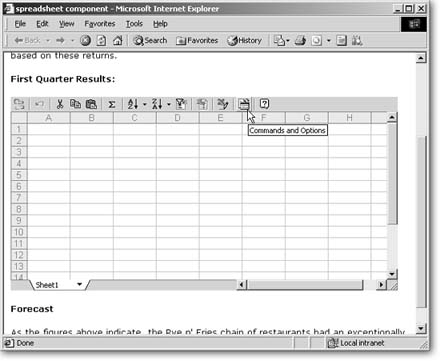
It's a mini-Excel application right inside your Web page. Inserting a spreadsheet as an Office component creates a kind of window into your Excel spreadsheet that visitors can use to view and manipulate data. The Commands and Options button is available to authors in FrontPage, and also to visitors viewing the component in a browserthough, as you'd expect, the choices for each differ (as you'll see in a moment).

When you try to view a spreadsheet component in a non-IE browser, your visitors will just see this big "missing" message.
Spreadsheet and chart components also require the presence of FrontPage Server Extensions on your Web server.
While this is a nifty interactive feature, you'll find that its use is limited. For instance, you can't save any visitor entries to an Excel file or any kind of database. This feature is really just for on-the-fly calculations that might help your readers figure out a monthly payment or special discount.
Adding a Spreadsheet Web Component
Inserting a spreadsheet component is a snap. First, open or create the page you'd like to place it on. Place your cursor where you want the component to appear. Select Insert » Web Component to open the Insert Web Component dialog box. Within the Component type list on the left, select Spreadsheets and Charts. Then, within the list that appears in the pane on the right, select Office Spreadsheet and click Finish. The spreadsheet appears on your page.
If the Spreadsheets and Charts option is grayed out, select Tools » Page Options and turn on the ActiveX Controls checkbox.
Enter whatever data you want the spreadsheet to contain.
If you have an existing spreadsheet you want to display, it's actually easier to start the process in Excel. In Excel, choose File » Save as Web Page. Within the Save As dialog box that opens, click the Selection: Sheet radio button and turn on the Add Interactivity checkbox. Then click Publish, and the program inserts the sheet as an interactive spreadsheet component within that page. You can also copy the desired cells out of Excel and then paste them inside your spreadsheet component (select cell A1, then press Ctrl+V or click the Paste button on the Standard toolbar).
Configuring the spreadsheet component
When you add a spreadsheet component, FrontPage gives both you and a visitor viewing the file through a browser some controls over spreadsheet display and behavior. As the all-powerful creator, you obviously have more options and can even limit what visitors can and can't do with your spreadsheet.
You and your visitors access these controls by clicking the "Commands and Options" button in your spreadsheet component's toolbar to see what this looks like). When you click this button, you can set all the options you're about to read about. When site visitors click this button, the more limited dialog box shown in Figure 18-7 displays.
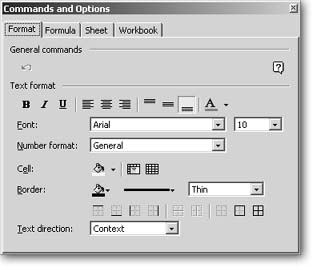
Visitors probably won't find much use for the limited options they have in this Commands and Options dialog box. For instance, formulas can be manipulated directly on the spreadsheet.
The Commands and Options box that authors see has a few more bells and whistles.
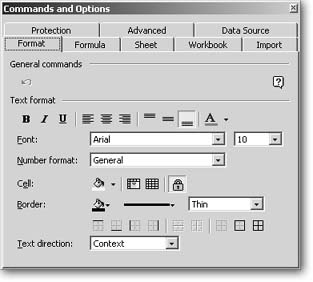
The author's Commands and Options dialog box contains additional tabs. You'll use these tabs to decorate your Webbased spreadsheet and also to control what appears in the visitors' Commands and Options box.
To open the Commands and Options dialog box, click the Commands and Options button on the Excel toolbar at the top of the component. The tabs in this dialog box let you do the following:
-
Set display preferences. You probably won't need to change the component's decorative scheme, but if you want to, click the Format tab to do things like change font color and alignment, or cell background. If you want to hide grid lines, Excel's gray column headers (A, B, C, and so on), or row headers (1, 2, 3, and so on), click the Sheet tab and turn off those checkboxes.
To resize the entire component, you can drag any of the eight handles (small black squares) that appear around its border when you select it.
-
Name worksheet(s). When you insert a spreadsheet component, FrontPage actually creates three worksheets, which all compose one workbook. Click the Workbook tab within the Commands and Options dialog box to change their names. If you have only one worksheet, you can turn off the sheet selector checkbox so visitors won't switch out of it. Or select empty sheet names in the pane at bottom and click Delete to remove them.
-
Set visitor controls. What do you want your visitors to be able to see and do? For example, you may not want to give them access to the spreadsheet toolbar. If that's the case, click the Workbook tab and turn off the toolbar checkbox. You can choose to hide scrollbars by turning off either scrollbar checkbox on this tab, too.
You can further define visitor abilities by clicking the Protection tab within the Commands and Options dialog box as explained in Figure 18-9.
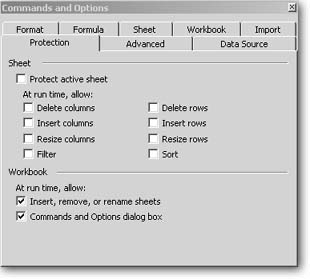
The Protection tab lets you control visitor actions. The "Protect active sheet" checkbox acts as a master switch, which locks the spreadsheet, preventing any edits or manipulation. If you turn it on, you can then choose to allow select actions by turning on their checkboxes. The term "at run time" refers to the point at which a viewer opens the page containing the spreadsheet in a browser.
Make your spreadsheet read-only if you want, by turning on the "Protect active sheet" checkbox. Doing so prohibits visitors from entering or manipulating data in any way. You can also allow some select functions by turning on checkboxes underneath the "Protect active sheet" checkbox. For instance, you can lock the sheet from edits but allow viewers to sort information by turning on the Sort checkbox.
If you don't want viewers to have access to the Commands and Options dialog box, turn off the "Commands and Options dialog box" checkbox at the bottom of the Protection tab. If you just want to stop visitors from creating or deleting worksheets, then turn off the "Insert, remove or renamesheets" checkbox just above that. If you do so, FrontPage removes these options from the visitor's Workbook tab within their Commands and Options dialog box.
Import data.The spreadsheet component is a simple and limited feature. You're not going to use it to display data from a database. However, you can import data if it's in the form of an HTML file, comma-separated text file (.csv), or an XML file. To do so, open the Commands and Options dialog box and click the Import tab. Select the appropriate file type, then browse to and select the file and click Open. The path and file name appear on the Import tab. Click Import Now and FrontPage populates your spreadsheet component with data from the file.
Adding an Office Chart Web Component
The spreadsheet component is great, but what if you want to present data in a graphical format that can really help visitors understand the figures? In that case, you can use the Office Chart Web component.
This works a lot like the spreadsheet component, but instead of a spreadsheet, visitors can look at a bar graph or pie chart to analyze and manipulate data.
To turn your spreadsheet into a pretty picture, do the following:
-
Create a spreadsheet component on a page.
Follow the instructions in the last section for inserting a spreadsheet component. For the Chart component to work, you need to name it. To do so, right click the edge of the spreadsheet component and then select ActiveX Control Properties. Within the ActiveX Control Properties dialog box that opens, click the Object Tag tab. Type a name within the Name box. Don't use spaces or special characters.
-
Insert the chart.
Place your cursor to the right of the spreadsheet component. Select Insert » Web Component to display the Insert Web Component dialog box. Within the list on the left, select Spreadsheets and Charts. Then in the list that appears on the right, select Office Chart and click Finish. A Commands and Options dialog box displays.
-
Select the data source.
You have three data options:
-
If you want to enter data manually, click "Data typed into a data sheet." Then click Data sheet and enter the information you want your chart to show.
-
If you want to display data from a database, select "Data from a database table or query," and then click Connection to browse to and connect to it.
-
If you want to use the spreadsheet on your page, select the third choice, "Data from the following Web page item." Then select the spreadsheet from the list below. Next, set a range of cells. To do so, click Range and enter the range of cells that contain the data you want to show. For example, if you enter A1:F8, the chart would display cells A1 through F8. Then click OK.
-
-
Choose chart type.
Click the Type tab in the Commands and Options dialog box and select a chart style.
-
Save settings.
Click outside the dialog box to save your settings. A chart appears on your page.
Test your chart in a browser.

Figure 18-10. You can use a chart to illustrate a spreadsheet you've posted. If visitors edit figures in the spreadsheet, the chart changes to reflect the new values.
If you want to let visitors change the chart type and other view options, you can give them a toolbar and a Commands and Options dialog box. To do so, right-click your chart component and then select ActiveX Control Properties. Click the Show/Hide tab and turn on the toolbar checkbox and the "Commands and Options dialog box" checkbox.
Pivot Table
Pivot tables are a way to glean essential figures when you've got lots of data. Say you've got several months worth of sales data for a bunch of different products, and you want to know which products are selling and which aren't. A pivot table helps you find the answer by quickly and easily sorting through all the info stored in your table.
Since you're connecting to a pivot table you created, you already have an Excel file filled with data. So, begin by opening Excel.
Next, follow all the steps for converting an Excel file into a Web file. When you do so, add the following steps: within the initial Save As dialog box, turn on the Add Interactivity checkbox and then click Publish. A "Publish as Web Page" dialog box displays. Within the "Add interactivity with" dropdown list, select "PivotTable functionality" and click Publish.
Excel creates a Web page, which includes a pivot table Web component.
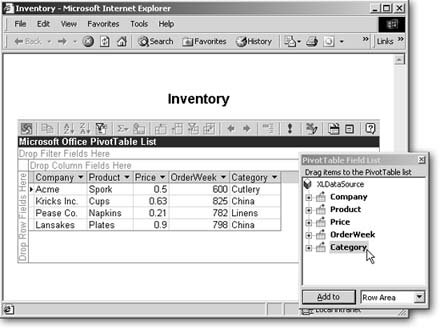
Figure 18-11. Site visitors can manipulate a pivot table just as they would in Excel.