Basic Proofreading
As you'll see, FrontPage offers lots of tools to help you present a polished, professional site. But, your best tools are your own two eyes (or, even better, enlisting someone else as a dedicated proofreader). Read each page carefully as you create it. Test all your pages in a browser to make sure everything works correctly (you'll learn how to do that on Testing With Different Browsers). Does everything look the way it should? Confirm that the page has the right color scheme and that pictures appear where they're supposed to.
Checking Spelling
If your eyes tend to fail you now and then, you can lean on FrontPage. Even a crack proofreader might miss an error or two. In any case, FrontPage can help you check your spelling.
Checking spelling automatically as you type
You may already have noticed that as you type, FrontPage underlines misspelled words with a red squiggly line. This is your first line of defense. As soon as you see the line, ask yourself "Is it me? Or is it FrontPage?" FrontPage doesn't recognize a lot of wordslike your unusual last name, or other items that don't show up in its dictionary. On the other hand, if you see the word "galoses" where you meant to type "galoshes," go back and fix it by right-clicking the word to make a speedy correction (see Figure 12-1).
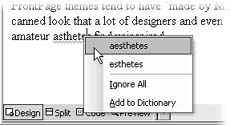
Figure 12-1.
If those squiggly lines annoy and distract you, you can turn this feature off. Select Tools » Page Options and click the General tab. Then turn off the "Check Spelling As You Type" checkbox. But actually, there's a sneakier way. If you leave that checkbox on, and then also turn on the checkbox underneath it, "Hide Spelling Errors in All Documents," FrontPage stops pestering you with squiggly lines, but the program continues to tally up your errors. This can help later on, if you decide to run FrontPage's spell checker yourself. FrontPage will already have all the information, and you won't need to wait for the program to run a full check.
Manually running FrontPage's spell checker
Maybe you don't mind a few spelling errors while you're composing your pages; you prefer to leave proofreading until you're ready to publish. If so, it's easy to run the spell checker yourself. FrontPage tosses up a dialog box for each misspelled word, forcing you to correct or actively ignore it.
Just follow these steps:
-
Open the page you want to check.
If you want to check only one word or a paragraph, you can start by selecting the suspect text.
-
Unleash the spell-checking hounds.
To trigger the spelling command, select Tools » Spelling, or click the Spelling button on the toolbar, or press F7. FrontPage displays a prompt asking if you want to check selected pages or the entire Web site. Make your pick and click Start.
The Spelling dialog box displays, showing the first word it's found that's not in the program's dictionary (see Figure 12-2).
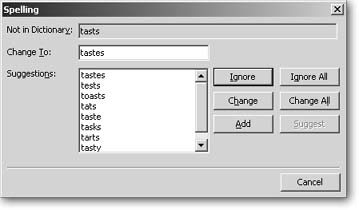
Figure 12-2. The Spelling dialog box lists likely alternatives for your misspelled word. If you know you misspelled the word more than once on your page, click Change All, and FrontPage corrects all instances at once.
-
If the "Change to" field is correct, click Change.
FrontPage shows a list of suggestions, with the most likely candidate already in the "Change to" field. If you want to replace the mistake with a word from the Suggestions box, double-click it, or select it and click Change. If FrontPage gets all its suggestions wrong, but you still want to change the word, you can type your own correction by just typing right in the "Change to" field.
-
If the word is correct, tell FrontPage to ignore it.
You can tell FrontPage to ignore a word in one of three ways:
-
Click Ignore and FrontPage doesn't change the word, but will flag it again the next time it sees it spelled that way.
-
Click Ignore All and the program ignores all instances of the word throughout the rest of the page.
-
Click Add to add the word to FrontPage's dictionary. If you do so, the program will never flag the word again. You may want to add items like company or staff names to the dictionary, so they don't keep popping up.
-
-
End the spell check.
When the spell check finishes, FrontPage alerts you with a small prompt letting you know you've completed the check. Click OK.
Checking spelling on multiple pages
You can also check spelling on many pages at onceeven across your entire site. To do so:
-
Select the pages you want to check.
Within the folder list, select multiple pages or highlight the folder that holds your entire site.
-
Check spelling.
To trigger the spelling command, select Tools » Spelling, or click the Spelling button on the toolbar, or press F7. FrontPage displays a prompt asking if you want to check selected pages or the entire Web site. Select your preference and click Start.
The dialog box then displays a list of pages that contain misspellings (see Figure 12-3).
Attention procrastinators! If you turn on the "Add a task for each page with misspellings" checkbox and click Start, FrontPage ends the spell check and creates a task for each page's spell check (see Collaboration Tools, Assigning Tasks, for more on tasks). Later, you can double-click one of these tasks to re-initiate the spell check and pick up where you left off.
-
Make corrections.
If you double-click the first page in the list, FrontPage opens it in Design view, so you can correct spelling errors (pop back to steps 2 and 3 in the preceding section for instructions).
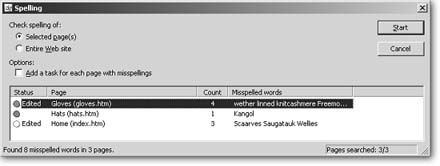
Figure 12-3. FrontPage shows you the number of errors it found on each page in the Count column and lists misspellings in one continuous line to the right. Once you make some corrections, the Status column on the far left tells you which pages you've already edited.
Most of the time, you'll want to begin with the first page in the list. This way, FrontPage leads you in order through each page's corrections. If you start in the middle, the program won't include the pages that precede your starting point in the list. However, the Spelling dialog box always shows you which pages you've edited and which you haven't (see Figure 12-3), so you can initiate another correction session to tackle the rest of the list.
Once you've corrected all misspellings on one page, FrontPage displays a "Continue with Next Page?" dialog box. To move on and make corrections on the next page, click Next Page. You can continue like this through all the pages that feature errors. If you want to return to the Spelling dialog box (in Figure 12-3) instead, click Back to List. Once you've made all your corrections, click Back to List (your only option).
-
Click Cancel to close the Spelling dialog box.
FrontPage's spell check scours your pages for errors, but the tool doesn't examine elements like page titles and comments. While only other developers will see an error in a comment, page titles display in a browser's title bar for all the world to see, so make sure you check for errors on your own.
Find and Replace
Imagine that you've spent many weeks creating a series of Web pages about your new product, which is called the Amazing Doohickey. At the last minute, the bigwigs at corporate HQ order you to change the name to the Marvelous Thingamabob. Meanwhile, the old name already appears throughout your site. It's in included content snippets, in regular page text, and…well, you don't even remember all the places it pops upthere are so many. How are you going to find all the instances and correct them?
Easyyou're not. FrontPage is going to find and replace them all for you.
Find and replace does just what it sounds like. It takes one word or chunk of text (like doohickey) and replaces it with another (thingamabob). This feature is great for correcting mistakes, making site-wide edits to specific terms, and even sometimes just locating a snippet of text that you may be looking for.
Finding text
The first step in the process, is of course, searching for instances of the text you want to replace. You can also use this feature to hunt down a word or phrase that you're looking for.
To locate text:
-
Decide which page or pages you want to search.
If you just want to search one page, place your cursor at the top of the page. If you'd like to search your entire site, select your site's folder in the folder list. You can also search through a collection of pages by selecting them in the folder list (press the Ctrl key as you select each page to highlight a group of pages).
-
Initiate the search.
Select Edit » Find, click the Find button on the Standard toolbar, or press Ctrl+F. The Find and Replace dialog box opens (see Figure 12-4).
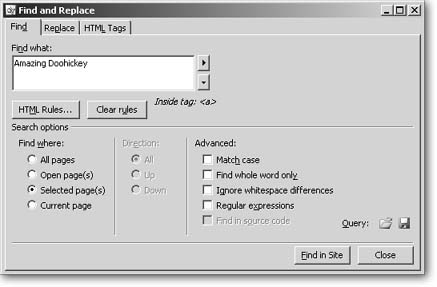
Figure 12-4. The Find and Replace dialog box features three tabs. Use the Find tab if you just want to track down a particular word or phrase. Use the Replace tab to find and replace text. If you want to find or replace HTML tags, click the HTML tags tab.
-
Tell FrontPage what you're searching for.
In the "Find what" field, enter the text you want FrontPage to locate.
-
Set your search parameters (optional).
If you need to, you can create a very specific search that includes information about where an item appears within your HTML code. Say you want to find a word or phrase, but only where it occurs within a hyperlink. To set this parameter, click HTML Rules. (HTML Rules tells FrontPage exactly where or where not to look.) In the dialog box that opens, click "New rule" in the main box. In the drop-down list on the bottom left, select "Inside tag" (because you want to find the word only where it appears inside a hyperlink tag). In the drop-down list that appears just to the right, select the <a> hyperlink tag, and then click OK.
You could also do the opposite. Say you want to find some text, but in any place except where it appears in a hyperlink. Just follow the steps above and select "Not inside tag" instead of "Inside tag." FrontPage then ignores all instances of the text wherever it's part of a hyperlink.
You can narrow your search even further, if you want. Once you've selected a tag within the HTML Rules dialog box, FrontPage displays some additional choices in the New rules drop-down list on the lower-left corner of the dialog box. You can specify whether or not the tag you're searching within (or excluding, depending on your first choice in this dialog box) has special attributes (for example, the destination of a hyperlink or a style you attached to a tag). You can even tell FrontPage which attribute it should have (see Figure 12-5). You can also specify whether or not a tag contains some other text or an element like an <img> image.
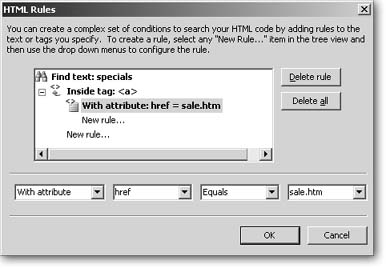
Figure 12-5. You can customize rules to search for instances of text inside a tag and even specify tag attributes. For example, the rules attached to the search shown here require that FrontPage find the word "specials" only where it occurs inside a hyperlink <a> tag and only when that link leads to the sales.htm page (attribute href). To add another attribute rule here, you'd click the "New rule" entry indented beneath the tag. If you want to add another tag, click the "New Rule" entry at the bottom.
-
Choose additional settings (optional).
Once you return to the Find and Replace dialog box (see Figure 12-4), you can use some checkboxes to help you modify your search:
-
Match case creates a case-sensitive search. In other words, if you turn this on, a search for "Caboose" wouldn't find "caboose," because the latter doesn't start with a capital letter.
-
Find whole word only returns the text where it's surrounded by spaces. For example, a search for "are" would return the word "are" but not "aren't" or "tartare."
-
Ignore whitespace differences treats all spaces as one. So, the search would find instances of a string of words with any number of spaces1, 3, or 10 between them. For example, a search for "enormous herring" would return both "enormous herring" and "enormous herring."
Finding a Pattern
Say your boss doesn't like the way you've entered telephone numbers. You've included them in this format: 800- 555-1212. But your boss prefers phone numbers to be written like this: (800) 555-1212. You'd like to do a search to find all the phone numbers, but they're made up of all different numbers. How can you find them all?
FrontPage 2003 has a new search feature that saves the day. You can search for a pattern of text. In the situation above, you'd search for chunks of text that fall in the pattern: xxx-xxx-xxxx. The actual content of the text string (the collection of characters) doesn't matter. Instead FrontPage searches that particular 10-digits-broken-up-by-two-dashes format.
But if you want, you can also specify some specific characters. Say you want to find a certain kind of word. For instance, a co-worker has been including contractions in her prose, which isn't the formal tone your boss prefers. You can search for any word that includes an apostrophe. When you search for a pattern like this, you're using what mathematicians call a regular expression.
To conduct such a search, select Edit»Find and turn on the "Regular expressions" checkbox. Next, enter your search parameters in the "Find what" field. You'll do this using a special combination of characters. Here are some of your building blocks:
-
A period stands for "any character." So, to find a phone number pattern, you could enter: …-…-…. to find instances of telephone numbers.
-
An asterisk means that the character that precedes it ("i" in the example that follows) can appear any number of timeseven zero. Search for "tri*p" and you'd find "trip," "triiip," or even "trp."
-
A + stands for one or more of the character that directly precedes it. So a search for "ha+t" would bring "hat," or "haaaaa,t" but not "ht" or "hart."
-
A backslash tells FrontPage that the character following the backslash should be exactly that character. For example, entering "poo\c\h" would return only "pooch." Of course, you can achieve the same effect by just searching for the word "pooch," so why bother? Well, what if you wanted to search your site for a +? In the Find dialog box, FrontPage treats a + as part of a regular expression. You can use the backlash to say to FrontPage "Hey, I'm really looking for an actual plus sign." Do so by entering "\+" in the "Find what" box.
-
Square brackets can find any one of the characters you put between them. If you enter "p[oiu]t, FrontPage would return "pot," "pit," or "put," but not "pat" or "pet."
If you want to learn even more expressions, check out FrontPage's Help file (select Help»Microsoft Office FrontPage Help or press F1) and type "Regular expressions" in the search box.
Once you've entered your expression, set the scope of your search in the "Find where" section and click Find Next (or Find in Site). FrontPage returns all results.
-
-
To learn about the Regular expressions option, see the box "Finding a Pattern."
-
Find in source code looks through regular page text and HTML code, too.
-
-
Find.
Click Find Next or Find in Site to spur FrontPage into action.
Find and Replace HTML
Say you get a new boss, who's an absolute HTML purist. She wants you to get rid of all <font> tags in your Web site. The staff will be using straight CSS from now on. No problem. You can do a find and replace operation within your site's HTML code just like you can in your site's regular content.
Open the Find and Replace dialog box (by pressing Ctrl+H, or using any of the methods you learned in the previous section). Click the HTML tags tab. In the Find tag drop-down list, select the tag you want to find. In the Replace Action drop-down list, choose from the following options:
-
Replace tag and contents replaces the tag and anything the tag contains (even other tags and their contents).
-
Replace content only replaces all text that the tag encloses.
The next four options do just what each one says:
-
Add before (after) start (end) tag lets you slip in some content just in front of or behind a start or ending tag.
-
Remove tag and contents deletes a tag and everything it contains.
-
Remove tag deletes only the tag. Contents remain.
-
Change tag lets you change one tag into a different tag. For instance, change all your <i> italics into <b> bold format.
-
Set attribute value adds or replaces a tag's attribute. For instance, <table> could become <table width="50%">
-
Remove attribute strips the tag's attribute out. You could use this setting to remove the background color of table cells (<td> tag), or change the alignment of >h1> (Heading 1) paragraphs, for instance.
You might not always want to find a tag. Maybe you're looking for some other passage of HTML codelike a phrase that appears in an HTML comment, for instance. If so, open the page in Code view and do a find and replace just as you would in Design view.
So, armed with all this information, you can easily get rid of those font tags mentioned earlier. To do so, open the Find and Replace dialog box and click the HTML tag tab. Click the "Find tag" drop-down list and select Font. Then within the "Replace action" drop-down list, select "Remove tag" and click Replace All. FrontPage strips all the font tags out of your pages, leaving a lot of text unformatted. Now you can go ahead and apply CSS styles to jazz up your site efficiently. (Flip back to Cascading Style Sheets to learn about using CSS.)

If you're searching within one page, the program highlights the first instance it finds. Click Find Next to move to the next match. Then repeat that sequence for the entire page. FrontPage tells you when it can't find anymore occurrences.
If you're searching many pages or an entire site, FrontPage lists (within the Find dialog box) search results grouped according to each page. Double-click a page to open it and see each instance that's been found.
Replacing text
If you want to replace text that you've found with some other text, you can start by selecting Edit » Replace or pressing Ctrl+H. Or, if you've already set up your search, you can also just click the Replace tab within the Find and Replace dialog box. The only new field that appears in the Replace tab is the "Replace with" field. Here you'll enter the text that should take the place of the text you asked FrontPage to find. To proceed from there, the dialog box offers the following options:
-
If you want to make all the changes in a snap, click Replace All. FrontPage finds every instance of the term you searched for and replaces it with the text you entered in the "Replace with" field.
-
If you'd rather make changes on a case-by-case basis, click Find Next. FrontPage takes you to the first instance. If you click Replace, the program makes the change. If you don't want to edit a particular instance of the search term, just click Find Next again to move on to the next instance.