When you save results to a database, FrontPage gives you three options: you can save results to a new database that FrontPage creates for you, you can update a database that FrontPage previously created for you, or you can save results in an existing database.
To save results to a database, your Web server needs to be running both FrontPage Server Extensions 2002 (the latest version) and Active Server Pages Extensions. This feature won't work on a Web server with SharePoint Services installed.
Creating a New Database with FrontPage
You can turn any HTML form into a database, if you want. FrontPage can take your field names and generate an Access database to hold your visitor's entries. It's astoundingly easy. After you've created your form, do the following:
-
Open the Form Properties dialog box (right-click the form and select Form Properties), click "Send to database," and then click Options.
The Options for Saving Results to Database dialog box opens.
-
Within the Database Results tab, click Create Database.
FrontPage creates an Access database with a .mdb extension.
A prompt appears letting you know the database has been created and telling you the database name (FrontPage uses the name of the HTML file the form is in) and location (a folder FrontPage creates within your site called fpdb).
-
Click OK to close the prompt and then twice more to close both open dialog boxes.
If you've created the form yourself, FrontPage then prompts you to save the page your form is on as an ASP page. You must do this for your new form results settings to work. Then click OK to close the prompt. On the other hand, if you've created the form using one of FrontPage's form templates, the program automatically saves the page as an ASP page for you.
-
If FrontPage didn't change the file type of your Web page for you, change the file extension from .htm to .asp.
Within the folder list, right-click the file and select rename. Replace the file suffix, htm, with the letters asp.
-
Save the file.
Make sure your Web server supports Active Server Pages. Ask your host or Web site administrator.
Updating a Database
FrontPage has created a nifty little database for you, but what happens if you need to add or remove a form field? Will doing so mess up your database? NopeFrontPage is pretty flexible in this department. First, make whatever changes you want to your form. Then open Form Properties, click Options, and then click Update Database. FrontPage updates your database to match your form. Magic.
Saving Results to an Existing Database
What if you have an existing database that you want your form fields to feed into? FrontPage can help you out even though the program's fairly late (compared to its competitors) in providing this service. However, you'll have to help out with some tweaks here and there.
One major limitation when you save results to a database is that FrontPage can only save form data to one table per form. If your form has fields that feed into more than one of your database's tables, forget it. In that case, you'll need to save results to a text file or single table database and then import them into your existing database somehow. Or just create separate forms for each table.
-
Configure the form to send results to a database.
To link to a database, open the Form Properties dialog box (right-click the form and select Form Properties), select "Send to database," and then click Options.
-
Select the database connection.
If you've already connected to the database, select the connection name from the "Database connection to use" list. If you need to add a connection, see the next section for detailed instructions.
-
Match form fields to database fields.
Within the Options dialog box, click the Saved Fields tab. Here, match up fields in your form with fields in the database (see Figure 16-4).
-
Click OK to close all dialog boxes and save your settings.
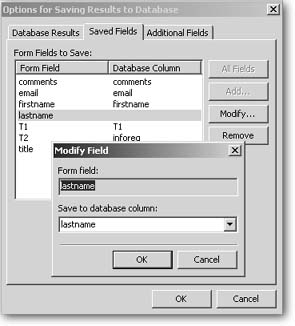
Figure 16-4. Double-click a form field in the "Form Fields to Save" list to display this Modify Field dialog box. Select the column in the database that you want to receive the values entered in the form field. If names match between the form and the database, FrontPage makes an educated guess for you.