The Problem:
The way we've got mail merge set up at the moment, I have to go through the letters in the merge document to check them for blank lines in awkward places, fill in any missing information ("Dear [blank] Smith" doesn't cut it), and make sure we're not sending any letters to Delaware (don't ask). As you can imagine, this takes almost as much time as the merge itself saves.
The Solution:
It sounds as though you could smarten up the mail merge a lot by using sorting, filtering, and If fields.
Use filtering and sorting
Unless you create a data source specifically for your mail merge and it's manageably small, chances are that your data source for the mail merge will be imperfect, with some fields blank and others containing the wrong type of information. Word's filtering capabilities and its fields can help you avoid consequences from the imperfections in your data source. Sorting can help put the merged documents in the best order for whatever you're going to do with them.
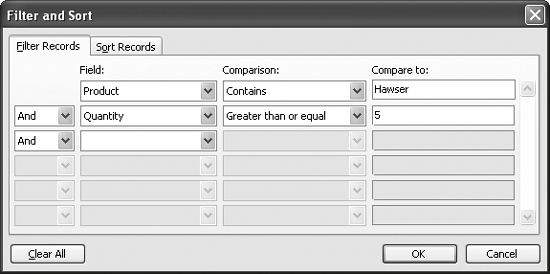
To use filtering on your mail merge, in Word 2003 or Word XP, click one of the "Edit recipient list" links in the Mail Merge task pane or wizard, click the Edit button in the Mail Merge Recipients dialog box, and then click the "Filter and Sort" button to display the Filter and Sort dialog box (see Figure 9-8). In Word 2000, click the Query Options button in the Mail Merge Helper dialog box to display the Query Options dialog box, which is the Filter and Sort dialog box by its earlier name.
Figure 9-8. Filtering enables you to narrow down the records in your database to match only specific criteriain this case, customers who bought five or more hawsers.

The Sort Records tab lets you sort the records in your database by one, two, or three fields; for example, you might sort records by city, then by last name, and then by first name. For each sort field, you can choose between ascending order (A to Z, low numbers to high) and descending order (the reverse).
Use If fields
Word's If fields enable you to enter specific text if a condition is true, and other text if it is not. The If fields give you great flexibility in your merges.
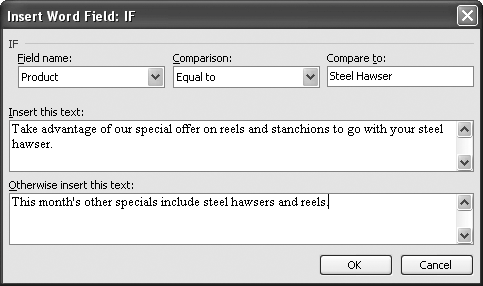
To use an If field, click the Insert Word Field button on the Mail Merge toolbar and choose "If... Then... Else..." from the pop-up menu. Set up the condition in the Insert Word Field: IF dialog box (see Figure 9-9): select the field name, the comparison type ("Equal to," "Not equal to," "Less than," "Greater than," "Less than or equal," "Greater than or equal," "Is blank," or "Is not blank"), and the text for the comparison (for any comparison except "Is blank" or "Is not blank"). Then type the text strings in the "Insert this text" and "Otherwise insert this text" boxes. Word displays the "Insert this text" string in the document until you perform the merge.
Figure 9-9. If fields let you customize the text of your mail merge documents depending on a condition.

If fields tend to be the most widely useful, but Word offers eight other field types (on the Insert Word Field drop-down list) that you should investigate if you need to perform complex merges. The next most useful field is probably the "Skip Record If" field, which lets you skip the current record if the comparison is true. Ask fields and Fill-in fields, which let you prompt the user for information as the merge runs, are also sometimes useful.