The Problem:
Okay, I've got the hang of direct formatting: bold, italic, and all the font jazz; indents, line spacing, keep-with-next-and-don't-leave-it-hanging-out-alone-at-the-end-or-start-of-a-page, space before and after, and all that. But I can't get the hang of styles. How do I add them to the formatting I've applied?
The Solution:
You don'tit's the other way around. Styles should be the basis of all the formatting you apply in Word. You'll be able to lay out your documents far faster, and with much less effort, by using styles rather than direct formatting.
Here's the best way to start using styles:
-
Make a list of all the different paragraph types you'll need to use in a particular set of documents: headings, body text, various types of lists (numbered, bulleted, sublists, etc.), figures, tables, captions, notes, and so on. You will create paragraph, list, and table styles for each of these items.
-
Make a second list of all the items within paragraphs that will need different formatting appliedfor example, bold, italic, bold and italic, subscript, superscript, or underline. You will create character styles for all of these items.
-
Create a new template for the documents. Save it, but don't close it.
-
In the template, create a new paragraph, list, or table style (or modify an existing style) for each of the elements.
-
Still in the template, create a new character style for each of the character styles you identified.
-
Turn off the "Update automatically" option for each style (more on this shortly).
-
Test the template by entering text in it and applying the styles. Change the styles as necessary.
-
Delete the text in the template, and set the remaining paragraph to the style with which you want each new document based on the template to start.
-
Save the template, close it, and start a document based on it.
Create a new style
To create a new style, take the following steps:
-
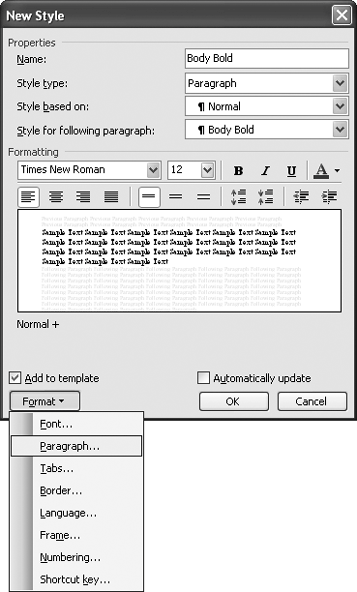
With the template open, choose Format » Styles and Formatting to display the Styles and Formatting task pane, and then click the New Style button to display the New Style dialog box (see Figure 4-10). In Word 2000, choose Format » Style, and then click the New button in the Style dialog box.
-
In the New Style dialog box, type a descriptive name for the style and specify the style type: Paragraph, Character, Table, or List.
By giving your styles names that start with a word they have in common, you can make them appear close to each other in Word's style lists. For example, styles named "Body Italic" and "Body Special" will appear close to each other and be easy to apply, whereas "Italic Body" and "Special Body" will be widely separated and harder to find in the list.
Figure 4-10. Set up the formatting of a new style in the New Style dialog box. The Modify Style dialog box offers almost exactly the same controls.
-
For a paragraph style or a table style, select the style on which the new style is based. The new style picks up all the formatting of the base style, which you can then change as needed. This enables you to create new styles quickly, but bear in mind that if you change the base style afterwards, the new style will inherit those changes. For a paragraph style, select the style for the following paragraph as well. For example, after a heading style, you might want a body text style.
-
Use the controls in the Formatting area to adjust the font formatting, alignment, spacing, and indentation. To make further adjustments, click the Format drop-down list and choose the appropriate item from the pop-up menu.
The "Add to template" box controls whether a change you make to the style in a document is added to the document's template. When you're editing a style within a document, you must check this box to make Word save the changes back to the style in the template. When you're editing a style in the template itself, you don't need to check this box (although there's no harm in checking it).
-
If you want Word to update the style automatically when you change a paragraph that has the style applied, and then reapply the style throughout the document, check the "Automatically update" box. Usually it's best to uncheck this box and to update your styles manually. (This box doesn't apply to character styles.)
-
Click the OK button to close the New Style dialog box, and then save your changes to the template.
Modify an existing style
You can modify either one of the styles you've already created or one of Word's built-in styles. To do so:
-
In Word 2003 or Word XP, choose Format » Styles and Formatting, click the style, click the drop-down arrow button, and choose Modify from the pop-up menu to display the Modify Style dialog box.
-
In Word 2000, choose Format » Style to display the Style dialog box, select the style in the Styles list, and click the Modify button to display the Modify Style dialog box.
If you're working in a document rather than in the template itself, remember to check the "Add to template" box if you want Word to apply the change to the template as well as to the document in which you're working.