The Problem:
Our office is moving from paper-based forms to online forms as part of our "Drive to Save the World." I've created online versions of most of the forms now, with plenty of space for people to fill in the relevant information. The trouble is, they tend to delete areas of the form that they think don't apply to them.
The Solution:
What you need is a Word form: a document that has fields for filling in information, and in which you can protect the areas that you don't want users to change.
To create a form, follow these general steps:
-
Create a document as usual, entering the necessary text, leaving gaps for the form fields that the users will fill in, and formatting the contents as needed.
You can also create a form in a template rather than in a document and then make it available to your colleagues in a workgroup templates folder shared on the network. However, a document kept on the network is usually easier to keep updated than a template.
-
Right-click the menu bar or any displayed toolbar and choose Forms from the pop-up menu to display the Forms toolbar (or choose View » Toolbars » Forms).
-
Use the three leftmost buttons on the Forms toolbar to insert text boxes, checkboxes, and drop-down lists as needed. Word puts a bookmark around each form field, so if you have bookmarks displayed, each form field appears within brackets. (To display bookmarks, choose Tools » Options, click the View tab, and check the Bookmarks box.) You can toggle field shading on and off by clicking the Form Field Shading button on the toolbar. Having the shading displayed while you're laying out the form helps you avoid deleting form fields by accident.
-
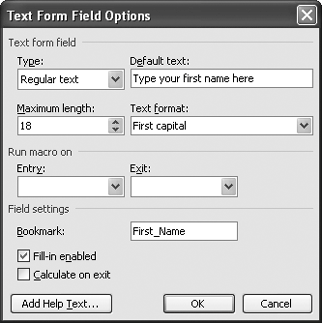
Double-click a form field (or select the field and click the Form Field Options button on the toolbar) to display the Form Field Options dialog box for the form field. Figure 5-1 shows the Text Form Field Options dialog box; the Check Box Form Field Options dialog box and the Drop-Down Field Options dialog box include checkbox- and drop-down-specific options but are otherwise almost identical. They include similar fields for running a macro on entry to and exit from the form field, the bookmark name for the field, a checkbox for specifying whether the field is enabled, and a checkbox for controlling whether Word calculates the field when the user leaves it.
You can add help text to a form field by clicking the Add Help Text button and working in the Form Field Help Text dialog box. You can choose between two forms of help text: text displayed in the status bar when the user accesses the field, and text displayed when the user presses F1 when the field is selected. This help can be useful for complex forms, but you should try to explain the contents of fields in the body of the form so that users don't need to rely on the help text, which they may not be savvy enough to access.
-
To test your form, click the Protect Form button (the button with the lock icon) on the Forms toolbar. Word then makes only the form fields accessible. You can move the selection from one field to another by pressing Tab, Page Down, or
 to move forward, or Shift+Tab, Page Up, or
  to move backward. Click the Protect Form button again to remove the protection.
 -
When the form is complete, protect it with a password so that others can't change it. Choose Tools » Protect Document. In Word 2003, check the "Allow only this type of editing in the document" box in the Protect Document task pane; choose "Filling in forms" in the drop-down list; click the Yes, Start Enforcing Protection button; and enter a password in the Start Enforcing Protection dialog box. In Word XP or Word 2000, select the Forms option in the Protect Document dialog box, type a password, and click the OK button.
Figure 5-1. Use the Form Field Options dialog box to control whether the form field is enabled (so that the user can fill it in) and to set the name of the bookmark that refers to it. The other options available depend on the type of form field: a text box (as shown here), a checkbox, or a drop-down list.
-
Save the document, and then make it available to the users who need to fill in the form. When a user opens the form, she can move quickly from one field to another, fill in the necessary information, and save the form under a name other than its current name (because the form is password-protected).
Word uses the term "form" to describe a document (or template) with areas that you fill in, but there's no reason to restrict your use of Word forms to documents that are considered to be forms in the conventional sense of the word. Word's form capabilities can be useful for many other sorts of documents, from business invoices to personal letters.