Unless a date is entered correctly, Excel won't recognize it as valid. This sometimes means you cannot perform calculations with figures that look like dates but aren't. It also means any charts or PivotTables based on these dates will not be valid. Although the use of Excel's very versatile validation feature (described in Built-in Features) can help with this, it is far from bulletproof.
With this tutorial, you can add the Calendar Control to any Excel workbook. To start, open the workbook for the calendar. It is a good idea to use your Personal.xls file for this, in which case you should first select Window » Unhide. If this option is grayed out, it means you do not have a Personal.xls file yet. You can create one easily by recording a dummy macro. Select Tools » Macro » Record New Macro and choose Personal Macro Workbook from the Store Macro In: box. Then click OK, select any cell, and stop recording. Excel will have created your Personal.xls file automatically.
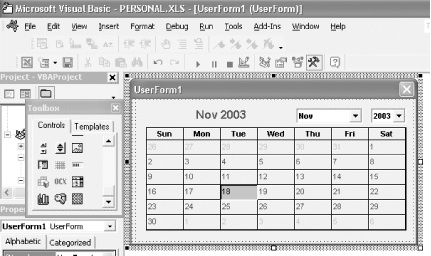
Next, select Tools » Macro » Visual Basic Editor (Alt/Option-F11) and then select Insert » UserForm from within the VBE. This should display the Control toolbox. (If it doesn't, select View » Toolbox.)
Right-click the Control toolbox and select Additional Controls. Scroll through the list until you see the Calendar Control 10.0 checkbox (the number will differ depending on the version of Excel you are using). Check the checkbox and click OK. Click the calendar that is now part of the toolbox and then click the UserForm you inserted earlier.
Using the size handles on both the UserForm and the Calendar Control, size the UserForm and Calendar Control to a reasonable size, as shown in figure.
Figure. Inserted Calendar Control
Make sure the UserForm is selected and then select View » Properties Window (F4). Select Caption from the Properties window and replace UserForm1 with the word Calendar. Now select View » Code (F7), and in the private module, add the following code:
 Private Sub Calendar1_Click( )
        ActiveCell = Calendar1.Value
End Sub
Private Sub UserForm_Activate( )
        Me.Calendar1.Value = Date
End Sub
Select Insert » Module, and in the public module, place this code:
Sub ShowIt( )
UserForm1.Show
End Sub
Close the window to return to Excel. Select Tools » Macro » Macros (Alt-F8) and then select ShowIt. Click Options, assign a shortcut key, and you're done. Just press your shortcut key, and the calendar will show with today's date as the default. Click any date and it will be inserted into the active cell.