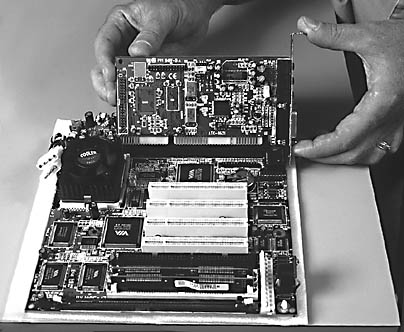
Figure 14.5 Motherboard and expansion card
Ask these questions first:
- Is adding a new card the most cost-effective way to make this upgrade, given the type of device and performance/capacity desired? In some cases a USB (universal serial bus) peripheral can offer the same features without requiring the case to be opened.
- Are there any expansion slots available? If no slots of the type required are available, you will have to make some room. To do that, you will need to do one of three things: replace separate, single-port cards with one multifunction card that provides all port connections; use a SCSI card and a chain of SCSI devices, if available; or use USB. if available.
- Will the card fit in the type of slot available? Does it match the bus type of the motherboard?
- Are there any available I/Os and IRQs in the system? If so, write them down.
- Is there enough memory (RAM and hard-disk) available to run the device and its software?
- Does the card require a DMA (direct memory access) channel? If so, is one available?
- What are the potential conflicts with other cards and devices?
- Will the software operating system support this card? If so, are all the necessary drivers provided with the operating system or will they have to be provided with the card?
After you have determined that the expansion card will work, the installation is a simple three-step process:
- Set any jumpers or switches for IRQ and I/O addresses.
- Install the card and cables.
- Install any software for the card.
Step 1 (IRQ and I/O setup) is perhaps the most confusing and frustrating part. This is especially true if the computer has not been properly documented.
IMPORTANT
Be sure to cover all slots. A missing expansion-slot cover can cause a computer to overheat. Be sure that no screws or other items are left loose inside the case that could possibly short out a component after the case is closed.
General Procedure for Installing an Expansion Card (Non-Plug and Play Capable)
A card that is not Plug and Play capable is a bit more complicated than one that is.
- Read the documentation that comes with the card and note any special requirements or limitations before you start the installation.
- Check the computer documentation (run MSD or other diagnostic program) and determine which IRQs and I/O addresses are available. Check the computer documentation (run MSD or other diagnostic program) and determine which IRQs and I/O addresses are available.
- Configure any jumpers or switches on the card. (See Figures 14.6 and 14.7.) Note that some cards might require changes in order to prevent conflicts and allow all devices to work.
-
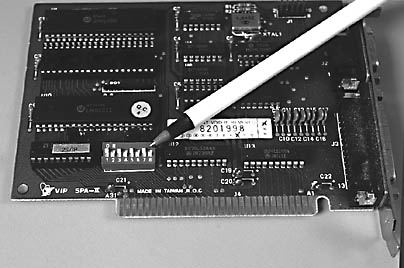
Figure 14.6 Switches
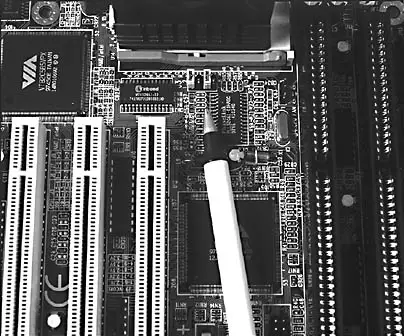
Figure 14.7 Jumpers
- Turn off the computer and unplug the power cord.
- Follow the appropriate ESD safety procedures.
- Remove the cover of the computer.
- Install the card in a free slot. (See Figure 14.8.) Power up the computer, note any conflicts, and make adjustments as necessary. Remember to remove power and use ESD precautions when making changes.
-

Figure 14.8 Installing an expansion card
- Replace the cover.
- Install any software drivers or applications.
General Procedure For Installing An Expansion Card (Plug And Play)
The latest technology available for installing expansion cards is called Plug and Play. This is an independent set of specifications developed by a group of hardware and software companies that allow the user to make configuration changes with minimal adjustment. Simply install the card, turn on the computer, and use the device.
In order for Plug and Play to work, the device must be able to identify itself and its system requirements to the system. The operating system will then set the device and make any other adjustments, such as reconfiguring other devices, as required. In order for a Plug and Play device to work immediately, you must be sure that the computer hardware-motherboard, BIOS, and other components-the operating system, and the device are Plug and Play-compliant.
TIP
If a device is Windows 95-compliant, it is Plug and Play-compliant, too, and can take full advantage of operating in a Windows 95 environment.
NOTE
In many systems you must enable Plug and Plug features in the system CMOS. (Failure to have the right settings will make installing a Plug and Plug card a difficult task.)