Communicating
The following sequence occurs as computer-to-printer communication is established:
- The operating system sends a request to the printer and is informed that the printer is online and ready to accept data.
- The PC starts sending data.
- During the printing process, the printer-if it is able to handle bidirectional communications-informs the computer of any problems encountered while handling the print job so the user can address the complaint. These messages might include an out-of-paper condition, paper jam, or low toner.
- After the entire job has been sent, the printer acknowledges the receipt of all data and waits for the next request.
Many printers can store more than one job, and network printers often have hard disk drives that can hold common jobs to allow the printer to print without being connected to a PC.
Warming Up
The printer might delay accepting the job or printing the first page while it warms up its rollers and the imaging drum.
Raster-Image Processing
The image (text and graphics) to be made is converted into a series of raster lines that can be drawn much the same way as the image is formed on the PC's monitor. The data is stored in memory, waiting for the send command.
Paper Feeding
The printer moves a sheet of paper from the proper tray onto a series of rollers, through the imaging and fixing areas, and to the output hopper.
Drum Cleaning and Charging
Any residual toner from past jobs is scraped from the printer's photosensitive drum. A fine wire (the primary corona) produces a negative electrical charge across the entire face of the drum. The image is set in raster lines as a series of fine dots on the drum.
Imaging the Drum
The information from the raster-image processor is read from memory and sent to the print engine, one line at a time. The laser sets a positive charge in the areas of the image to be filled with toner.
Transferring Toner to the Drum
A film of fine plastic power is placed on the toner transfer roller, which is turning close to the photosensitive drum. This toner is then attracted to the positively charged areas of the drum.
Transferring Toner to the Paper
The corona wire places a positive electrical charge on the paper as it moves close to the drum. The toner is attracted to the page, forming an image.
Fusing the Toner
The page passes through a pair of rollers. The roller on the side toward the toner that has been placed on the page is heated just enough to melt the plastic toner particles onto the page without smearing. The roller on the other side supplies the needed pressure.
Finishing and Output
After the toner has been fused to the paper, the next step is usually to transport the page to the output tray. However, if other options-such as a duplexer or collator-are available, the page might be routed through a separate path, based on the options for the current print job, and then sent out to the tray. Figure 12.3 shows the process of laser printing.
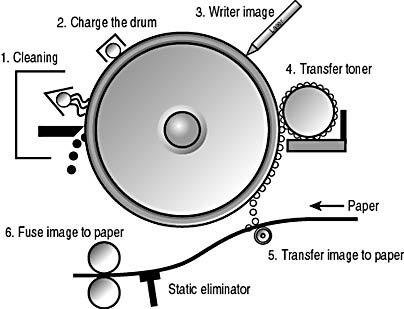
Figure 12.3 The laser printing process
Laser Printer Resolution
The quality of a laser printer is directly related to its resolution, given in dpi. Horizontal resolution is determined by how fine a line can be focused on the drum by the laser (the number of dpi across the page); vertical resolution is based on the increment by which the photosensitive drum is turned for each pass of the raster line.
In most cases, resolution is given as a single number, indicating that both the horizontal and vertical increments are the same. The first laser printers offered 300 dpi resolution; printers today commonly offer 600 and 1200 dpi. The higher the number, the sharper the detail and the more memory required to image the page. In general, the human eye cannot distinguish between 600 dpi and 1200 dpi text on bond paper, but the higher resolution does benefit images and drawings by providing a smoother transition between tones and curved lines.
TIP
Many laser printers offer a "toner saver" that uses a lower-resolution draft mode, thereby extending the life of a toner cartridge by placing less toner on each page.
Troubleshooting Laser Printer Problems
Properly installed laser printers are quite reliable when operated and maintained within the guidelines set by the manufacturer. Still, given the combination of mechanical parts, the variety of steps in printing, and the innovative ways some users use the printer, problems do occur. The following table lists a few problems that can be encountered with laser printing and their possible causes.
Ghost images appear at regular intervals on the printed page.
Photosensitive drum is not fully discharged. Previous images used too much toner, and the supply of charged toner is either insufficient or not adequately charged to transfer to the drum.
Light ghosting appears on pages.
Previous page(s) used too much toner; therefore, the drum could not be properly charged for the image (called developer starvation).
Dark ghosting appears on pages.
Drum is damaged.
Page is completely black.
Primary corona, laser scanning module, or main central board has failed.
Random black spots or streaks appear on page.
Drum was improperly cleaned; residual particles remain on drum.
Marks appear on every page.
Drum is damaged and must be replaced.
Printing is too light (appears in a column-like streak).
Toner is low.
Memory overflow error.
Not enough RAM-printing resolution too high.
Characters are incomplete.
Print density is incorrect. (Adjust the darkness setting on the toner cartridge.)
Mass of melted plastic is spit out.
Wrong transparency material is used (see section on transparency, later in this lesson).
Pages are creased.
Paper type is incorrect.
Characters are warped, overprinted, or poorly formed.
There is a problem with the paper or other media or with the hardware. (For media: avoid paper that is too rough or too smooth. Paper that is too rough interferes with fusing of characters and their definition. If the paper is too smooth, it can feed improperly, causing distorted or overwritten characters. For hardware: run the self-test to check for connectivity and configuration problems.)
After clearing a paper jam from the tray, printer still indicates a paper jam.
Printer has not reset. (Open and close the cover.)
Paper continues to jam.
Problem with the pickup area, turning area, and registration (alignment) area. (Look for worn parts or debris.)