To accomplish this, the first thing we'll have to do is alter our Welcome page. At a minimum, we need to describe the application so that users know what they can expect. We also want to differentiate between anonymous users who don't want to register and those users who do. Repeat users will probably want to sign in on the Welcome page and have full access to the application from then on. New users will probably want to view some of the whitepaper summaries before parting with personal information. This means that we'll have to have the facility to dynamically disable some of the features of our Web pages. We'll also want to be able to access common Web pages (such as the Registration page) from multiple locations within the application. Having obtained personal information from users, we might feel inclined to make them more at home by customizing the pages presented to them, too.
We've redesigned our Welcome page to be more descriptive of the application, added some graphical navigation buttons, and increased the number of options that a user has on this page. (See Figure 3-4.)
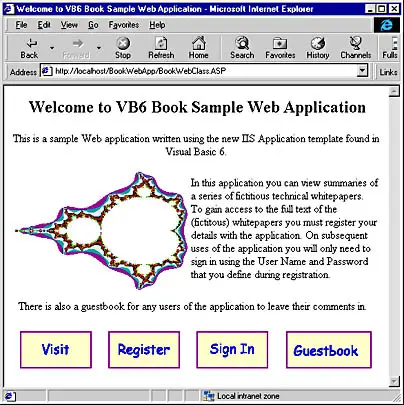
Figure 3-4 New Welcome page
Graphical navigation buttons were used partly for their visual appeal (even done as simply as this!) but they were used mostly because each graphical button can trigger an event individually. This is because the buttons actually are graphical hypertext links whose HREF attributes can be connected to custom events (or Web items) if we choose. (They are not Input tag controls wrapped inside Form tags and therefore don't have to be accessed through the Request object's Form collection.) The HREF attribute of each of the buttons references the corresponding HTML template (SignIn, Guestbook, and so forth). The Respond event in each of these templates simply calls the WriteTemplate method of the template to display the HTML page in the browser. So the only new feature in the Welcome template is the use of graphical buttons instead of straight text links or "proper" input buttons inside an HTML form. The guestbook itself remains the same, but there is more to comment about in the application, so it serves more of a purpose!
The Registration page is new, but the techniques behind it aren't. A single form contains all the input fields. The data entered on the page is returned in the Request.Form collection. To handle the registration of users in our WEBAPP.MDB database, we have added a class module to provide us with a CUser object. This class has properties that match the information we want to capture about our users. The CUser class also has a method, RegisterUser, which adds the data held in the properties of a CUser object to the database. This method has a return value of True if the user was successfully added to the database (the value is otherwise False). Armed with this information, we can control what happens next. If the RegisterUser method fails, we want to redisplay the registration form to allow the user to re-enter their details. If the user was successfully added to the database, several things should happen. First we ought to move the user to a different area of the application, away from the registration form, maybe by sending them back to the page where they jumped from to get to the registration page. Alternatively, we could send them to a fixed page of our choosing, perhaps with a "Thank you for registering" message. To make our application more welcoming, we also want to personalize the pages that we send back to users who have signed in.
Now that we have more pages in our application, we've decided that we want to use the same toolbar on several of those pages. To this end we've created a separate template called Toolbar which duplicates the functionality of the Welcome page toolbar. The next task is to edit the Welcome template to remove the section of HTML connected to the toolbar buttons and allow Visual Basic to refresh the template in the designer.
Finally we need to add code to display the Toolbar Web item at the bottom of the Welcome page. We could use the following code in the Respond event of Welcome:
Welcome.WriteTemplate
  Toolbar.WriteTemplate
This does the job of putting the buttons at the bottom of the page, but it is not the code we are going to use. The WriteTemplate method can take the name of another template as its only argument, so it would seem that we could use this code as an alternative:
Welcome.WriteTemplate
  Welcome.WriteTemplate Toolbar
If we try this code, however, we find that instead of getting buttons at the bottom of our page we get only another copy of Welcome displayed. (See Figure 3-5.)
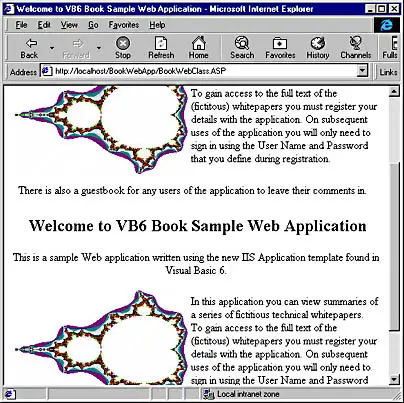
Figure 3-5 A doubly warm Welcome!
Toolbar.WriteTemplate Toolbar works as we would expect (perhaps "hope" would be a better word to use), which suggests that the template argument to a WriteTemplate call is ignored. However, we'll use this code:
Welcome.WriteTemplate
  Set NextItem = Toolbar
Why use this technique? Because accessing the Toolbar via the NextItem property of the Web class ensures that the Respond event of Toolbar fires, which won't happen if we use the Toolbar's WriteTemplate method. This way, any extra processing we specify in the Respond event is applied before the template is sent to the browser.
Now that the Toolbar Web item has been added to the Welcome page, we'll add it to the Summary page, too. This page is much more interesting, both in terms of HTML construction and also in the Web class and Web item features used. The template used to construct the Summary page is called SummaryLayout. The HTML file this template is derived from uses frames to enable different sources to be used for the content of different areas of the screen within the browser. The following fragment of the original HTML file
<FRAMESET ROWS="25%,50%,25%">
      <FRAME SRC="" NAME="SummaryList">
      <FRAME SRC="" NAME="SummaryView">
      <FRAME SRC="" NAME="SummaryToolbar">
  </FRAMESET>
produces the event candidates shown in Figure 3-6 when parsed by the Web class designer.
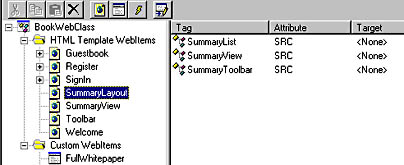
Figure 3-6 Event candidates for SummaryLayout frames
Now the question is, "Why have we designed the Summary page like this?" After all, if we wanted three different blocks of HTML code outputting to the browser, we could have strung three Web items together to produce the output. We've structured this part of our application like this because of the features we want it to provide to our users (as will become clear later).
Since we already have our Toolbar template written and in place, we'll connect that to SummaryLayout first. We want it to be displayed at the bottom of the page, so we connect the Toolbar Web item directly to the SummaryToolbar tag that is the source for the bottom frame of the page. (See Figure 3-7.)
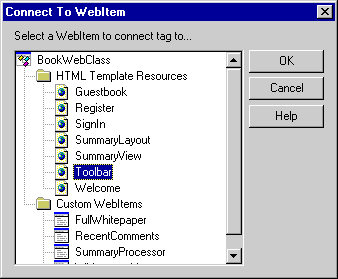
Figure 3-7 The Connect To WebItem dialog box
Fatal Errors in a Web Class
In a Web application, errors can occur outside of the Visual Basic code. In such cases, traditional error handling techniques (such as those discussed in Chapter 1) are not available for handling the situation gracefully. Instead, you can make use of the FatalErrorResponse event of the Web class. This has a single Boolean argument, SendDefault, which is an output argument. By setting SendDefault to False, the default error message is prevented from being shown in the browser. By using the Response object, you can send your own text to the browser to explain to the user that there has been a problem. The Web class provides an Error object that you can query to determine the Source, Number, and Description relating to the error. Such information can be written to the browser or logged to a file as necessary. On Windows NT 4 systems, the error is also written to the Application Log, where it can be examined in the context of other errors.
There's no problem with the article list in the top frame of the page. We'd always intended this to be generated dynamically in a custom Web item, called WhitepaperList. This Web item generates the list of available whitepapers and formats the list to make best use of the space in the top frame of the page. The names of the whitepapers are presented as hyperlinks so that clicking them sends a request to the server for the whitepaper summary. In HTML, frames can be used as targets for page requests if the frame is given a name. We've done this for the middle frame so that when the browser requests the whitepaper summary from the server, the summary is displayed in the middle frame upon receipt by the browser.
To produce a server request specific to the whitepaper that the user has selected, we use the URLFor method of the Web class and the UserEvent event of the SummaryView custom Web item we've created for displaying whitepaper summaries. The URLFor method generates, at run time, a URL either for an existing Web item event or for a run-time event. The arguments for URLFor are an existing Web item (which is required) and, optionally, the name of an event to fire in the Web item. If no event name is supplied, the Respond event will be fired if a request is made with this URL. If an existing event's name is used, that particular event will be fired in the Web item. The advantage of this method is the ability to specify an event that does not exist at design time-a run-time event:
Response.Write "<a href="""
  Response.Write URLFor(SummaryProcessor, "Whitepaper 1")
  Response.Write """>Whitepaper 1</a>"
The hyperlink defined above appears as "Whitepaper 1" in the browser and when selected will send a request to the server containing the URL for the "Whitepaper 1" event in the SummaryProcessor Web item. Since this event does not exist at design time, the UserEvent event procedure of the SummaryProcessor Web item is fired. A single argument is passed into the UserEvent event procedure that is the name of the run-time event that was triggered. This technique is well suited to presenting our whitepaper summaries, since it allows us to pass a request for the whitepaper into an event that we can use to send the summary back to the browser.
To generate the Summary page we make use of the ProcessTag event, the only standard event of a Web item that we haven't used yet. This event is fired automatically when the WriteTemplate method of a Web item encounters replacement tags in the template's HTML. We could generate dynamically the HTML to send back to the browser in the UserEvent of the SummaryProcessor Web item. However, because the format of this page will be static, with only its content changing, we're using a template Web item with certain areas replaced as each whitepaper is requested. The template will display the whitepaper name and (obviously) the summary, so we insert placeholder tags into the template at design time, which are replaced at run time. Our template contains the following HTML code at a place where we want the whitepaper name to be displayed in the browser:
VB6 Book Sample Web application
  <WC@WHITEPAPERNAME> Whitepaper name </WC@WHITEPAPERNAME>
  Summary
When the WriteTemplate method for this Web item is called, the WC@WHITEPAPERNAME tags in the template trigger the ProcessTag event of the template. This event is fired once for each pair of tags, which allows the text between the tags ("Whitepaper Name" in this case) to be substituted by whatever text is required. The same pair of tags is used throughout the template in areas where the whitepaper name is required. The whitepaper summary is replaced using the same technique. Tags are recognized as replacement tags because of their starting prefix; the TagPrefix is a property of each Web item, which is set to WC@ by default. If this prefix is changed, the new prefix should contain at least one character that is unlikely to appear elsewhere in the HTML generated by the Web item. This reduces the risk of ordinary HTML or text being processed as a replacement tag. The code used to perform the replacements is quite simple:
'Depending on the tag being processed, substitute either the whitepaper
  'name or summary.
  Select Case LCase$(TagName)
      Case "wc@whitepapername"
          TagContents = smWhitepaperName
      Case "wc@whitepapersummary"
          TagContents = smWhitepaperSummary
  End Select
Both TagName and TagContents are passed into the event. The two variables used to replace content are set in the SummaryProcessor_UserEvent event procedure that is the target of all the whitepaper hyperlinks in the top frame of the Summary page.
Now we're at the point where we can display summaries of our whitepapers to users of our application, but we haven't included a mechanism for displaying the full text of our whitepapers. This can easily be done by including a hyperlink (in the form of a button, perhaps), which will request the file containing the whitepaper. As we've already stated, we want users to register (or sign in if they have previously registered) before we allow them access to the full text of our whitepapers. This being the case, we should probably display a message to that effect if the user requests a whitepaper summary without having signed in. Because we are already using text replacement tags in the SummaryView template, we'll use the same technique to place either a hyperlink button or a message in the whitepaper summary section of the page.
OK, so we know what we're going to make available as replacement text in the ProcessTag event of the SummaryView Web item, but how are we going to decide what text to supply? By adding to the functionality of our CUser class, we expose a SignInUser method and SignedIn and FailureReason properties. This method and these properties let us sign in a user to the application, find out the reason for failure if they were not accepted (as shown in Figure 3-8), and also check to see if they have already been signed in.
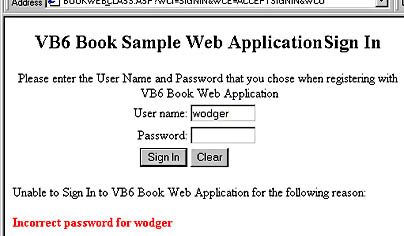
Figure 3-8 Failed user sign-in
To make the information from the CUser object available throughout the Web class, we define an instance of the CUser class at the Web class level. We create the CUser object in the Web class Initialize event (and to be tidy, destroy it in the Terminate event) and set and query its properties and methods throughout the Web class, right? If we try this approach, what happens?
Well, we can sign in to the application and be taken to the whitepaper summary page without a problem. However, when we display a whitepaper summary, we find that the information from our sign-in has disappeared and that we are asked to sign in before being able to view the full text of our whitepaper. The problem we're facing is one of application state. Unless we do something to prolong the application lifetime, each request the browser sends to the server causes an instance of the application to be created when the HTTP request is received, and causes that instance of the application to be destroyed once the HTTP request has been completed. Thus, during the sign-in process, our CUser object accepts the sign-in and sets its SignedIn property to True. When the request arrives to display a summary article, the previous instance of CUser is long gone and we access a new instance that has no knowledge of our previous sign-in. What can we do about this?
The easiest change we can make is to set the StateManagement property of the Web class to keep the Web class alive between requests. StateManagement can be set to wcNoState (the default) so that the Web class is continually created and destroyed as requests come in from the browser. The wcRetainInstance setting, however, keeps the Web class alive between requests. Once the StateManagement property of the Web class is set to wcRetainInstance, we can sign in to the application, choose a whitepaper summary, and be presented with the opportunity to view the full whitepaper. If we look at the temporary ASP file created when we start a debugging session of our application, we can see how this property change has affected the file:
<%
  Server.ScriptTimeout=600
  Response.Buffer=True
  Response.Expires=0
  If (VarType(Application("~WC~WebClassManager")) = 0) Then
      Application.Lock
      If (VarType(Application("~WC~WebClassManager")) = 0) Then
          Set Application("~WC~WebClassManager") = _
              Server.CreateObject("WebClassRuntime.WebClassManager")
      End If
      Application.UnLock
  End If
  Application("~WC~WebClassManager").ProcessRetainInstanceWebClass _
      "BookWebApp.BookWebClass", _
      "~WC~BookWebApp.BookWebClass", _
      Server, _
      Application, _
      Session, _
      Request, _
      Response
  %>
The difference is that the ProcessRetainInstanceWebClass method of the WebClassManager object is used instead of the ProcessNoStateWebClass method. The ProcessRetainInstanceWebClass method has an additional parameter ("~WC~BookWebApp.BookWebClass"), which is the name of the session that should be kept alive. Subsequent accesses to the application by the same user utilize the existing Web class instance by retrieving a reference to it using the same session name. Using this mechanism to maintain information between requests relies on the browser accepting cookies from the server. The server sends the name for the session as a cookie to the browser when it first accesses the application. Subsequently, whenever the browser accesses the application (until the user terminates the browser), it passes the session name cookie back to the Web server. This is how the server knows which session to associate with the request. If the user of the application has set his or her browser to refuse cookies, no session name information can be passed as a cookie. In this situation, even though we've set the StateManagement property of the Web class to wcRetainInstance, the server will generate a new session for the browser because it has no information that the browser has previously established a session on the server.
The same problem arises if we use the Session object directly from within our application-the browser cannot be associated with a session without accepting a cookie. If the Session object is available to us, we could store a user object in it to maintain our sign-in information. Alternatively, we could simply store a Boolean that gave the SignedIn state in the Session object.