Around the Stage you see a variety of panels. The panel on the left is called the Tools panel (see the following figure). This panel includes tools you can use to create and modify documents, such as tools you use to draw and make selections.
Use the Tools panel to draw and make selections. You use the Selection tool (the black arrow) to make selections in these tutorials.

A panel near the bottom of the Flash application is titled Properties. (Select Window > Properties > Properties if you don't see the panel.) This panel is called the Property inspector (see the following figure). This panel lets you change various properties of whatever is currently selected in your document (such as an image or a frame), or set properties for the entire SWF file (such as the frame rate or dimensions). For information on controlling the frame rate of a document, see "Change the frames per second speed".
If you don't have any objects or frames selected, the Property inspector allows you to modify properties for the document itself.
Open the Property inspector (Window > Properties > Properties) and click the button next to the text that says Size to open the Document Properties dialog box.
Make sure that you don't have a frame selected. Click the Stage if you do not see the button mentioned in the previous step.
Click this button in the Property inspector to open the Document properties dialog box. You can then change the size and color of the Stage.
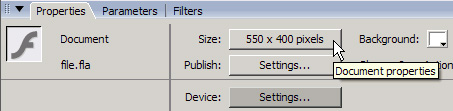
The button displays the current dimensions of the FLA file (550 x 400 pixels). By default the Stage size in a new Flash document is 550 pixels wide by 400 pixels high. When you click Size, you open a dialog box where you can change several document-wide properties (such as the Stage dimensions, color, and document frame rate).
Type 160 into the Width text box, and 600 into the Height text box.
When you type new values into these text boxes, you resize the dimensions of your FLA file. You need to use these specific dimensions because you're creating a banner and you should use a standard banner size. In this tutorial, you're creating a "wide skyscraper." For a list of standardized banner sizes, check out the Interactive Advertising Bureau's page on Interactive Marketing Units at
www.iab.net/standards/adunits.asp.You can also create banners from a Macromedia template by selecting File > New from the main menu. Select the Templates tab and select the Advertising category.
Click OK when you finish entering the new dimensions to return to the authoring environment.
When you return to the authoring environment, notice how the dimensions of your document change. You can also change the current document's background color and frame rate directly in the Property inspector, without going to the Document Properties dialog box. You'll find information about frame rate in Part 2 of this tutorial, Basic Tasks: Creating a banner, Part 2.
Select File > Save to save the document before you proceed to the next section (Importing graphics).