When making corrections, I rely heavily on the History brush, my most often used correction tool. Many people seem puzzled that I use the History brush as often as I do as a correction tool. I try to use masking functions as little as possible because of time and the risk of the mask being the wrong size, shape, etc. With the History brush, I can make subtle changes and corrections easily without masking or selections, so that the corrections will appear far more natural in appearance.
I typically don't like to make a mask to restrict color corrections. There are a couple of reasons for this. For one thing, it takes time to create a mask with the Pen tool and, depending on the image or area being masked, it could be quite complex. Brushing a mask in the mask mode is time consuming as well. What if the mask or shape you create isn't the right size? Or the shape isn't quite right? Or the positioning is off? An "organic" shape such as the blush on a cheek is hard to define with a lasso. There are many variables that could go wrong when creating a mask to restrict a correction.
Admittedly, if the area to be corrected is a sharp, predefined shape, or is a very obvious area that could be masked or selected easily with a Masking tool, it could be worthwhile to make a mask, especially if there is the possibility that the image may come back for further correction in the same area. Care must be taken however when a mask is made that you soften the selection edge to match the general look of the rest of the image so that when the correction is done, it doesn't appear carved out or obviously corrected, but rather has a natural effect like the image in following figure.
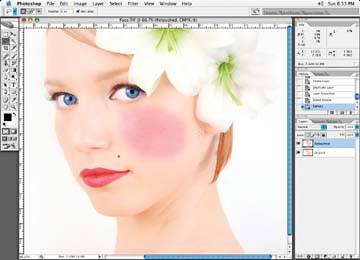
Before: using a mask to redden cheeks in a face creates an unnaturally hard edge
After: using the History brush can give a natural effect to the blush

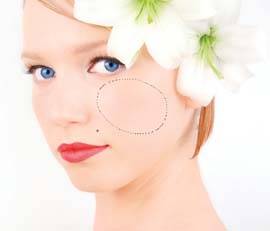
Let's suppose you have a person's face and you want to add a red blush to the cheeks. You could mask the area and use the Lasso tool and soften the selection. Or, you could use the Pen tool to create a shape and make a selection from that, or you could paint in a mask in the mask mode with a soft brush. Again, what if you don't like the position of the mask? Or the shape of the mask? Or maybe it's too hard or too soft? You'll have to spend time correcting the mask or selection when you could be doing the correction.
Even with a softer edge, the mask still looks unnatural
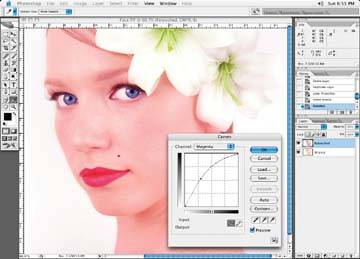
So let's use the History brush to add the blush to our original figure. First, make sure you do your correction on a duplicated layer of the layer to which you wish to make the correction. Start off by making an overall correction to the image, using the curves adjustment in the magenta channel, as you can see in following figure. Don't worry that we are making the correction to the whole image, as you will be taking a History snapshot of the correction and will be brushing in the correction only where it is needed. If I have had clients sitting behind me watching a History correction like this, panic usually sets in with them when they see the overall correction! Rest assured, their worries are put to rest when I explain what I am doing. The curve adjustment tool is under the menu item Images » Adjustments » Curves. Accept the change when you have the blush color you are looking for by clicking OK.
A face with a curve adjustment in the magenta without a selection
Obviously, the correction is applied to the whole face, which is not what I am looking for yet. Next, take a History snapshot of the correction and name it Red Cheek, as shown figure. A History snapshot is taken by clicking on the little camera icon in the History palette. When you take a History snapshot, a new little image icon appears in the History palette list.
Save your snapshot by using the History palette tool
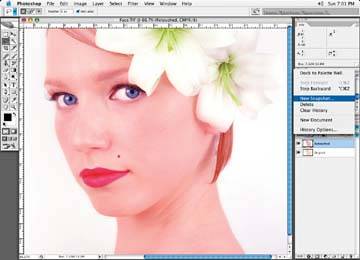
Next, undo your color correction so it reverts back to the original look of the image. Then select the History brush from the Tools palette. Be very sure that you click only the little checkbox to the left of the newly created History snapshot and not on the History snapshot icon itself. If you click on the History snapshot icon, you will change the whole image to the color change you just made, and you don't want that. If you do click on the History snapshot icon, simply go to your list of History palette states and click on the one prior to the correction you just made.
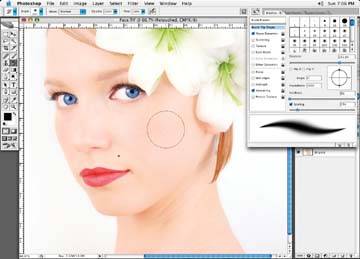
In the History brush attributes, select a brush size and softness you think will suit your task; in this case, we'd like to create a soft blush on this person's cheeks, so let's select a large brush that is very soft. I also set my brush opacity to about 20%, a good starting point.
History brush attributes
Next, click on the History snapshot you took earlier of the correction you had made. Be sure you don't click on the actual image portion of the snapshot or the whole image will change. Just click on the little eye to the left of the History snapshot. Now select the History brush from the Tool palette. Or use the Apple Y key to select it. Once thing to keep in mind with the History brush is that if you ever use the Undo key to revert a change, you will have to reselect the History snapshot from the History palette. If you think you may be making many History snapshot corrections, giving them a descriptive name may prove useful.
Note: One of the few things you cannot do with the History brush is change color modes and expect to brush in the change. The History brush will not allow you to brush in a change from another color mode. For instance, if you change the image to grayscale, and then back to the original color, you won't be able to brush in the grayscale mode information into the color image.
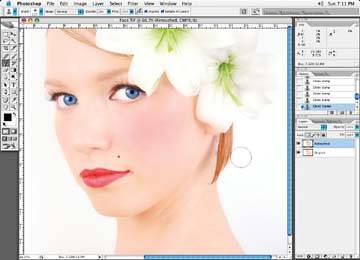
Go over to the image and begin to brush in your History snapshot of the color-corrected image onto the cheeks. Keep brushing until you achieve the look you're after. You can see the final effect in figure.
As you can see on the final image, the changes are very natural and very little time was spent on this correction. The beauty of the History brush is that you are not limited to the type of correction you make. You can use any of the filters and color-correction tools available and apply them with the History brush. It wouldn't be uncommon for me to make several corrections to an image using various correction tools and complete the image without ever making a mask.
The final effect