Figure 9-2. Spec sheet from a carton printer
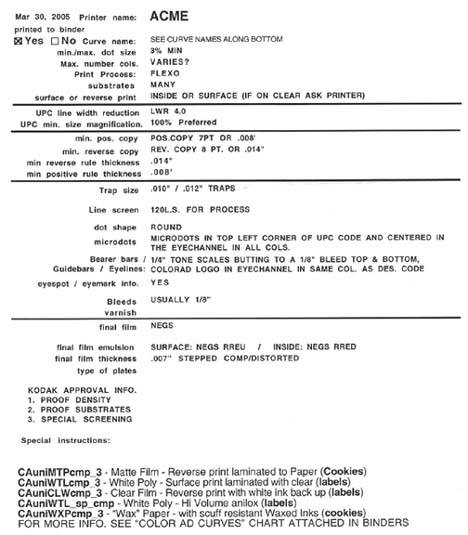
A spec sheet typically looks like Figure 9-2.
Figure 9-2 is a typical spec sheet from a printer that prints on various kinds packaging material. Here's the information we should be concerned with:
-
The printer has indicated a curve; we will investigate this later on.
-
They can print a variety of colors; this would mean that a number of special colors could be used. It is very typical to use special colors in packaging work because companies that sell goods on store shelves want to attract your attention to their boxes and bags!
-
The print process is flexo, or flexographic, which is a type of press that can print on various packaging material, folding cartons, plastics, and bags.
-
Substrates indicate the material to print on, such as a bread bag. You probably won't care what material the image is going on, but you will want to know what the specifications are for the image so that it prints properly.
If we skip through the rest of the specifications in this example, you will want to be aware of the following things:
-
What the press does to the image; this is very important.
-
The dot gain curve. We'll cover the dot gain curve in a minute.
-
The minimum dot required for an image. If you have anything less than the minimum dot anywhere in the image, the press will drop any dots less than the minimum and they will not print. If you have a soft gradation in a shadow or vignette, you may be disappointed to find out that it breaks off where the minimum dot drops off.
-
You may or may not be concerned with the trap values. If you are doing the trapping in Photoshop then yes, you would be concerned with trapping. Trapping is typically done with specialized software designed for trapping or packaging. Trapping is covered in Tutorial 5.
-
The line screen required for the image. No point working on a very large file at a high resolution if you're only going to be using the image for the one job. You'll save processing time and move around a little faster in Photoshop if your file is smaller as well.
-
Bleeds will be a concern for you. Bleed is the amount of extra image you will need to have around the perimeter of the image that extends out beyond the "live" area of an image, or what will be seen when the final job is done. Extra image or bleed allows for any shift when the printed job is cut or die-cut out of a printed sheet. For example, when you see an ad in a magazine, it probably had 1/8 inch or so of bleed around it, and the final magazine you see was trimmed back or cut to the final magazine page size. If no bleed is added, the page is trimmed to the correct size by a cutter, and the cutter happens to trim the sheet or paper just outside your image area, you'll have a line where the printed material or paper pokes out along the edge where the cut was off or where the image was offset when it was printed.
The rest of the specifications have more to do with the film output or running the file directly to the printing plate and are directed to the people who will be outputting the final files.