You can pick bullets or a numbering scheme when the insertion point is in any text, whether in the title placeholder, text placeholder, or even on the drawing layer.
If you've applied a Slide Design to your presentation, PowerPoint has probably already selected a bullet character and formatted it with a color from the default palette for that design. To change a bulletsay, to use a picture as a bulletgo through the Bullets and Numbering dialog box.
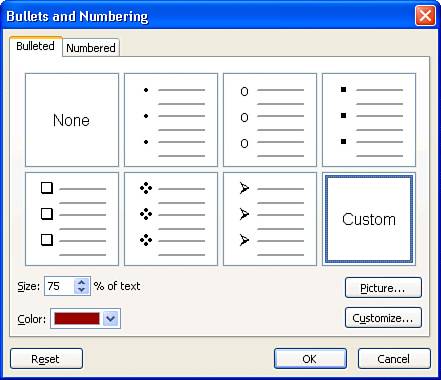
Click within the line you want to change, or select all the lines to change, and then choose Format, Bullets and Numbering. (Equivalently, right-click and select Bullets and Numbering.) The Bullets and Numbering dialog box appears (Figure 3).
Figure 3. PowerPoint lets you choose any character or picture as a bullet.
 |
Although you can change the bullet character for a single line, you will usually want to change all the bullets on a slide. To customize an entire presentation, perform these steps using the Slide Master rather than an individual slide. |
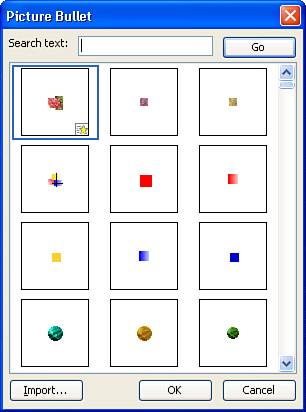
Choose a bullet character from the list of preset options, or click Customize to select a different character from any available font. You can also use a picture in any Office-compatible graphics formatGIF or JPEG, for exampleas a bullet. To do so, click Picture (Figure 4), and use one of the built-in bullets, or click Import to bring in a picture of your own.
Figure 4. Choose a picture from among the ones offered, or import your own.
|
PowerPoint stores the bullets just once, so you needn't be overly concerned about swelling file sizes if you stick to just one or two picture bullets. Your primary concern should be how legible the bullet will be in your presentation. Simple line art drawingssay, a pointing finger or a starburstcan help make your point. Washed-out photographs rendered in tiny sizes will only leave your audience squinting. |
The Size nn% of Text box in the Bullets and Numbering dialog box (Figure 3) adjusts the size of the bullet (whether picture or character), scaling it to the point size of the text. You can select any size between 25% and 400%.
Note
The Color drop-down list box in the Bullets and Numbering dialog box applies only to characters; it does not affect the color of a picture used as a bullet.
Numbered paragraphs renumber themselves as you add new items and delete or move existing ones. Follow these steps to number the lines in a slide:
|
1.
|
Click within the line you want to number, or select a range of lines to be numbered. Auto numbering is supported only for the highest-level paragraphs; if you select lower-level paragraphs, they are ignored.
|
|
2.
|
Choose Format, Bullets and Numbering. (Or right-click and select Bullets and Numbering from the shortcut menu.)
|
|
3.
|
In the Bullets and Numbering dialog box, click the Numbered tab.
|
|
4.
|
Pick the type of numbering you wantfairly simple Roman and Arabic numbers as well as alphabet sequences (a,b,c) are supported on the Numbered tab.
|
|
5.
|
If you have a long numbered list that extends over multiple slides, specify a starting value other than 1.
|
The size and color formatting options mentioned for bullets earlier in this section apply to numbers, too.
If you want to construct multiple-level numbering schemes (for example, 1.1, 1.2, 1.3, 2.1, 2.2), you have to type and maintain the numbers manually.