Excel provides protection that you can add to an Excel worksheet by selecting Tools » Protection » Protect Sheet. You also can supply a password so that another user cannot unprotect the worksheet and gain access unless he knows the password.
Sometimes, though, you want to password-protect and unprotect all worksheets in a workbook in one step because protecting and unprotecting each worksheet individually is a huge nuisance. Here is how you can simplify this task.
Open the workbook to which you want to apply the code. Or, select Window » Unhide and unhide your Personal.xls file to make it available to any workbook. If this is grayed out, it means you do not have a Personal.xls file yet. You can create one easily by recording a dummy macro. Select Tools » Macro » Record New Macro and choose Personal Macro Workbook from the Store Macro In: box. Then click OK, select any cell, and stop recording. Excel will have created your Personal.xls file automatically.
Next, select Tools » Macro » Visual Basic Editor (Alt/Option-F11) and then select Insert » UserForm. This should display the Control toolbox. If it doesn't, select View » Toolbox.
From the toolbox, select a TextBox (indicated as ab|). Click onto the UserForm to add the TextBox to the UserForm. Position it in the top left of your form and size it to your preference.
Ensure that the textbox is still selected and then select View » Properties (F4). From the Properties window of the textbox, scroll down until you see PasswordChar, and in the white box on the right, enter an asterisk (*). From the toolbox, select a CommandButton and then click the UserForm and position it in the top right of your form.
With the CommandButton still selected, select View » Properties (F4). From the Properties window of the CommandButton, scroll down until you see Caption, and in the white box on the right, enter the caption OK. If you are using Excel 97, also scroll down until you see TakeFocusOnClick, and set this to False.
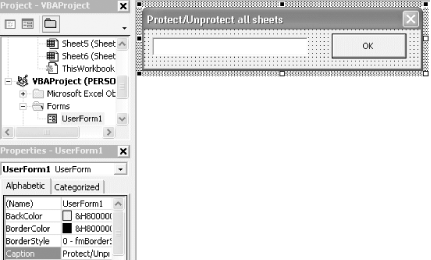
Now select the UserForm and, from its Properties window, find Caption and change it to Protect/Unprotect all sheets. Your form should look like that shown in the figure.
Figure. UserForm inserted in the VBE

Select View » Code (F7) and enter the following code exactly as shown:
Private Sub CommandButton1_Click( )
Dim wSheet As Worksheet
    For Each wSheet In Worksheets
        If wSheet.ProtectContents = True Then
           wSheet.Unprotect Password:=TextBox1.Text
        Else
           wSheet.Protect Password:=TextBox1.Text
        End If
    Next wSheet
    Unload me
End Sub
The code loops through all worksheets in the active workbook. If one is protected, it unprotects it using the password entered into the text box. If the worksheet is already unprotected, it protects it using the password entered into the text box.
Now select Insert » Module and enter this code:
Sub ShowPass( )
    UserForm1.Show
End Sub
This is used to launch the UserForm. Close the window to get back to Excel.
Select Tools » Macro » Macros (Alt/Option-F8). Select ShowPass and then click Options and assign a shortcut key. This will unprotect all worksheets that are protected and protect all worksheets that are unprotected.
As this macro does not ask you to confirm your password, you should be very sure of what you type. Otherwise, you may find that typos lock you out of your spreadsheets.
If you're protecting the contents only from yourself, the following macro lets you perform the same tasks with a blank password instead:
Option Explicit
Sub Protect_Unprotect( )
Dim wSheet As Worksheet
For Each wSheet In Worksheets
    With wSheet
        If .ProtectContents = True Then
            .Unprotect Password:=""
        Else
            .Protect Password:=""
        End If
    End With
Next wSheet
End Sub
Although it's not very secure, it's definitely convenient.