Installing SIMMs
When installing SIMMs:
Always use precautions to avoid ESD. Refer to Tutorial 13, "The Basics of Electrical Energy," for details.
Always handle SIMMs carefully-keep your fingers on the plastic edges. There is nothing worse than destroying a 16-MB SIMM because of static discharge.
All SIMMs have a notch on one side that prevents them from being installed improperly. If you cannot insert the SIMM easily, it's probably backwards.
SIMMs are inserted into the slot at a 45-degree angle along the wide side (see Figure 7.12).
After the SIMM is securely seated in the slot, push it upright until the holding clamps on either side are secured.
IMPORTANT
SIMMs are extremely sensitive to static. Be sure to handle them carefully.
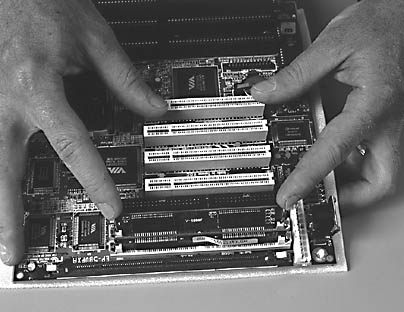
Figure 7.6 Installing SIMMs
After the chip is physically installed:
Turn on the computer. If the DRAM is installed correctly, the RAM count on the computer will reflect the new value.
If the RAM value has not changed, probably either a bank is disabled or the SIMMs aren't installed correctly. Check the motherboard documentation to determine if a jumper needs to be changed in order to turn on the SIMM.
If the computer does not boot and the screen is blank, the RAM was not installed correctly.
NOTE
When a computer is booting, the RAM count is based on units of 1024 bytes. One MB of RAM should show as 1024, 2 MB as 2048, 4 MB as 4096, and so on. Most RAM counts will stop before they get to the value expected (less than 1 MB). This is acceptable-some memory is "skipped" during the count, but it's all there.
After the RAM is installed, and the RAM count correctly reflects the new value, the CMOS needs to be updated. On most machines, this is done automatically and no intervention is required.
If you get an error similar to "CMOS Memory Mismatch Press Fl to continue," access the CMOS with the CMOS setup program, then save and exit (changes will be automatically recorded). The CMOS will be reset.
If the system fails to boot, or reports less than the amount of memory actually installed, recheck the modules to make sure they are seated properly according to the motherboard manual and that the right type and amount are present.