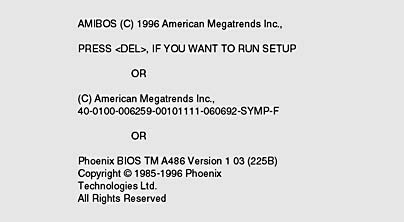
Figure 6.3 BIOS information
Although several companies write BIOS code and sell it to computer makers, three companies-American Megatrends (AMI), Phoenix, and Award-dominate the BIOS market. Motherboard vendors might use one supplier for a series of products; however, it is not uncommon for a manufacturer to change sources within a series due to design or cost considerations. A good technician should be familiar with the basic CMOS setup procedures for BIOSs manufactured by all three.
Because of its flexibility, the Hi-Flex BIOS, manufactured by AMI, has taken a large share of the computer market. Motherboard manufacturers can purchase a basic BIOS from AMI and then add setup parameters to meet the needs of their products. For this reason, the number of setup parameters available on one computer can differ from those on another computer that is based on the same motherboard. Award competes directly with AMI, providing very flexible BIOS chips. Award was the first BIOS to heavily support PCI (Peripheral Component Interconnect) motherboards.
Phoenix is considered a manufacturer of high-end BIOS. Phoenix creates individual BIOS chips for specific machines. As a result, Phoenix BIOS chips have fewer setup parameters available. These chips are commonly used in machines with proprietary motherboards, such as laptops. Vendors can tune the BIOS for performance, basing new code on the Phoenix core.
There are several ways to determine who the BIOS manufacturer is:
- Watch the monitor when the computer boots. A BIOS screen will usually be displayed, indicating the manufacture and version number. (This screen might not be visible if the computer is warm-booted. In that case, power off the unit and restart.)
- Check the computer or motherboard manual. Most include a section on entering the setup program and setting options.
- Remove the cover of the computer and look at the chip. Most BIOS chips have a manufacturer's label.
- Try a good third-party utility program. These products are available at almost any software store. A Web search for a key phrase such as "BIOS diagnostic" will yield the names of a number of them.
- Reboot the computer and hold down several keys at once or unplug a drive. This will often cause an error and prompt you to get into the setup program. Unplugging the keyboard will accomplish the same goal with less work; however, you won't be able to make adjustments on most systems with the keyboard inoperative.
A Typical CMOS Setup
Every CMOS setup program looks slightly different. Do not be too concerned about the differences-all BIOS routines contain basically the same information. Take your time and be comfortable searching around the setup programs. Most of the CMOS setup programs are text-based, so you will have to use keystrokes to navigate through the information. However, some newer machines use a Windows-like CMOS setup (they have the look of a Windows environment and will let you use a mouse to select changes).
The Most Common Ways to Access BIOS Setup Programs
- For AMI, press DELETE when the machine first begins to boot.
- For Phoenix, press CTRL+ALT+ESC or F2 when requested.
- For Award, you can usually follow either of the first-mentioned procedures.
Motherboard makers can change the key combinations to access the CMOS setup. This can be especially true for brand-name computers, and manufacturers are not likely to publish the information on the start-up screen.
NOTE
If all else fails, try any of these key combinations: CTRL+ALT+INSERT, CTRL+A, CTRL+S, CTRL+F1, and F10.
Let's look at some typical screens from a Phoenix BIOS setup program. They are good examples of how typical CMOS settings are presented and adjusted.
Figure 6.4 shows the first screen of this CMOS setup. From this point, you can select alternate pages (Advanced, Security, Power) or adjust any of these individual items: floppy disk drive, hard disk drive, date and time, or RAM settings.
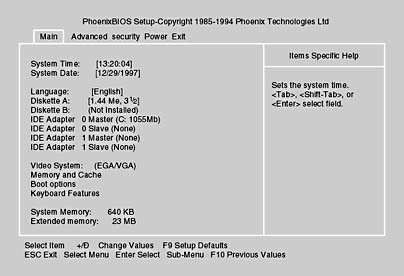
Figure 6.4 Main screen
The hard disk drive setup screen (Figure 6.5) is where individual hard drive parameters are set. Today, most hard drives based on IDE (Integrated Device Electronics) can be automatically detected by the BIOS. The CMOS settings are then made by the BIOS automatically. However, you should still know how to do this manually, to be able to work with an older machine and in case the setup program fails in its recognition.
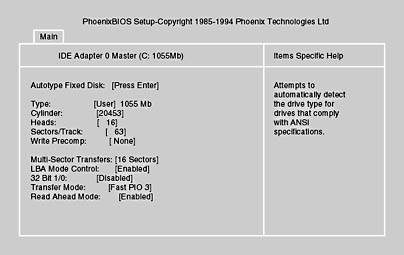
Figure 6.5 Hard disk drive setup screen
The Advanced screen (Figure 6.6) leads to more advanced setup parameters. A lot of customization can be achieved using these settings. Pay careful attention to any warnings that come up before you make any changes to device settings. If you don't understand a setting, it is best to leave it on the default option.

Figure 6.6 Advanced screen
The Security screen allows you to set security parameters. Be careful: once you set a password, you have to remember that password to change the security parameters. If you encounter a situation in which an owner has set and forgotten a password, you will have to flush and reset the CMOS to the factory default settings. Check the motherboard manual for information on how to do this. It usually involves changing jumper settings twice.
Notice in Figure 6.7 that the virus check reminder option is disabled. If you find a CMOS virus checker enabled, turn it off. This is especially important during operating system and program installation. If you are certain that no virus software is on the computer, yet you continue to get error messages warning you to turn off all antivirus software, the CMOS virus checker is the source of these erroneous messages. If you find this happening, disable the CMOS virus checker. Of course, if you still get the message you should check for a real virus. Figure 6.7 shows a Security screen.
TIP
These built-in CMOS virus checkers actually do very little to protect your system. For the best possible protection against viruses, be sure to install a good Windows 95 or 98 antivirus program and update it regularly.
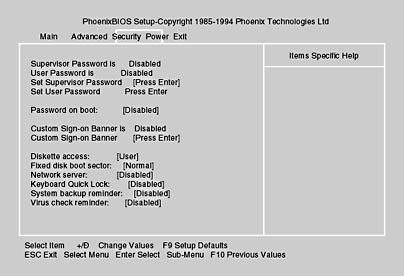
Figure 6.7 Security screen
The Power screen, shown in Figure 6.8, allows the user to set up any power conservation options provided by the manufacturer. These features typically include setting a time limit for reducing power to the monitor and hard disk drive.
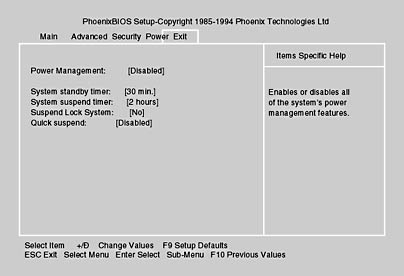
Figure 6.8 Power screen
Maintaining CMOS
Losing CMOS information is, unfortunately, a common problem. If the information on the CMOS chips is erased or corrupted, the computer will not be able to boot and/or you'll get nasty-looking errors. Some of the more common reasons that CMOS data is lost include the following:
- The on-board battery has run out.
- Cards have been removed or inserted without regard to preventing ESD.
- Improper handling of the motherboard has caused electrical short circuits or failure due to ESD.
- Something has been dropped on the motherboard.
- There is dirt on the motherboard.
- The power supply is faulty.
- There have been electrical surges.
The following types of errors indicate lost or corrupt CMOS data:
- CMOS configuration mismatch
- CMOS date/time not set
- No boot device available
- CMOS battery state low
- Cannot locate hard disk drive or floppy disk drive
It is wise to back up the CMOS setup just as you back up important data. One way to do this is to write down the information (especially before making hardware changes). There are many third-party CMOS save-and-restore utility programs available.
NOTE
Many newer machines that run Windows 95 and 98 and offer Plug and Play place less emphasis on the CMOS. The BIOS information is stored with the device and is automatically detected at boot.