Let's have a look at a simple example of reentrancy using a data control. The program shown in Figure 13-10 (which is in CHAP13\recurse\broken\rcb.vbp) is about as simple as it gets, with a single data-bound list wired up through a data control to the Visual Basic sample database BIBLIO.MDB (available on the Visual Studio 6 MSDN CD). Assume that the list contains a set of records you need to process somehow and that it doesn't matter in which order the records are processed. Clicking in the list causes a Reposition event, and the program puts up a message box that lets you simulate the kind of Jet page-locking error you might encounter in a multiuser application. You can think of the Reposition event handler as the equivalent of the DoFSM function in the comment stripper program.
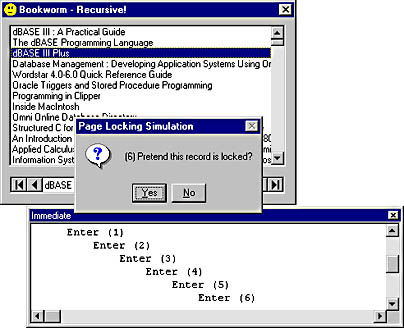
Figure 13-10 Recursion in the data control's Reposition event
Clicking No when the message box pops up simply continues, and this is where you'd process the new record. Clicking Yes simulates a locking error and simply skips to the next record by calling the MoveNext method of the data control's recordset. The idea is that you'll reach the end of the locked page after skipping a few records and so find a record you can process. The problem here is that you're calling MoveNext from within the Reposition event handler, which causes another reposition event before the first one has finished-this is recursion. The example program maintains a static variable to count the number of recursions; the count is displayed in the message box, and the program also prints the entry and exit traces for the reposition event to the Immediate window when you run the program in the IDE. You can also see the effects of the recursion by pressing Ctrl+Break and selecting Call Stack from the View menu.
This example, which comes from a real program, might not have particularly serious consequences because it's a pure recursion that doesn't nest too deeply, and it involves no static data (except for the counter, of course). Generally, however, and particularly when you're devising code such as FSMs to control the loading and unloading of forms, the code will break as soon as you try to invoke it recursively. You might, for example, end up in a situation in which you're trying to load a form from its own Form_Load event.
Coming back to the recursive Visual Basic program, it's not immediately obvious how to fix the problem. It turns out that this is quite a common class of problem, and one that conveys the true flavor of event-driven code. What you want to do when you find a lock is to exit the event handler and then immediately issue a MoveNext on the recordset. Unfortunately, Visual Basic can't do this because as soon as you exit the event handler, control passes back to the run-time system (the <Non-Basic Code> you see when you select View/Call Stack in break mode). What you need to be able to do is to post some kind of request for a MoveNext and have it execute after you've left the Reposition event handler.
Just because Visual Basic won't do this kind of thing for you doesn't mean that you can't implement it yourself. CHAP13\recurse\fixed\rcf.vbp is a modified version of the pathological data control program that uses a simple event queue to achieve what you need. You use an unsorted list box as a convenient event queue and a timer control that continually polls the queue looking for events. There's only one kind of event in the program, so you don't even need to look at its value when you find it on the queue-always consider it a request for a MoveNext.
The program works like this: inside the Reposition event, instead of directly calling MoveNext when a locked record is encountered, we post an event onto the queue and then exit the event handler. The queue manager (the timer control) then comes along and, finding an event on the queue, kindly calls MoveNext for us. Now, however, the MoveNext is called from the timer's event handler, and there's no recursion. Notice that it doesn't matter how fast you push event requests into the queue; you never get recursion because the events are processed one by one in sequence.
Adding an event queue to an FSM
To prevent reentrant code, you need to add a queue to the FSM model. Strictly speaking, the comment stripper program doesn't need a queue because it doesn't do anything that will cause recursion. Because it's an example program, however, we'll add the queuing now so that you can build on it when you design real-world FSM programs later.
The queue built in the previous example worked adequately, but it needed a form to carry the list box and the timer control. This awkwardness over essentially nonvisual code has dogged Visual Basic from the start, and it means, for example, that you can't define a queue inside a class or a startup module without creating a dummy form. You could dump the controls onto an existing form, of course, but that's anathema to modular design, and it means you must contrive to load the form before starting the event queue. Getting rid of the list box isn't too hard, but until Visual Basic 5 there was no getting around that timer control without doing something horrific like this:
Sub Main()
      Dim nEvent As Integer
      frmMain.Show vbModeless    ' Main program is in here.
      Do
          If bGetEventFromQueue(nEvent) Then
              DoFSM nPuState, nEvent
          End If
          DoEvents
      Loop
  End Sub
With Visual Basic 5 and 6, however, you can devise acceptable code-only solutions to this kind of problem-in this case, to build an event queue. By using the AddressOf operator, you can call the SetTimer API function and pass a Visual Basic routine as the timer's callback procedure. This means you can create a timer from pure code, and just like a Visual Basic Timer control, it will invoke the Visual Basic procedure asynchronously at the requested interval. Creating a timer is simple:
lTimerId = SetTimer(0&, 0&, 500&, AddressOf MyFunc)
The first two parameters are NULL values, which simply signify that the timer isn't associated with any window, and the third is the timer interval, in milliseconds. The last parameter is the interesting one; it passes a pointer to a Visual Basic function that will be invoked by Windows whenever the timer fires. Windows expects this function to have the following interface and to pass the appropriate parameters:
Sub MyFunc(ByVal lHwnd As Long, _
             ByVal nMsg As Long, _
             ByVal lEventId As Long, _
             ByVal lTime As Long)
Note
When working with callback functions, be careful to include the ByVal keywords. If you miss a ByVal, simply moving your mouse pointer over the parameter name in the Visual Basic debugger is enough to crash Visual Basic. This happens because of Visual Basic 6's instant quick watch feature, which displays a variable's value as a ToolTip. Because Visual Basic thinks you passed a reference parameter (ByRef is the default), it tries to dereference an illegal pointer value, which almost always causes an access violation. You can turn off this feature with the Auto Data Tips check box under Tools/Options/Editor.
For now, just ignore the parameters. Make sure to destroy the timer when you're finished with it:
Call KillTimer (0&, lTimerId)
That takes care of the queue manager, so now all you need to do is provide a queue for it to manage. A simple way to do this is to use a Visual Basic collection:
Dim colPuEventQueue As Collection
You'll see a more sophisticated use of collections later, but for now you can use one as a simple queue by defining a couple of routines:
Sub AddEventToQueue(ByVal niEvent As Integer)
      colPuEventQueue.Add niEvent
  End Sub
  Function bGetEventFromQueue(ByRef noEvent As Integer) As Boolean
      If colPuEventQueue.Count = 0 Then
          bGetEventFromQueue = False
      Else
          noEvent = colPuEventQueue.Item(1)
          colPuEventQueue.Remove 1
          bGetEventFromQueue = True
      End If
  End Function
And that's it-a code-only asynchronous queue manager that you can build into a class or a normal module.
Building a Better Event QueueRemember Message Blaster? Message Blaster is a custom control that lets you intercept Windows messages sent to any Visual Basic control. Windows messages are the raw material of Visual Basic events, but the Visual Basic designers filtered out most of the messages when they decided which events Visual Basic programmers were likely to need. A form's Resize event, for example, occurs after the resize has happened, which makes implementing size limits for a resizeable form ugly because you have to snap the size back in the Resize event handler. With Message Blaster, you can intercept the WM_SIZE message and change the form's size with a suitable API call before Windows repaints it.
Now that you know what Message Blaster is, forget it. Visual Basic 6 lets you do all the things that Message Blaster did, directly from Visual Basic code. Message Blaster is an example of a subclassing control; subclassing is what Windows programmers do to hook a custom message handler (usually called a window procedure) onto a window, and subclassing controls were an inelegant hack to make this possible in earlier versions of Visual Basic. By allowing Windows callback functions to be coded in Visual Basic, Visual Basic 6's AddressOf operator opens up subclassing directly to Visual Basic programmers.
The theory goes like this: You nominate any object that you have (or can get) a window handle for and tell Windows the address of a Visual Basic procedure to call whenever it receives a message for that object. For messages you don't want to handle, you simply call the original message handler. To fix the resizing problem outlined above, you'd write something like this:
pcbOldWindowProc = SetWindowLong(Me.hWnd, GWL_WNDPROC, _
                                   AddressOf lMyWindowProc)
  .
  .
  .
  Function lMyWindowProc(ByVal hWnd As Long, _
                         ByVal lMsg As Long, _
                         ByVal wparam As Long, _
                         ByVal lparam As Long) As Long
      If lMsg = WM_SIZE Then
          ' Play with the size here.
      End If
      lMyWindowProc = CallWindowProc(pcbOldWindowProc, hWnd, _
                                     lMsg, wParam, lParam)
  End Function
Any messages that Windows receives for a window are queued so that they arrive in sequence, and you can use this behavior to make a queue for FSMs. The simplest way is to hang a window procedure off an arbitrary control and start sending messages to the queue with PostMessage, but this is a bit ugly and can't be done unless you have a form loaded. A better way is to create a window for your own exclusive use behind the scenes. The code is straightforward:
lHwnd = CreateWindowEx(WS_EX_TRANSPARENT, "static", _
                         "My Window", WS_OVERLAPPED, _
                         0&, 0&, 0&, 0&, 0&, 0&, _
                         CLng(App.hInstance), 0&)
  lEventMsg = RegisterWindowMessage("FSM Event")
The choice of style and extended style parameters is arbitrary and doesn't really matter since you're never going to display the window. Now all you have to do is hook up an event handler to the window and start sending messages. It's a good idea to register a private message as done here, but you could just use any message number greater than WM_USER. It's best to encapsulate the code in Visual Basic functions or a class (CHAP13\fsm\fsmcls\pubfsm.cls shows one possible way), but be aware that the window procedure must be in a standard module. All the constants and Visual Basic declarations for all the functions can be pasted from the API Viewer tool supplied with Visual Basic. This tool is run from the file Apiload.exe, which is located in the Common\Tools\Winapi folder on the Visual Basic 6 CD.