- Make sure the interface fits on a 640x480 pixel screen resolution. Users with low vision, and sometimes those just trying to avoid eye strain, keep their resolution at this highest point. Creating an interface larger than 640x480 pixels means part of your interface will be hidden and inaccessible to many users.
- Use the system settings to display standard elements. This is pretty simple in Visual Basic. When a user changes the system display settings (from the Control Panel Display properties) and applies those settings, your Visual Basic application will automatically pick up those changes. Try running one of the sample applications that contains a menu. With the sample still running, go to your Display properties and change the font size of the menu. When you click Apply, you'll see that the menu in your Visual Basic application has changed to the new settings. However, the size of the menu doesn't change the size of the form, so the menu might wrap on the form if you don't change the form size to accommodate the menu. You might also need to resize your controls at run time based on the changes to the system settings in order to make sure they're all still visible. See the discussion below on using the Size sample.
- Allow customized sizes. You can allow the user to customize certain properties at run time. For instance, you can allow the user to size a form, at which time you'd adjust the size and spacing of the controls in the Form_Resize event procedure. You can also include common dialog controls that allow the user to set the font sizes and styles specifically for your application. Again, you'll need to resize the form controls accordingly. (See the Size sample.)
- Make borders visible. Borders separating screen elements can make a user interface more intuitive, but only if the borders are visible to everyone. To determine an appropriate border size, you should call the GetSystemMetrics function, discussed later in this chapter, with the constant values that determine border width and height.
Size example
I've created an example to demonstrate how to dynamically size controls and allow the user to customize the look of an application. This sample application allows the user to size the form and set the font size for all the controls on the form. The form and the controls adjust to fit the changed settings. First let's take a look at the form in design mode.
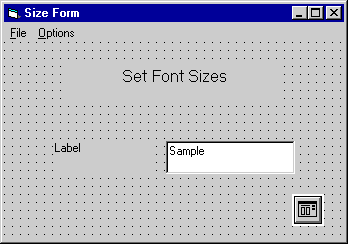
I've kept this example simple by including only three controls-two labels and a text box-as well as a common dialog control. I've also added two menus: File and Options. The Options menu contains one menu item, Font. This item uses the common dialog control to display the Font dialog box, shown here.
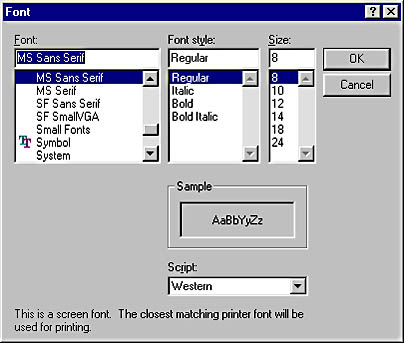
By selecting the Font menu item, the user can set the font style and size for all the controls on the form. Let's take a look at the code that does this.
Private Sub mnuOptionsFont_Click()
      Dim ctlControl As Control
      ' Initialize the settings and display the Font dialog box.
      With dlgCDialog1
          .Flags = cdlCFBoth ' Display the screen and printer fonts.
          .FontName = labLabel2.FontName
          .FontSize = labLabel2.FontSize
          .ShowFont
      End With
      On Error Resume Next
      ' Run through all the controls, setting the font size and style
      ' according to the user selections in the Font dialog box.
      For Each ctlControl In frmSize.Controls
          With ctlControl.Font
              .Name = dlgCDialog1.FontName
              .Size = dlgCDialog1.FontSize
              .Bold = dlgCDialog1.FontBold
              .Italic = dlgCDialog1.FontItalic
              ' Set the heading size to be larger than the rest
              ' of the controls.
              If ctlControl.Name = labLabel1.Name Then
                  .Size = .Size + 4
              End If
          End With
          ' Resize the controls to fit the new font.
          ctlControl.AutoSize = False
          ctlControl.AutoSize = True
      Next ctlControl
  End Sub
The first thing we do is initialize the settings for the common dialog control. We set the Flags property to cdlCFBoth to indicate that we want the dialog box to display fonts that are available for both the screen and the printer. Next we initialize the font name and size to the current settings for the controls. We then call ShowFont to display the Font dialog box.
At this point execution of the Visual Basic routine pauses while the Font dialog box is displayed and the user selects his or her settings. When the user closes the dialog box, the application loops through the controls on the form and assigns the new settings to each one. The label that acts as the heading for the form should stand out from the rest of the controls, so I've increased the font size for that control.
NOTE
Some of the controls on a form might not support the Font property. To guard against any errors that might arise I've included the error statement On Error Resume Next to bypass these controls. First tutorial warns against problems that can occur from using this statement. I've used it here for the sake of simplicity, but in your own programs you'll probably want to check the control type to make sure the control supports the given property, and use the error checking recommendations described in Chapter 1.
Looping through the controls and changing the settings isn't the final step. The font might now be too big for the controls that were created at design time. Maybe when you designed the controls you were sure to set the AutoSize property to True, thinking that would size the controls as needed. Unfortunately, the AutoSize property doesn't work like that. Each time the settings are changed, you need to set the AutoSize property to False to uninitialize it, then set it again to True so that the control will be resized.
We now have all the code in place so that the user can size the fonts in the application. But what happens if the controls aren't fully visible on the form anymore? Or if the user just wants to see more or less of the form? To accommodate these possibilities, we've made the form resizable. The user can make the form as big or as small as he or she wants (allowing for screen size). If we leave the controls as we placed them at design time, sizing the form smaller would cut off some controls, while sizing it bigger would leave the controls where they are and just show a lot of blank space on the form. We want the controls to move in proportion to the sizing of the form. For this to happen, the placement of the controls must be changed in the Form_Resize event procedure.
Private Sub Form_Resize()
      Dim ctlControl     As Control
      Dim nHalfWidth     As Integer
      Dim nHalfWBuffered As Integer
      Dim nHalfHeight    As Integer
      Const BUFFER_AREA  As Integer = 100
      nHalfWidth = ScaleWidth / 2
      nHalfWBuffered = nHalfWidth _ BUFFER_AREA
      nHalfHeight = ScaleHeight / 2
      On Error Resume Next
      For Each ctlControl In frmSize.Controls
          With ctlControl
              Select Case .Name
                  Case "labLabel1"
                      .Alignment = vbCenter
                      .Width = ScaleWidth
                      .Left = 0
                      .Top = 0
                  Case "labLabel2"
                      .Width = nHalfWBuffered
                      .Left = 0
                      .Alignment = vbRightJustify
                      .Top = nHalfHeight
                  Case "txtText1"
                      .Width = nHalfWBuffered
                      .Left = nHalfWidth
                      .Alignment = vbLeftJustify
                      .Top = nHalfHeight
              End Select
          End With
      Next ctlControl
  End Sub
The Form_Resize event procedure is called every time the user sizes the form, as well as when the form is first displayed. For each of the controls on the form, we set the Width, Left, Alignment, and Top properties to determine where on the form the control will be placed. For example, we always want the form heading, labLabel1, to be centered on the form no matter what the size of the form is, so we've set the Alignment property to vbCenter. Because there are no other controls at the same vertical position as labLabel1, we can set the Width property to ScaleWidth, which is the width of the form. That also allows us to place the left edge of labLabel1 all the way to the left edge of the form, position 0. The heading will always be at the top of the form, so the Top property is also set to 0.
The other controls are sized in a similar manner. Because they are located side by side, they must share the width of the form (ScaleWidth / 2), and allow for some white space in between (- 100). Run the Size sample and try setting the fonts to different sizes and resizing the form to see the results.
Creating A Resource File
In the code sample shown above, you see calls to LoadPicture and LoadResPicture. The call to LoadPicture with an empty parameter list removes any picture that has been loaded. To put the picture back on the form, you could call LoadPicture with the filename of a picture (BMP, JPEG, and so on) as the parameter. However, it's more efficient to store your picture in a resource file and use LoadResPicture to load the picture from the resource file.
To create a resource file in Visual Basic, you first must add the Resource Editor add-in to your Visual Basic project. Select Add-In Manager from the Add-Ins menu to bring up the Add-In Manager dialog box. From the Available Add-Ins list, select VB 6 Resource Editor.
Check the Loaded/Unloaded check box in the Load Behavior group and click OK. You'll now see the VB Resource Editor button, shown here, on the Standard toolbar.
Now that you've included the Resource Editor in your project, you can create a resource file and add the bitmap you're going to use as your background image. (You can also add text strings, icons, cursors, and custom resources to the resource file.) Click the VB Resource Editor button to open the Resource Editor window. Click the Add Bitmap button on the Resource Editor toolbar to open the Open A Bitmap File dialog box. Select the bitmap you want to include in your resource file and click Open. The bitmap is added to your resource file and assigned a resource ID that you will use as the first parameter in your call to LoadResPicture. Save the resource file.