You create an animation in a Flash document by adding content to a timeline, such as the main timeline, or a timeline inside a movie clip. When the playhead moves across the Timeline, those individual frames play and when played in quick succession (like a flipbook or succession of frames on a reel of film), you can create an animation.
When you create a frame-by-frame animation, every frame is a keyframe. In a tweened animation, you define keyframes at significant points in the animation and let Flash create the contents of frames in between. Flash displays the interpolated frames of a tweened animation as light blue or light green with an arrow drawn between keyframes. Because Flash documents save the shapes in each keyframe, you should create keyframes only at the points in the animation where something changes.
Select Modify > Document.
The Document Properties dialog box opens. This is the dialog box you used to change the dimensions of the banner in Part 1 of this tutorial. Now you want to change the frame rate for the banner.
Change the number in the frame rate text box to 18, and then click OK to apply the new setting.
A higher frame rate means that your animation plays smoothly, more so than when you had it set to 12 frames per second (fps). Changing the fps setting means that the main timeline and movie clip timelines all play at the specified frame rate.
Note
An increased frame rate also means that there is a slightly increased demand on the user's computer (or CPU) to render the extra frames each second.
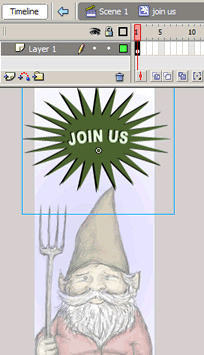
Double-click the join us symbol instance on the Stage.
This opens the symbol in symbol-editing mode (see the following figure). In this mode, you see the movie clip symbol's timeline, which runs independently of the timeline for the main FLA file (the one you saw before double-clicking the symbol). This means you can have animations that play and stop independently from animations on the main timeline. Remember that a movie clip still plays at the document's frame rate (18 fps).
In symbol-editing mode, the symbol that you're editing appears normal, while other items on the Stage are dimmed. Changes that you make in this mode apply to every instance of the symbol in your FLA file. Notice how the edit bar (above the Timeline in this figure) changes to show you what you're editing, and its relation to the main Stage.
When you enter this mode, it means you edit the symbol itself, not just the single instance on the Stage. Any changes you make on this timeline (which is the movie clip's timeline) apply to every instance of the symbol that you use in the FLA file
You can tell that you're editing a symbol by looking at the edit bar (see the top of the previous image). Use the edit bar to navigate throughout a document. The edit bar might be above or below the Timeline, depending on how you have the workspace set up.
Scene 1 refers to the main timeline of the FLA file. You can click this button on the edit bar to return to the main timeline. The names after it point to the symbol that you're editing. If the symbol is nested within other symbols, this path might contain several names. In the previous figure, you can see that you're editing the join us symbol that's on the main timeline (Scene 1).
Select the PNG file that's inside the movie clip, and then press F8 to convert it into another symbol.
In the Convert to Symbol dialog box, type the name nested mc in the Name text box, select Movie clip, and click OK.
Select Frame 15 and select Insert > Timeline > Keyframe.
Note
Press F6 to quickly insert a new keyframe.
This command inserts a new keyframe, which means you can modify the content on that frame to create animation. Currently, the content on Frame 15 is duplicated from the content on Frame 1. When you modify Frame 15 in a future step, the modifications won't change the content on Frame 1.
Select Frame 30 and press F6 to insert a new keyframe.
The keyframe duplicates the content from Frame 15. That means the content on all three frames is the same.
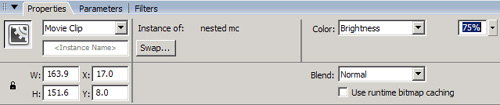
Select the movie clip instance on Frame 15, and open the Property inspector (Window > Properties > Properties).
Note
Make sure you select the instance on Frame 15, not just the frame. You can first select the frame on the Timeline (or move the playhead to Frame 15), and then select the movie clip instance on the Stage in order to see the correct context of the Property inspector, as shown in the following figure.
Select Brightness from the Color pop-up menu (the following figure).
Change the slider value to 75% (see the following figure).
Change the brightness of the movie clip instance.
The brightness changes for the instance on Frame 15. The instances on Frames 1 and 30 do not change. This means that you can now add a motion tween that animates the brightness value between Frames 1 and 15, and then from Frames 15 to 30. After playing Frame 30, the playhead loops back to Frame 1 and the animation starts again.
Note
You could also change the alpha or tint values using the same procedure. Alpha tweens are more processor intensive than tweens that change the brightness or tint of your animation. Try to avoid processor-intensive procedures whenever possible.
Select the instance on the Stage at Frame 15 again, and then select the Free Transform tool in the Tools panel. Select the lower right handle and drag it towards the center of the image to make it smaller (see the following figure).
Resize the instance using the Free Transform tool. As shown in this figure, you can also rotate the image using the Free Transform tool.

You can create several kinds of animation in an FLA file, such as motion tweens, shape tweens, and frame-by-frame animation. In this tutorial, you will create a motion tween. A motion tween is an animation where you define properties such as position, size, and rotation for an instance at one point in time, and then you change those properties at another point in time. In this animation, you change the brightness and size of the instance.
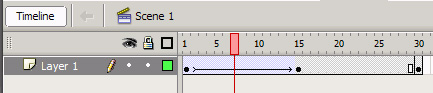
Select any frame between Frames 1 and 15, and then select Motion from the Tween pop-up menu in the Property inspector.
The span of frames changes color and an arrow appears between Frames 1 and 15 (see the following figure). Notice how the options in the Property inspector are different when you select a frame compared to when you select a movie clip instance.
Create a motion tween between Frames 1 and 15 on the movie clip's timeline.
Note
You can also right-click (Windows) or option-click (Macintosh) the frame and select Create Motion Tween from the context menu instead.
Select any frame between Frames 15 and 30, and then select Motion from the Tween pop-up menu in the Property inspector to create a second animation.
Click the playhead and drag it across the movie clip's timeline to test (or scrub) the animation.
Select Control > Test Movie.
Note
A quicker way to test your SWF file is to use keyboard shortcuts. Press Control + Enter (Windows) or Command + Return (Macintosh) to test the file.
The test environment opens where you can see the animation. Notice how it loops, appearing to fade in and out because of the change in brightness. By default, the playhead returns to Frame 1 and replays the animation after it reaches the final frame on the Timeline. This means the animation loops repeatedly, unless you tell it to stop. You will find out how to do this below in the exercise called "Writing simple actions".
Select File > Save to save your progress before moving on.
After you finish saving the file, proceed to the following exercise, "Creating a button".