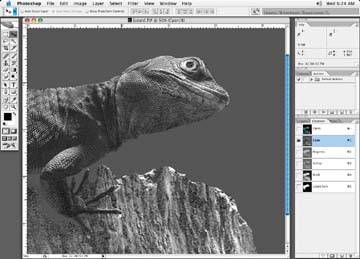
If the image is green, the dominant color will be the cyan or yellow. If I were asked to turn the image into a red, the bulk of my correction would use information from the cyan or yellow channels. So let's say we needed to change the color of our lizard. You can see in Figure 3-47 that the cyan channel has a great deal of information.
Figure 3-47. In the case of a green lizard, the cyan channel has the most information
Another option is to either desaturate the image so that there is a healthy amount of information in all color channels to play with or create a grayscale of the image, and paste it back into the original color image. You could add lots of shape with a "crazy curve" (as described earlier to your grayscale image, prior to pasting it back into the four-color image. Figure 3-48 shows the effect of desaturation.
Figure 3-48. Desaturating an image is another alternative for isolating an image to change color
Next, mask the area of color to be changed very carefully with the Pen tool; you do not want to either miss some of the color to be changed or crop outside of the area you wish to change. The color change would either spill over into another area of the image, or the old color would poke out from behind the new change.
Be warned that desaturating an image can make an image look a little flat. You may have to experiment with your image to see whether this works well.
Add a soft feather to the selection as well. Depending on the look of the rest of the image, most of the time that works out to be a .2 to .5 feather. Adding a feather helps the correction look like part of the image. You don't want to have the correction looking like it was cut out and dropped it with a butcher knife!
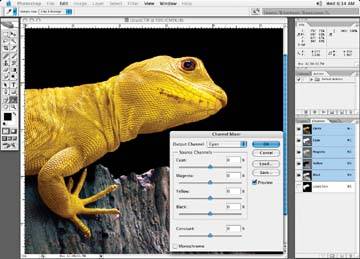
Once the area has been masked and you've selected it, call up the Channel Mixer adjustment tool) (Image » Adjustments » Channel Mixer).
Once you have selected the Channel Mixer tool, the first color to show on the palette is the cyan, which it is displayed at the top of the dialog box as the Output Channel. You'll notice that the cyan, magenta, yellow, and black are also displayed on the dialog box under Source Channels. Basically, when you change the values in the Source Channel sliders, you are adding information from other Source Channels the Output Channel's information. For example, assuming I have my cyan channel selected in the Output Channel and I slide the magenta slider up to 100%. That would mean that I just added 100% of whatever information is in the magenta channel to the cyan channel (Figure 3-49). There are infinite combinations you can mix in the Channel Mixer tool, and it can be a very useful tool. Figures 3-50 and 3-51 show a couple of other options for our lizard.
Figure 3-49. Here are the Channel Mixer settings for making the lizard red
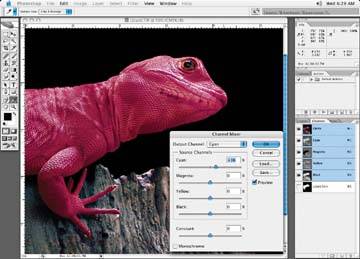
Figure 3-50. These settings turn the lizard blue
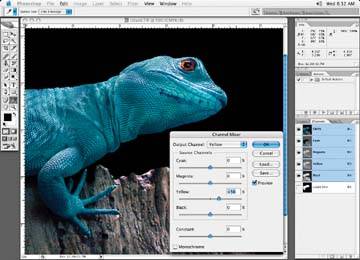
Figure 3-51. These settings turn the lizard yellow
Keep in mind that when changing the color of an object to a completely different color, you don't want to lose any shape, highlights, or shadows that were in the original image. Make your adjustments carefully. You may want to have a duplicate of the original image open while you're making an adjustment to serve as a reference.