Once the brush is set, you can begin clicking on the areas of the image where you want to create the shadow. I usually start in areas where parts of the object in the image are farthest away from the objects closet to the ground or other objects, and work my way in from there.
Here's a tip I stumbled across regarding brushing in a shadow: I usually keep halving the brush size as I get closer to the object, closer to completing my shadow. I like to call this my halving effect. By constantly halving my brush size, it seems to gradate the shadow in the proper manner to provide a smooth transition into the rest of the shadow and create the correct size of darker shadow needed for realism.
For example, when I brush a car shadow, I'll start off with a large brush for the underside of the car. As I get closer to the wheels, my brushes seem to be halved with each mouse click until I have reached the tightest spot under the tire of the car.
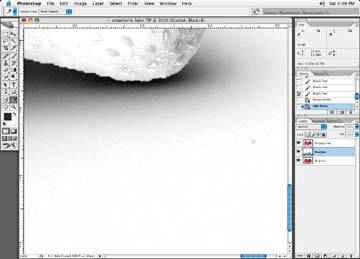
Figure 2-17. Erase parts of the shadow that may have oversprayed
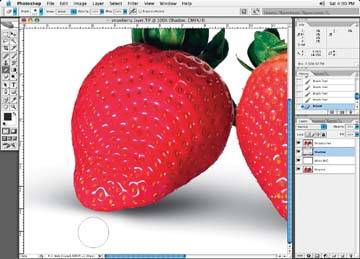
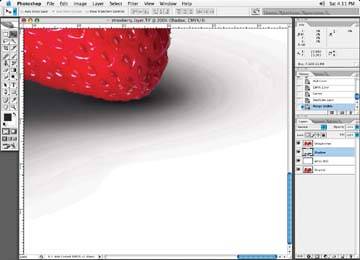
Figure 2-18. Shadow getting darker as the shadow gets closer to another object or the ground
When your shadow is done, you may want to go in and use the eraser to delete small portions of the shadow wherever the shadow gets close to the image Figure 2-17, since brushing may have caused some overspray.
Remember that as the object gets closer to another object, its fall-off, or vignetting, shortens and the shadow becomes smaller, thinner, and darker, as you can see in Figure 2-18.
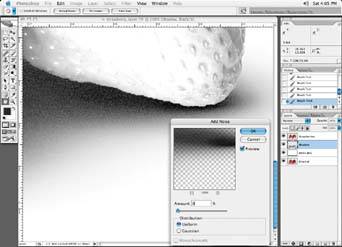
Once the shadow has been created, I will then go to the black channel (assuming it is a black-only shadow I'm creating, and I'm working in CMYK) and add a small amount of noise to the shadow in the black channel only, as shown in Figure 2-19. Typically, I just add a 1 or 2% for noise, depending on the size of the imagejust enough that you start to notice the noise, but not so much that the darkest areas of the shadow start to break up. I never go above 8%. Add too much noise, and the image starts to become a colorful array of noise (on a colored image) or too coarse (on a black and white image), as shown in Figure 2-20.
Keep in mind that a black-only shadow requires noise in the black channel only; if you add noise while viewing all colors, you will add a 1% dot of color in all channels to the shadow, which we don't want for our black-only shadow. If you are creating a four-color shadow, you will want to add a small amount of noise in each channel. Adding noise helps break up the shadow to a small degree, and helps prevent any banding that may occur.
Figure 2-19. Add noise to the black-only channel

Figure 2-20. Adding too much noise causes the shadow to break up
I add noise to just about anything brushed in because the brush is artificially very smooth when applied. If you look at any image at a very large magnification, you will see a small amount of grain in it. You are trying to replicate this look by adding noise to a newly brushed area. Noise also helps to reduce any banding that may occur when brushing an area in. Banding has the look of bands of color, particularly on vignetted or transition areas, like those of brushed areas. Adding noise also tends to break up the faint edges of a brushed area, which helps to diffuse it into a background.
Putting the shadow on a multiplied transparent layer and not on a white or colored background ensures that adding noise doesn't put a 1% dot all over the shadow background, only where there is color that you have brushed in. As you can see in Figure 2-21, the alpha or transparent areas of that layer will contain no dot from adding noise. Creating the shadow on an alpha or clear channel means you won't have to go back in and delete the 1% dot that the noise filter puts in.
Figure 2-21. A shadow on the alpha channel: there is no dot on the alpha portions of the image
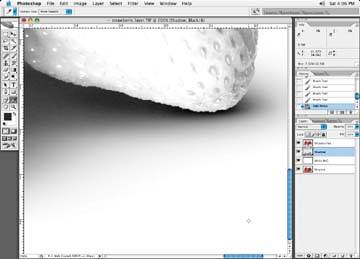
Figure 2-22. A shadow on a white layer when noise is added; note the dot on the white portions of the image
If I had created this shadow on a layer that was filled with white prior to brushing in my shadow, adding noise to the shadow would have put a 1% black dot in the background of the shadow, as in Figure 2-22. I could remove this with a mild curve adjustment, but putting the shadow on an alpha channel in the first place eliminates the need for any further corrections.
As I mentioned earlier, I like to use black-only shadows when I can, because there is no likelihood of colored banding occurring. Color banding can occur when one of the colors breaks up or pokes out from the other color channels and is more prevalent than another color, causing a rainbow effect, as in Figure 2-23. It isn't always obvious on your monitor either, because it only takes a couple of percent in one color to throw the color off neutral or cause banding. Color banding can also occur if the press happens to gain in one color more than another. Press gain in one or more colors can really cause a problem and throw a perfectly neutral-looking four-color shadow off neutral. This is why I typically stay with a black-only shadow, as I have no control over what happens on a press, and a black-only shadow will stay neutral.
Figure 2-23. Note the shadow banding around the edges