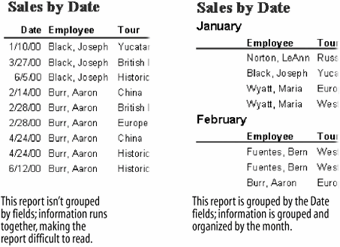
Grouping records by a specific field makes them easier to read. Compare the report that is grouped by date with the report that isn't.

The Sorting and Grouping dialog box

If you create a report using the Report Wizard (the preferred method), you specify which fields you want to use to group and/or sort your report by. If you're modifying an existing report or creating a report from scratch, you can use the Sorting and Grouping dialog box to create your groups. More importantly, if you use a Wizard to create a report for you, you can use the Sorting and Grouping dialog box to change the options for the report.
-
If necessary, open the Lesson 8 database.
Now let's open the rptEmployeeSales report in Design view.
-
Click the rptEmployeeSales report and then click the Design button.
In its current state, the rptEmployeeSales report has Report Header, Page Header, Page Footer, and Report Footer sections, but it doesn't have any grouping sections. To add a Group Section to a report you need to summon the Sorting and Grouping dialog box.
-
Click the
 Sorting and Grouping button on the toolbar.
Another way to sort and group is to select View » Sorting and Grouping from the menu.
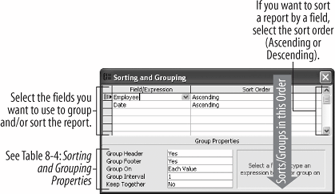
Access displays the Sorting and Grouping dialog box, which displays any fields that are currently being used for sorting or grouping your report, as shown in figure. To add a section to group and/or sort by, select a blank row and select a field from the Field/Expression drop-down list. In this exercise you will use the Employee field to group and sort the report.
-
Click inside the first blank Field/Expression row, click the list arrow, and select Employee from the list.
You can also specify the order in which Access sorts the records by selecting the order you want to sort by (Ascending or Descending) from the Sort Order list. Since you want to sort the Employee field in Ascending order, you can leave the Sort Order alone.
To make a Group Header or Group Footer, use the Group Properties settings at the bottom of the dialog box.(See table for Sorting and Grouping Properties.) You want to add a Group Header for the Employee field here's how to add one:
-
With the Employee field still selected, click the Group Header box in the Group Properties section and select Yes from the drop-down list.
Access adds an Employee Group Header to the report.
The order of the fields in the Sorting and Grouping dialog box is very important. The field in the first row is the first sorting/grouping level, the second row is the second sorting/grouping level, and so on. You want to group and sort your report by the Employee field, then by the Date field, so you need to rearrange the field order.
-
Click the Employee row selector, drag it above the Date row, and release the mouse button. Close the Sorting and Grouping dialog box.
Now that you have created the Group Header, you need to specify what you want to appear in itusually the field that the Group Header is based on. In this report you will want to move the Employee text box control field from the Detail section to the Employee Group Header section.
-
Cut the Employee field from the Detail section and paste it in the Employee Header section.
Let's see how the modified report looks.
-
Click the View button to switch to Print Preview.
Access groups and sorts the report by the Employee field.
-
Click Close to exit Print Preview.
Sorting and Grouping Properties
Group Header
Specify whether you want the report to contain a header section for this group.
Group Footer
Specify whether you want the report to contain a footer section for this group.
Group On
Allows you to choose the size of the group. For example, if you're using a date field to group a section, you can group each value by day, week, month, or year.
Group Interval
Allows you to choose the size of the interval from a drop-down list. You must have chosen an option other than Each Value from the Group On list.
Keep Together
No: Prints the group without keeping the group header, detail section, and group footer on the same page.
Whole Page: Prints the group header, detail section, and group footer on the same page.
With First Detail: Prints the group header on a page only if it can also print the first detail record.
To group records:
-
display the report in design view.
-
click the sorting and grouping button on the toolbar.
-
click the field/expression cell, click the list arrow, and select a field for grouping records.
-
click the corresponding sort order cell, click the list arrow, and select the desired sort order.
-
select any group properties you want to use in the group properties area.
-
repeat steps 3-5 for each field/expression you want to use to group and sort your data.
-
close the sorting and grouping dialog box when you're finished.