Banner Ad Manager Is Gone
If you've used previous versions of FrontPage, you may have used the program's Banner Ad Manager. This feature let Web authors include rotating ads on a page. Microsoft phased this feature out in FrontPage 2003. Why? Because in order for visitors to see the ads this feature creates, their computers need to have Java Virtual Machine, which used to ship with Windows but no longer does. This means that any visitor using Windows XP and/or Internet Explorer 6 will see a gray box instead of ads.
If you want ads like this on a Web page, your best alternative is to create the same effect using JavaScript or Flash. A lot of JavaScript Web sites feature-free scripts, including those to create a rotating banner ad. Try looking around online at sites like
www.javascript.internet.com. If you want to use Flash, you must purchase the program at Macromedia (www.macromedia.com), or find some kind soul to provide you with a Flash movie.If you're desperately addicted to FrontPage's Banner Ad Manager and want to use it just a bit longer, don't despair. Microsoft hasn't gotten rid of this feature, they've just stashed it out of site to discourage you from using it. To get Banner Ad Manager back, you can create a program shortcut to it. Right-click any toolbar and select Customize. The Customize dialog box opens with the Command tab on top. In the Categories pane on the left, click Insert. Scroll down the list of Commands that appears on the right. Once you find the Banner Ad Manager, drag it onto any toolbar or menu. If you want to remove it later, just open the Customize dialog box again, right-click the shortcut, and then select Delete.
There's a much easier way. Whenever you want the same information to appear in many places, you'll probably want to use FrontPage's Included Content feature. This tool lets you create one chunk of HTML (including text, pictures, tables, or whatever you want) that FrontPage can then take and slip into any page(s) you want.
But that's not all. The real beauty comes when you need to make a change. Say your company motto changes and you need to edit the text on every page across your entire site. Even though the phrase appears on hundreds of pages, you can make all those changes in a snap. All you need to do is edit the included content in one spot. The logo and motto that appears on all those other pages is really just a copy of the original HTML. When you change the source, FrontPage automatically updates the copies wherever they appear.
FrontPage creates included content using only HTML, not special FrontPage-dependent code. So, if you're collaborating with colleagues using Dreamweaver or other Web editors, this option is your best bet for creating elements that will be shared by lots of pages.
Inserting Included Content
Included content is just a Web page that you can drop into other Web pages. This page can have just two words on it, or your life story, complete with photos and a Flash movie of your birth. But generally, you'll want to use this feature for shorter passages that'll appear in lots of places, like a copyright notice. To include one page within another Web page:
-
Create the content.
Create the source content (the page that you want to include within other pages) just as you would any Web page. Usually your source page will be a small amount of text, which serves as a header, footer, menu, or text snippet.
Don't include any DHTML effects or behaviors within your included content. FrontPage includes only content between the <body> tags. So anything that resides between <head> tags, like JavaScript and some styles, won't copy over.
Save the page anywhere you wish. You may want to create a specific folder to hold your "includes" so you always know where to find them. Since these snippets aren't meant to exist on their own, you may want to tuck them out of site in the _private folder, so they won't show up during a search of your site.
-
Set the destination for included content.
Open the page in which you want to include the content. Place your cursor where you want to insert the source page.
-
Insert included content.
Select Insert » Web Component. Within the component list on the left, click Included Content. Then, in the pane on the right, select Page. Click Finish and browse to (or type the path) of the page you want to include. Click OK.
The included content appears on the page. Included elements take on the formatting properties of the page in which they're included.
You can put an automated link bar (Link Bars and Page Banners) within an included page and have the bar appear on as many pages as you want. And of course the link bar hyperlinks will all connect to the right pages.
Inserting a Scheduled Include
Say you have a special sales offer that ends at midnight. Will you be up editing and publishing your pages at that hour? Probably not. But FrontPage can help you out (or at least, try to help you out).
The scheduled include is similar to the regular include page feature, but comes with additional options. You can set a start and end time for the content you want to display and replace the included page with another page at a time you specify (Figure 11-11).
Scheduled include options require FrontPage Server Extensions (Where to Create Your Website).
The big problem with scheduled includes is that they don't always follow the schedule you've cooked up. Since the Web page can't track time on its own, it needs to be manually updated to show the new content. This means that the change will take place only if you publish your site after the time specified for the content swap. You can also run Recalculate Hyperlinks on your live Web site (Tools » Recalculate Hyperlinks), or ask your server administrator to create a batch file (a script that can tell functions to run at a certain time) to do this automatically.
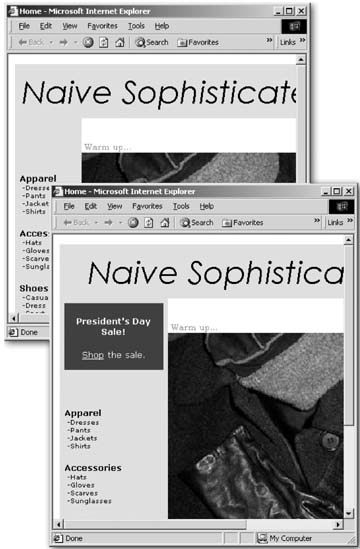
Figure 11-11. Here's a before and after picture of a scheduled include. The President's Day sale announcement doesn't appear on this page until it's scheduled. It will disappear again when the sale is over.
To set a scheduled include, create the content as you would for a regular include page (explained in the previous section) and place your cursor on the page where you'd like to insert it. Then:
-
Insert the scheduled content.
Select Insert » Web Component to open the Insert Web Component dialog box. Within the component list on the left, click Included Content. Then, in the pane on the right, select Page Based On Schedule. Click Finish and the Scheduled Include Page Properties dialog box displays.
-
Set included pages.
Here you'll specify the two pages that will exchange places. In the "During the scheduled time" field of the dialog box, browse to and select the page you want to include for a limited timesay, for your one-day sale. Below that, in the "Before and after the scheduled time" field, browse to and select the page you want to precede and replace the first page. You can leave this field blank, and nothing will appear.
-
Set the schedule.
Next, you set the time period during which the first page should appear. Enter starting and ending dates in the fields at the bottom of the dialog box. The time fields display two-digit increments: by hour, by minute, and by second. FrontPage won't let you enter numbers directly here. Select a figure and use the up and down arrow buttons in the dialog box or the corresponding keys on your keyboard.
Inserting a Scheduled Include Picture
You can include a picture at a particular time just as you'd include a page, though you might as well just stick your picture on a page and include that entire page instead. One reason is that pictures you include this way can't have their own paragraph breaks, which means that pictures included by schedule always appear smack dab in the middle of surrounding text.
But, if for some reason you decide you want to add a scheduled include picture, select Insert » Web Component to open the Insert Web Component dialog box. Within the component list on the left, select Included Content. Then, in the pane on the right, select Picture Based On Schedule.
The Scheduled Picture Properties dialog box that displays is similar to the one for regular scheduled included content (page), and you should fill it out accordingly (see the previous section for how to do that). This dialog box offers two additional options under the Alternative Text heading. These set the picture's alternative text (text that appears in a tool tip and in place of the image) both before and after the picture swap.
Scheduled picture includes come with the same glitch that regular scheduled pages do: they require you to publish or run Recalculate Hyperlinks before the update kicks in.