If you want, FrontPage can automate the hassle of maintaining your site's navigational menus. Link bars are navigation menus that FrontPage controls and manages for you. Link bars get their information from the navigation diagram you read about in Building And Managing A Web Site (see Creating A Site In Navigation View). To go along with link bars, the program offers the page banner (see Figure 11-8). A page banner is an automated page heading that shows the title of a Web page in a graphic across the top of the page. Because page banners also take their page titles from Navigation view, banner displays will always perfectly match the text in your link bars.
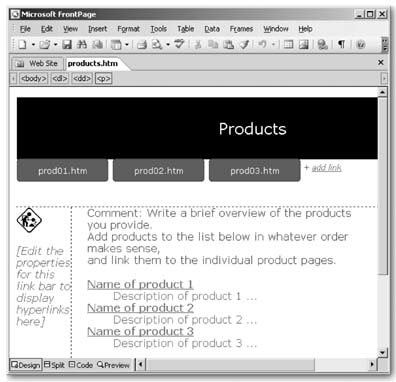
Figure 11-8. This page is from FrontPage's Corporate template. It has a banner at top that proclaims the page title: Products. A link bar appears just beneath the banner, featuring navigation buttons that lead to other pages. In Design view, link bars feature an "Add link" shortcut at the end that you can use to create additional navigation buttons. (This text won't show up in a browser.) Another link bar appears on the left edge of the page, but doesn't yet contain any links. (Text telling you to configure a link bar would show up in a browser if you don't edit it.) To edit this link bar, just double-click it
Steps for creating link bars and page banners follow. Before you create these elements, you must open your site in Navigation view and set up a hierarchy and flow for your pages (see Building And Managing A Web Site, Creating A Site In Navigation View for details). FrontPage uses the page relationships and titles in your navigation diagram to build links that make up a link bar. If you hate the idea of having to create a navigation diagram first, skip ahead to the "Link Bars with Custom Links" section on Section 11.2.2 to see how you can make a link bar without it.
You can't create link bars or page banners until you've established your site's navigation in Navigation view. However, the navigation diagram you create doesn't need to include every page in your site. Feel free to create a navigation scheme only for those pages that will feature link bars.
Creating a Link Bar Based on Navigation Structure
With some guidance from you, FrontPage can manage your site's navigation links. You need to get the process started by first creating a navigation diagram (Creating A Site In Navigation View). Once you've done that, you're ready to place your link bars.
-
Specify a location for your link bar.
Place your cursor on a page where you want to insert the link bar, and then select Insert » Navigation.
If Navigation is grayed out, that means that navigation features are disabled within FrontPage. To fix this, select Tools » Page Options and click the Authoring tab. Turn on the Navigation checkbox. (You may need to turn on the Author-time Web Components checkbox first.)
The Web Component dialog box displays. The pane on the left, Component Type, is set automatically to Link Bar. In the pane on the right, select "Bar based on navigation structure" and click Next.
-
Select a style for your link bar.
The dialog box that follows features formatting options. You can use the page's theme or select another. Scroll down the list for a preview of all your choices. If you prefer a look that's more "Spartan" than "Microsoft," check out the textonly choices end of the list. Select the look you want and click Next.
-
Choose an orientation.
You can make your link bar spread horizontally across the top of the page or fall vertically down the left edge of the page. If you choose vertical orientation, FrontPage puts a return between each item. Click on the preferred orientation preview and then click Finish.
Each dialog box you encounter while creating a link bar features a Finish button. If you don't need to set style or orientation, click Finish instead of Next to skip ahead to the Link Bar Properties dialog box.
-
Specify navigation.
Now that you've set a look for your link bar, FrontPage needs to know what links to include. The Link Bar Properties dialog box displays (see Figure 11-9).
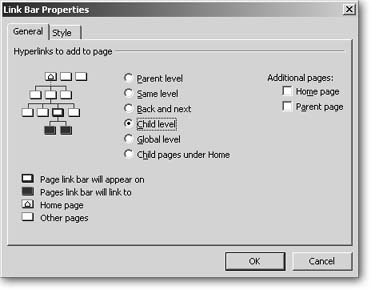
Figure 11-9. Use the Link Bar Properties dialog box to preview your link bar navigation options. Click on a radio button, and the diagram on the left shows the effect within a sample site. Pages that will get links appear in blue.
FrontPage creates links in relation to the current page. Select from the following options:
-
Parent level. Creates links to all pages one level above the current page.
-
Same level. Creates links to all pages on the same level as the current page.
-
Back and next. Creates links to pages on the same level as the current page that appear to the right and left of it. Use this scheme if you want to lead readers through your site in a specific page order. If this option appeals to you, check out a more flexible variation: see "Creating a Link Bar with Custom Next and Back Links" on Section 11.2.3.
-
Child level. Creates links to all pages to which the current page is a parent.
-
Global level. Creates links to the home page and any top pages. Top pages exist outside the directory structure and often include search or contact forms.
-
Child pages under home. Creates links to all the home page's first-level children. Depending on your site structure, this selection might be useful for providing general category links.
You have additional options here, too:
-
If you want to feature a link to the home page even though it may not be part of the navigation structure you've chosen, turn on the "Home page" checkbox on the upper-right corner.
-
If you want to include a link to the page one level above the current page, turn on the "Parent page" checkbox. The text for the link to the Parent is "Up" instead of the page title. If you want to change this, select Tools » Site Settings and click the Navigation tab.
If you find that you need to include multiple link bars on a page, go ahead and do so. For example, you may want all pages to include home and parent links, but only a designated few to offer links to their child pages. Create a separate link bar for each circumstance.
Once you set your navigation scheme, click OK. The link bar appears on your page. To edit a link bar, double-click it. The Link Bar Properties dialog box pictured in Figure 11-9 displays again. Repeat the steps above on each page on which you'd like to feature a link bar.
Link Bars with Custom Links
Many people like the idea of link bars but hate having to create and maintain the navigation diagram that's required.
Link bars with custom links let you create a link bar of your own design that lives independently from your site's navigation diagram. These special link bars let you include whatever links you want, with no interference from FrontPage. Even better, you can use a custom link bar over and over again. Here's how:
-
Specify a location for your link bar with custom links.
Place your cursor on a page where you want to insert the link bar and select Insert » Navigation.
The Web Component dialog box displays. The pane on the left, Component Type, is set automatically to Link Bar. In the pane on the right, select "Bar with custom links" and click next.
-
Select a style and orientation for your link bar.
In the dialog boxes that follow, select a look and layout for your link bar. (See steps two and three in the previous section, "Creating a Link Bar Based on Navigation Structure" for details.)
-
Name the link bar.
A Create New Link Bar dialog box presents you with a Name field. Type in a short, descriptive name. You'll use this name later to add this link bar to other pages.
-
Add links.
The Link Bar Properties dialog box displays (see Figure 11-10).
If you've already created a link bar, you can select it from the "Choose existing" drop-down menu at the top of the dialog box. Any custom link bars you create are always available here for you to insert on any page.
Click Add Link and the hyperlink dialog box displays. Select the URL (within your site or on the Web) and enter the text to display. In a link bar with custom links, younot your navigation diagramset the text of a link.
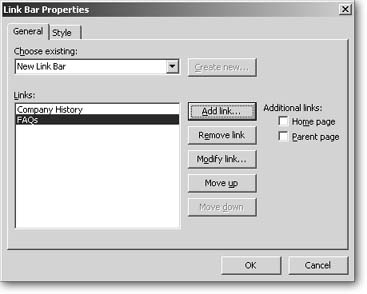
Figure 11-10. When you create a link bar with custom links, the Link Bar dialog box gives you direct control over links and link order. Add, modify, or remove a link using the buttons on the right. Set link order using the Move Up and Move Down buttons.
Creating a Link Bar with Custom Next and Back Links
If you want to lead your visitors page by page through your site (which is great for Web-based picture slideshows), use back and next links. When you create a link bar based on navigation, you can use back and next links, but they work only on one navigation level at a time. If you use this custom option, you can set any order you wish. The flexibility can't be beat.
To get started, first select Insert » Navigation. The Web Component dialog box displays, with the left pane set to Link Bars. In the pane on the right, select "Bar with back and next links" and then click Next. In the dialog boxes that follow, choose style and orientation, and then click Finish. The Link Bar Properties dialog box pictured in Figure 11-10 displays. Use it to add links as you would for a link bar with custom links. Once you've added all your links, use the Move Up and Move Down buttons to set browse order for your pages. The order in which pages appear in the links list is the order in which viewers will see them when they click Next.
Page Banners
As you're discovering in this tutorial, FrontPage is chock full of features that help you help visitors navigate your site. One key to a good navigation system is letting readers know where they are. A page banner goes a long way toward this goal. If a huge graphic at the top of the page says "Products," then your visitors know they've made it to the list of products.
Of course you can create a page heading like this yourself with special font effects, or by making your own graphic, but FrontPage has an automated solution that works hand in hand with link bars and Navigation view.
FrontPage banners are page headings that the program creates and controls. You'll get the most bang for your banner buck if you use banners in conjunction with link bars. Both these features take their page names from page titles in Navigation view. So link names in a link bar will always match the text in page banners. Often banners proclaim a page's identity with text set in a fancy graphic. However, if you aren't using a theme, the "banner" effect is somewhat anticlimactic. Without a theme, a page name shows up as just plain text.
Don't forgetin order to include a page in a link bar or banner, you first must place the page in a navigation diagram (Creating A Site In Navigation View).
To add a page banner, open the page in Design view and place your cursor at the top of the page. Select Insert » Web Component to open the Insert Web Component dialog box. Within the list of Component types on the left, click Included Content. Within the list on the right, select Page Banner, and then click Finish. The Page Banner Properties dialog box opens.
-
If you have a FrontPage theme applied to your site, select Picture, and then confirm or change the banner text. (Changing text here will also change the page name in Navigation view.) If you select text, the banner won't be very flashyit'll appear as plain text.
-
If you have no FrontPage theme in place, a plain text banner will result, even if you select Picture.
-
If your page doesn't exist in the navigation structure, the text box is grayed out. When you click OK, a message appears on your page telling you to add it to the navigation structure.
To edit a banner name, double-click it in Design view. This opens the Page Banner Properties dialog box again.