Creating the Main Menu
First, you'll create a horizontal menu bar containing a few basic choices. Later, submenus will unfurl from this main menu.
-
Create a new blank page.
-
If the task pane isn't open, select View » Task Pane.
-
Click the task pane drop-down menu and select Layers.
-
Draw a layer at the top of your page. Make it stretch horizontally across the top.
Need a refresher on inserting layers? Pop back to Layers Tutorial.
-
In the task pane, right-click the layer you created, and then select Modify ID.
The layer name in the task pane becomes editable.
-
Type in a new name for the layer, like Menu.
-
Within the document window, click inside the layer, and then select Insert » Interactive button.
The Interactive buttons dialog box appears.
-
Select a button type.
FrontPage starts you out with the BorderBottom style, which is fine. These buttons are designed to form a horizontal menu bar, like the one you're creating in this layer. If you want, take a look through all your choices here. If you select a button type, it previews in the dialog box. Some are designed for horizontal menus and others for vertical menus. Many are even labeled "row" or "column" to help you out.
-
In the Text field, type a name for the button, like Home, and click OK.
The button appears in your layer. Your cursor sits to the right of the button, where you'll add a second button.
-
Select Insert » Interactive button again.
-
Select a button type and name it something else, like Clothing, and click OK.
Your second button appears. Add one more button by repeating steps 10 and 11. All your buttons should now form a single horizontal line near the top of the page (see Creating Actions).
Creating a Submenu
With the main menu in place, you're ready to create a submenu. In the steps that follow, you'll make a submenu for your second menu button (Clothing, in Creating Actions). As you might suspect, the process involves a new layer.
-
Draw a layer below the middle button, in the shape of a vertical rectangle.
If it's not quite where you want it, don't worryyou can set exact placement later.
-
Right-click the layer in the task pane, and then select Modify ID.
The layer name in the task pane becomes editable.
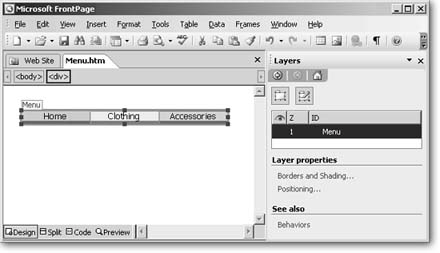
Figure 9-11. The first level of your menu should look like this. If the shape of your layer has caused a button to wrap beneath the others, just expand your layer out to the right by dragging the handle on the right border. (For help with resizing, see Resizing And Positioning Layers.) You'll also want to shrink your layer box so its edges line up with the edges of your buttons.
-
Type in a new name for the layer, which corresponds to the button, like ClothingMenu (avoid using spaces or special characters in layer names).
-
Within the document window, click inside the new layer, and then select Insert » Interactive button.
The Interactive buttons dialog box appears.
-
Select a button type.
Here you're creating a vertical menu, so select one of the buttons that's designed for drop-down menus, like the Border Left style.
-
In the Text field, type a name for the button, like Shirts, and then click OK.
The button appears in your layer. Your cursor sits to the right of the button.
-
Press Shift+Enter, so your cursor sits just below the button.
-
Select Insert » Interactive button again.
-
Select a button type and name it something else, like Pants, and click OK, and then repeat this step, adding a new button, called something like Jackets.
-
Make the main menu a parent to the submenu.
In the task pane, drag the submenu onto the main menu. You'll recall from Layers Tutorial that the advantage to grouping layers this way is that later, if you need to move the main menu, the submenu will move with it.
-
Resize and move the submenu layer.
You want layer edges to line up with button edges. Place the submenu just beneath the middle button on the main menuso it looks connected.
-
Set the visibility of the ClothingMenu layer to Hidden.
Because you want the ClothingMenu layer to appear lateras if by magicyou need to set its initial visibility to Hidden. Remember how? In the Layers task pane, click in the visibility column on the left until a closed eye appears (see Figure 9-11). See Modifying Layers back in Layers for more details on layer visibility settings.
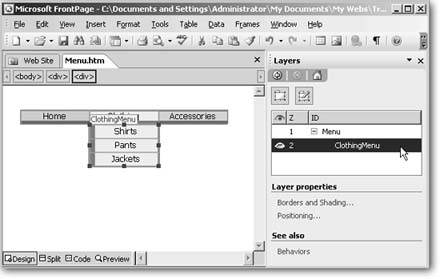
Figure 9-12. The main menu now has a submenu that will be connected to the Clothing button. In the Layers task pane, on the right, the ClothingMenu is indented beneath the Menu layer because you've made it a child layer. The closed eye to the left of ClothingMenu shows that it's hidden.
Adding Behaviors to Animate the Menu
Layers! Visibility! Action! Now, you'll really make things happen. Again, the effect you're after is this: when a cursor passes over the Clothing button, the submenu appears.
Since an event on the Clothing button is the agent for this change, you'll begin setting this behavior with that button. To do so:
-
Select the Clothing button, then click the Behaviors link at the bottom of the task pane.
The Behaviors task pane displays. Since FrontPage interactive buttons automatically create swap image behaviors for themselves, you'll see some behaviors already listed here for the Clothing button.
-
Within the task pane, click Insert, and then select Change Property.
The Change Property dialog box appears. It's set to Current Element, which is the Clothing button you selected. In the next step, you'll change this. You want the event on the Clothing button to "change the property" of the Clothing-Menu layer, switching it from hidden to visible.
-
Click Select Element.
Make sure the Element Type field is set to div (the layer tag). If it's not, click the drop-down menu, and then select div.
-
Within the Element ID drop-down menu, select the layer that contains your submenu, as illustrated in Figure 9-12.
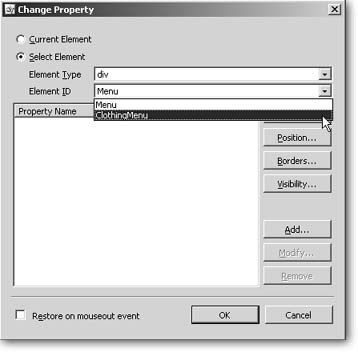
Figure 9-13. In this example, ClothingMenu is the name of the layer that contains the submenu. You select it here in order to change its visibility property in reaction to an event on the Clothing button.
-
Click Visibility, and within the dialog box that appears, select Visible. Then click OK.
Your setting appears within the dialog box.
-
Turn on the "Restore on mouseout event" checkbox.
This will ensure that once a viewer's cursor moves off the Clothing button, the submenu will disappear.
-
Click OK to save the change property setting.
Within the task pane, your change property setting appears in the Actions column. To its left is the event that triggers the property change. It's set to onclick, meaning when a mouse clicks on the Clothing button, the Clothing submenu layer will appear. But you want the submenu to appear when a cursor merely passes over the button. So, change the event.
-
Within the events column, pass your cursor over onclick and click the dropdown arrow that appears on the right.
-
Select onmouseover.
-
Save the page and preview it in multiple browsers to test your effect (Figure 9-13).
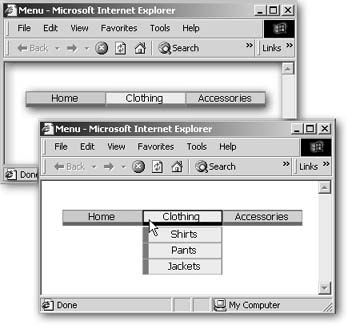
Figure 9-14. Before and after: the submenu is hidden (above left), until a cursor passes over the Clothing button (below right).
If you followed all the steps above, your submenu appears every time a cursor passes over it. Everything's great, right? Well, almost. You may have noticed a problem. When you try to run your cursor down the submenu, the submenu disappears. FrontPage needs some more direction from you. You need to specify that the Clothing submenu should remain visible while a cursor passes over it. Otherwise, how would a visitor select an item on the submenu? To make this change, add the following action to the submenu layer:
-
Select the ClothingMenu layer.
Since the submenu is a hidden layer, FrontPage doesn't display it in the document window. You'll need to switch back to the Layers task pane and select it from the list. At the bottom of the task pane is a Layers link. Click it and then select the ClothingMenu layer from the list in the Layers task pane. Then, at the bottom of the task pane, click Behaviors to return to the Behaviors task pane. (Because you often need to switch back and forth like this, FrontPage provides these handy links at the bottom of related task panes to speed your work.)
-
Within the Behaviors task pane, click Insert, and then select Change Property.
-
Click Current Element.
-
Click Visibility, and within the dialog box that appears, select Visible, and then click OK.
-
Turn on the "Restore on mouseout event" checkbox.
You do this so the submenu won't hang around when a cursor passes off it.
-
Click OK to save the change property setting.
-
Change the onclick event to onmouseover in the Behaviors task pane.
-
Save the page and test in a browser.
Problem with Renamed Layers
You may encounter one bug when animating layers. If you change the name of a layer within the Layers task pane, any behaviors or dynamic effects that involve that layer no longer work. This is because FrontPage changes the name of your layer, but it doesn't change code that refers to that layer.
Fortunately, this name confusion is easy to fix. Switch to Code view and select Edit » Replace. Within the "Find what" field, type the layer's old name. Within the "Replace with" field, type the layer's new name. Click Replace All. Close the Find and Replace dialog box, save the page, and then test out your layer behaviors in a browser.