Disk Maintenance
Windows Explorer is as helpful in managing disks as it is in managing files. By right-clicking a disk's icon (see Figure 17.4), you can access a full menu of disk-management options.
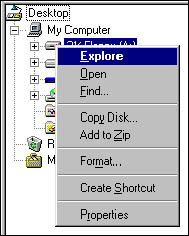
Figure 17.4 Disk management options
The two most common disk-management tools are Format and Copy.
Formatting a Floppy Disk
Follow these steps to format a floppy disk:
Insert a disk into the floppy disk drive.
From Explorer, right-click the drive containing the disk and select Format. Do not highlight the drive first-Windows 95 will not let you format if the drive is highlighted first.
Use the Capacity drop-down list to select the correct drive size.
In the Format group, choose from Quick (removes files but does not check for bad sectors), Full (removes files and checks for bad sectors), or Copy System Files Only (makes a bootable disk but does not delete any data).
Select any other options: Label (to add a label of less than 11 characters), No Label (to delete an existing label), Display Summary When Finished (to display a summary of the results of the formatting process), or Copy System Files (to add system files after formatting is complete).
Select Start and the formatting process will begin.
Copying a Floppy Disk
Follow these steps to copy a floppy disk:
Insert the disk to be copied in the floppy disk drive (this is the source disk).
From the Disk Management menu, select Copy Disk.
From the Copy menu, highlight the disk to be copied (source).
From the Copy menu, highlight the disk to be copied to (destination).
Click Start to begin the process.
When all the data is copied from the source disk into memory, you will be prompted to insert the destination disk.
If the destination disk is unformatted, Windows 95 will format it first.
When the copy process is finished, select Close.
Viewing Disk Properties
By selecting Properties from the Disk Management menu, you will be able to see statistics about the drive. Figure 17.5 shows the Disk Properties dialog box.
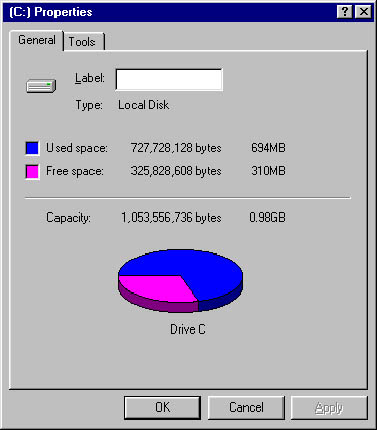
Figure 17.5 Disk Properties dialog box
By selecting the Tools tab, you can perform basic maintenance on the selected drive. You can check the:
Error-checking status: This tells you when ScanDisk was last run and allows you to run ScanDisk.
Backup status: This tells you when the disk was last backed up and allows you to backup.
NOTE
Backup hardware (tape or disk drive) must be installed before a ScanDisk backup can be performed.
Defragmentation status: This group tells you when the drive was last "defragged" and allows you to defragment the disk (rearrange disk sectors so that files are stored on consecutive sectors in adjacent tracks).
Partitioning a Disk in Windows 95
Partitioning a disk increases its storage efficiency by reducing waste or cluster overhang. Basically, the smaller the drive, the more efficient it is. As discussed in Tutorial 8, Lesson 2: Hard Disk Drives, the basic unit of a hard drive is a cluster, and its size depends on the size of the partition. Also, a cluster can contain data from only one file.
If you have a file that is 4000 bytes and a cluster size of 8389 bytes, you will have 4389 bytes of wasted space. By creating several smaller partitions, you will have smaller clusters and, therefore, less waste. Creating a partition in the Windows 95 environment follows the same process as with MS-DOS and is explained in detail in Tutorial 8, "Basic Disk Drives." Here are a few things to keep in mind when partitioning in Windows 95:
Use FDISK to partition a drive.
FDISK destroys all data on the drive.
FDISK must be run from MS-DOS. The computer must be booted from the startup disk.
FAT32
One of the advantages of using FAT32 with Windows 95 OSR2 or Windows 98 is that you can create partitions up to 8 GB and limit the cluster size to 4 KB.