To complete the illustration, you will apply two more linear gradients: one to the white circle on the eight ball and one to make a highlight on the top of the eight ball.
Next you will add a gradient to the white circle on the eight ball graphic.
|
1.
|
Select the Selection tool from the Tools panel.
|
|
2.
|
Double-click the eight ball group to edit the group.
|
|
3.
|
Double-click the white circle group.
|
|
4.
|
Select the white circle shape.
|
|
5.
|
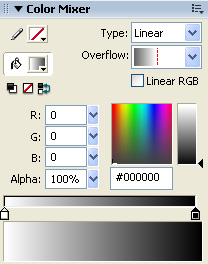
In the Color Mixer panel, assign the white circle shape a linear gradient by selecting Linear from the Type menu.
|
|
6.
|
Select Nonrepeating from the Overflow menu.
|
|
7.
|
Drag the left gradient color swatch all the way to the left and double-click it.
|
|
8.
|
Select the color white (#FFFFFF) from the Color Picker.
|
|
9.
|
Set the Alpha value for the white color swatch to 100%.
|
|
10.
|
Drag the right color swatch all the way to the right and double-click it.
|
|
11.
|
Select the color black (#000000) from the Color Picker.
|
|
12.
|
Set the Alpha value for the black color swatch to 100%.
Your gradient settings should match those in the following illustration:
The Color Mixer with the correct settings for the gradient on the white circle

|
|
13.
|
Select the Gradient Transform tool from the Tools panel.
|
|
14.
|
Drag the Gradient Rotate handle approximately 120° clockwise.
The gradient rotated 120°

|
|
15.
|
Select the Selection tool in the Tools panel.
|
|
16.
|
Double-click the Stage twice to exit the white circle group and the eight-ball group.
|
|
17.
|
Select File > Save to save your FLA file.
|
In this section you will apply a linear gradient.
|
1.
|
Click the red X icon in the layer named Highlight to reveal the shape in that layer. The shape appears at the top of the eight ball.
|
|
2.
|
With the Selection tool, double-click the highlight shape to edit its group.
|
|
3.
|
Select the highlight shape.
|
|
4.
|
In the Color Mixer, select Linear from the Type menu.
|
|
5.
|
Select Non-repeating from the Overflow menu.
|
|
6.
|
Drag the left gradient color swatch all the way to the left and double-click it.
|
|
7.
|
Select the color white (#FFFFFF) from the Color Picker.
|
|
8.
|
Set the Alpha value for the left swatch to 0%.
|
|
9.
|
Drag the right gradient color swatch all the way to the right and double-click it.
|
|
10.
|
Select the color white from the Color Picker.
|
|
11.
|
Set the Alpha value for the right swatch to 75%.
Your gradient settings should match those in the following illustration:
The Color Mixer with the correct settings for the gradient on the highlight shape

|
|
12.
|
With the highlight shape still selected, select the Gradient Transform tool from the Tools panel.
|
|
13.
|
Drag the Gradient Rotate control 90° counterclockwise.
|
|
14.
|
Drag the Gradient Scale control downward until it touches the top of the highlight shape.
The Gradient Scale control

Dragging the Gradient Scale control downward to touch the highlight shape

|
|
15.
|
Select the Selection tool from the Tools panel.
|
|
16.
|
Double-click outside the Stage twice to deselect the highlight group.
The finished Flash illustration looks like this:

|
|
17.
|
Select File > Save to save your FLA file.
|