On occasion, you can get away with using the Magic Wand tool for selection. The Magic Wand tool is designed to make a quick, automatic selection of a color area with a simple click. The tolerance setting adjusts how far away or how close to the sample color you clicked on the selection will deviate. For instance, if I set a value of 10 as my tolerance, the selection will limit itself very closely to the color I click on. If I set my tolerance to 100, my selection will not only pick up the color in the area of the image I click on, but will also select many other colors within the image.
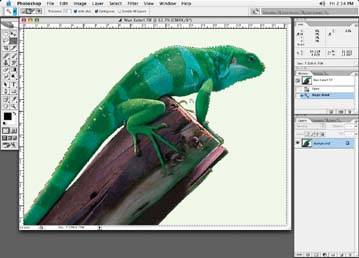
For the image in following figure, I was able to select the entire background easily in one go with the Magic Wand tool. Additional areas of the background between the legs and arms of the creature can be selected by adding to the selection with the Shift key. You may want to soften the selection or expand or contract the selection when you are done to adjust the softness, or to crop in tighter to the object, depending on how well the selection worked out. In this case, the background was selected first (because it's solid), and then I used Shift+Command+I to invert the selection.
I chose the background with the Magic Wand, then reversed to select the creature and his perch
The Magic Wand tool can be good for very simple or very complex objects, especially if there is good contrast between the object you would like to make a selection of and the other objects in the image. It also works well if the part of the image you wish to make a selection of is a solid, continuous tone without breaks. However, making a mask or selection with the Pen tool for the same complex object could take a very long time. The downside to the Magic Wand tool is that even though the image may contain the same color throughout, if there are any breaks in the color or big deviations in color from one part of the image to another, you will have to keep clicking throughout the image to make a complete selection.
For instance, if I have a screen full of raindrops I can't just click on one raindrop and have the Magic Wand make a selection of all of the raindrops at once just because they are the same color or tone. If I were to make a selection of a spider web where the entire web is connected together without any breaks, though, the Magic Wand tool may work well.
I find that many clicks are often necessary with the Magic Wand tool, and it can be quite time consuming. Additional selections can be added by holding down the Shift key until all desired areas are selected. You can also click on other colors and include them in your selection. If you use the Magic Wand tool, you will have to click in every nook and cranny before getting all the areas you are after.
Channel Masks and Clipping Paths
If your image is to be placed in a layout program like Quark, it is typical for Quark to recognize a clipping path that you have created in Photoshop, assuming you have saved a path that you created in Photoshop as a clipping path. Quark will recognize the clipping path in the image and crop the image to the shape of the clipping path you created when the image is placed in Quark. The downside to this is that you cannot create a clipping path that will carry any kind of softness, so any image that is placed in Quark with a clipping path will always have a very hard edge to it like a knife cut. This may or may not be desirable.
If the clipping path option is not suitable, the newest version of Quark now recognizes a channel mask. This is terrific because nice, soft masks can be made with a channel mask, and it will come into Quark nice and soft!